What TenereGUY has been up too

TenereGUY

Well-Known Member
Joined
Jan 19, 2023
Messages
1,011
Location
Illinois
No need to remove the bars or left side panel to get the tank off.
Just remove three screws on the left side panel, the three on the right side, at the top, middle, and bottom.
With these removed you can pull the panel back to get to the tank bolt with an allen wrench.
Loosen the tank bolt then you can unscrew it by hand. You may need to lift the tank slightly to get any pressure off the screw.


The left side panel can also be removed without removing the AltRider bars.
Its tight and some force must be applied to the panel to get by some restrictions, but I've done it several times with no issues.
This method might not be for everyone though.
.

Removing the battery with the AltRider bars in place is also easily done.
See this thread: Yuasa Battery? | Reply #9
Thanks for those tips. I went and bought some Hex head bolts for the tank. I can slide in a box end ratchet wrench now. I'll have to play with that left panel some more. Don't need to remove it a lot as I can change coolant with it loosened and get the tank raised now.

Sent from my SM-N960U using Tapatalk
 

TenereGUY

Well-Known Member
Joined
Jan 19, 2023
Messages
1,011
Location
Illinois
Got home a bit early today and put in those cheap Oxilam LEDS. Why not if they don't work I will get something different... but for $17. Put the headlight assembly back in the bike and put the trim panels on and then lowered the windshield mounts and put on a tall touring windshield. About that time the FedEx truck pulled in the drive and dropped off the MotoZ Tractionator Adventure tires! Flipped the manual to the section to remove the rear tire. Wasn't so easy. Watched a YouTube video after I got it off. Next time it will be a lot easier... hurried to put everything in the truck and drove 33 miles to the dealer and got there 40 minutes before they closed and gave them the wheels and tires. Done right at closing time. (They knew I was coming) $40 for both. Back home and I cleaned up the axle and the gear hub. Stripped off all the old grease from the hub spline. I am finding nothing is greased very well. Both axles were dry and axle spacers too also the shifter lever. They're all cleaned and well greased now and excess is wiped off. Took me a couple of minutes to figure out the best way to line that spline up and then... Doh! Put the stupid axle through the brake caliper then through the wheel and out the other side. That will hold it up. Yep, jiggled it and then it mated right in. My buddy came over and I set him up with my 1/4" torque wrench and he ensured all spokes were torqued correctly. A lot were off! Before he got there I started cleaning the bike as I was getting into the putting it back together phase. I love F-11 waterless cleaner. Bike is looking better. Both rims back on and tightened up. AltRider drive shaft joint guard installed... gone is the stock shield that would have slid up my riding pants and kept me from putting my foot down when coming to a stop! AltRider kickstand footprint enlarger installed along with their kickstand switch protector. I also pulled off the shift lever bolt and lubed it. I AM SO GLAD YOU GUYS CLUED ME IN ON OTHER THREADS TO DO THIS ! It squealed the whole way off. It was very hard to remove. Went on real slick and now the lever even wiggles when I jiggle it. Wouldn't before.
Battery charged up. That rear rotor was sure burnt looking. I mic'd it at 5.19 mm. Haven't looked to see if that's in spec. Even the fronts looked scored... what's up with that. Stock pads and he didn’t ride this off road much. Those stock rotors may have to be replaced next year.
Tomorrow I will be at it again. More stuff to do.


Sent from my SM-N960U using Tapatalk
 

TenereGUY

Well-Known Member
Joined
Jan 19, 2023
Messages
1,011
Location
Illinois
Got out to the garage after life threw me some curve balls.
Ordered speed bleeders today. Bought some longer bolts where the crash bars/T-Rex racing belly pan and the engine mount bracket connects too. Drained and replaced the rear drive oil... it was very dirty! Put on the front brake calipers and fender... I finally figured out how the left side brake hoses and speed sensor wire were routed. Then put on the AltRider lower fork protectors. Puig headlight protector is now on. Lubed the kickstand and centerstand. Started mounting my Quad-lock waterproof wireless phone charger. I have to sit and think how I want the wiring to run and where to put the excess wire and fuses. Putting in battery lead extensions, power sources too. I am thinking of removing the tool kit from its place and putting fuses/wiring there. Tool kit fits nicely under the seat... where it should be IMHO. Once the electrics are figured out then put the panels on and mount the crash bars and skid plate. Then bleed clutch and brakes. I think I am getting close to being done with this project for now. I will be looking into stock heated grips. Are they any good? Honda heated grips never seem to be good heaters. How are Yamaha's stock grips for warmth?

Dirty!!


Sent from my SM-N960U using Tapatalk
 
Last edited:

pooh and xtine

Well-Known Member
Joined
Nov 13, 2014
Messages
292
Location
UK
The toolbag space has a drain hole because it can get wet in there, so you might want to think about sealing it from spray if that’s where you’re putting electrics. Great job on the bike, by the way!
 

TenereGUY

Well-Known Member
Joined
Jan 19, 2023
Messages
1,011
Location
Illinois
The toolbag space has a drain hole because it can get wet in there, so you might want to think about sealing it from spray if that’s where you’re putting electrics. Great job on the bike, by the way!
Thanks, I did see the drain hole. What I will be stuffing in there would be "waterproof".

where do most people run wiring that has separate fuses?
I just have to fiddle around and be patient and I think it will fall into place. I'm ahead of schedule right now but that can change so pressing to get done. I need to ride it a bit before I go to WV!

Sent from my SM-N960U using Tapatalk
 

SparrowHawkxx

Active Member
Joined
Dec 9, 2012
Messages
203
Location
Oklahoma
Cycledude,. Here is a link to that windshield.
Your link was to the Tall Touring Windscreen, is that what it is?
I know its hard to tell from a picture but I have the Sport/Tour Windscreen on my Gen 1 and thought the proportions looked more like the Sport/Tour.
VStream Gen 2 Windscreen specs​

I like the VStream screen but did get some wind noise with the wind stream hitting the top of my helmet. I'm 6'2"

I had looked at the MRA X-Creen Spoiler Blade but didn't think it would help much, but I finally decided to try it and ordered the X-Creen Tour.
Since I wasn't sure if I would like it, I got the clamp-on kit so I wouldn't need to drill holes in the VStream.
I was surprised how much this helped to cut down the wind noise and was glad I got it.

The downside of using the clamps, for me, was that it put the X-Creen about an inch higher on the windscreen so looking over the top, I couldn't see as much of the road in front of me. I could see just fine for street and highway riding but when riding anything rougher or somewhat technical I like to have better visibility of the road directly in front of me.

So the next thing I did was remove the clamps and mount the X-Creen directly to the windscreen to lower it about an inch. This worked well for me.
You get a template with the X-Creen so you know where to drill the holes. Just need to use a step drill bit to drill the 6mm holes. uxcell Step Drill Bit HSS 3mm to 13mm 11 Sizes
 

TenereGUY

Well-Known Member
Joined
Jan 19, 2023
Messages
1,011
Location
Illinois
Your link was to the Tall Touring Windscreen, is that what it is?
I know its hard to tell from a picture but I have the Sport/Tour Windscreen on my Gen 1 and thought the proportions looked more like the Sport/Tour.
VStream Gen 2 Windscreen specs​

I like the VStream screen but did get some wind noise with the wind stream hitting the top of my helmet. I'm 6'2"

I had looked at the MRA X-Creen Spoiler Blade but didn't think it would help much, but I finally decided to try it and ordered the X-Creen Tour.
Since I wasn't sure if I would like it, I got the clamp-on kit so I wouldn't need to drill holes in the VStream.
I was surprised how much this helped to cut down the wind noise and was glad I got it.

The downside of using the clamps, for me, was that it put the X-Creen about an inch higher on the windscreen so looking over the top, I couldn't see as much of the road in front of me. I could see just fine for street and highway riding but when riding anything rougher or somewhat technical I like to have better visibility of the road directly in front of me.

So the next thing I did was remove the clamps and mount the X-Creen directly to the windscreen to lower it about an inch. This worked well for me.
You get a template with the X-Creen so you know where to drill the holes. Just need to use a step drill bit to drill the 6mm holes. uxcell Step Drill Bit HSS 3mm to 13mm 11 Sizes
No it is the tall one
@ 24". I have a MRA Vario touring adjustable windshield on my CBR 1100XX Super Black Bird. That lip is usually down but when it gets cold and nasty that lip gets extended. It makes a huge difference!

Sent from my SM-N960U using Tapatalk
 

Cycledude

Well-Known Member
Joined
Jan 29, 2016
Messages
4,048
Location
Rib lake wi
Not sure PO had it in storage. Looks like it has some kind of Vstream logo. I'll take a pic and post it.

Sent from my SM-N960U using Tapatalk
I actually own a VStream just like that one, bought it when they had a Christmas sale at the end of 2021, bought it for our 2022 trip to Tuktoyaktuk thinking if we got into a lot of really cold riding it might help to keep me warmer. Well I grew to hate that windshield, it was to tall for me to look over the top comfortably and it was usually very dirty so that made it even worse, one of the first things I did after getting home was remove the tall windshield and reinstall my old medium sized VStream. They advertise the tall VStream being clear but to me it seems to be the same tint as the medium VStream, suspect I would highly prefer clear In any size but VStream refuses to make clear windshields. Other than the tint I’m pretty happy with my medium size VStream.
 

~TABASCO~

RIDE ON ADV is what I do !
Founding Member
2011 Site Supporter
2012 Site Supporter
2013 Site Supporter
2014 Site Supporter
Vendor
Joined
Apr 4, 2011
Messages
7,370
Location
TEXAS
Where are you going on your next adventure?

bike looks great ! Good job !
 

TenereGUY

Well-Known Member
Joined
Jan 19, 2023
Messages
1,011
Location
Illinois
Where are you going on your next adventure?

bike looks great ! Good job !
Going to West Virginia or Northern Georgia. Going last 2 days of March and 3 days into April... but just watching long term forecast and it is going to be cold. So we will see!
I was going to start working on the ABS on/off switch. I couldn't get the fuse cover off! Also it looks like a 30 amp fuse or 40 amp. The switch I bought can't handle those amps! It has 16 gage wires. Does anyone have a source for a switch for this mod?

Sent from my SM-N960U using Tapatalk
 

TenereGUY

Well-Known Member
Joined
Jan 19, 2023
Messages
1,011
Location
Illinois
Got out in the garage about 2 pm. Going into the high 40F today and raining tomorrow so salt will be washed off the road!
I broke out my battery lead extensions from Electricalconnection.com they cost $30. I hate having all these leads on the battery posts. By using these I only have one extra lead on my posts. I sat looking at the right side panel for a bit trying to figure out where I wanted them.
Criteria:
Accessible but not really out in the open.
Things I want to connect:
-Heated gear power pigtail.
-SAE Battery charger connection
-Power source for 12 v car plug(think cigarette lighter) and USB plugs with an integrated voltmeter too.
- Quad-lock wireless waterproof phone charger
So I found my place... we will see how I like it. Now these extenders have a 40A fuse within them. All my connections have appropriate size fuses too. I hooked up 35 Amps worth of fuses on the downstream size of the fuse. Then on the upstream side I connected my SAE battery charger connection and two other things (as I said they are all fused)
Found out that the power source doesn't have a mount as I had stolen it for another project. I could have figured something out but it didn't have a integrated VM so I ordered another one for $21.
Ran my wiring so it was neat (I hate spiderweb wiring messes) and have to label each fuse so if I ever have to look at them in the rain at night I can figure it out easier...
I have decided to get OEM grip heaters. Found some at Yamahapartsnation.com for $347. If anyone knows of a better deal please let me know.
I need a source for a good switch for the ABS mod that can handle weather and the amps it will see.
I didn't have large enough polyolefin heat shrink tubing for crimping the fittings on the battery leads... so I cut off so.e of the plastic housing where it flares on the crimp fitting and then I could just work my 1/4" tubing over it. I have learned on a bike I like to also solder these to help prevent corrosion and to ensure a good connection. Today I crimped and then filled in the open end with liquid electrical tape and also around the plastic fitting. That's it for today.


Sent from my SM-N960U using Tapatalk20230226_134904.jpg
Electrical Connection battery lead extensions 20230226_135024.jpg
40 amp fuse20230226_142641.jpg
I put these on with the provided zip tie and I had so.e double sided sticky tape from what Pyramid Plastic's Fenda Extender sent and I never used. Better than throwing it out!
These leads coming from the battery. 20230226_142923.jpg
Zip tied but made sure that the wire wasn't on that metal frame edge so it won't wear through and ground out.20230226_142714.jpg
Coming straight down from inside. Following stock wiring route. Will be cut to length and 10 gage washer fitting crimped on with heat shrink tubing and liquid electrical tape to seal it better.20230226_150904.jpg
Cut down fitting. Put in vise cut with hack saw (plastic only) then used knife to shave plastic even with metal20230226_150432.jpg
Completed and sealed.20230226_150423.jpg
Found out about this stuff a while back. This has been in my tool box for years. Every now and then it comes in handy... like today. 20230226_152752.jpg
How I was routing the wire to the loads. The fuses are just inboard of that frame tube. Tucked away nicely. Not hard to raise tank now that I have replaced those button head tank bolts with hex head bolts. Easily slid a ratcheted box end wrench in there now.
 
Last edited:

Cycledude

Well-Known Member
Joined
Jan 29, 2016
Messages
4,048
Location
Rib lake wi
You Did a very nice job !
Here are some other options you might want to consider in the future.
 

TenereGUY

Well-Known Member
Joined
Jan 19, 2023
Messages
1,011
Location
Illinois
You Did a very nice job !
Here are some other options you might want to consider in the future.
I have considered that for a few years... seems to technical for me! I was in the middle of WV last year and my Goldwing heated seat, heated gear and a few things quit working. Pulled the seat and some panels and found the culprit soon enough. Corroded wire. I'm looking right at it and saying that can't be it. It looks fine but the DVM doesn't lie. Pulled it off and the back was corroded and basically disconnected! I like simple fixes and things I can jump around. Black boxes make me scratch my head! Hahaha. It does seem like a wonderful product and I have a buddy who loves his. Maybe next time.
The worst part of that whole diagnosis story was I pulled the battery started looking for continuity and then put the battery back in and the bike wouldn't start or even turn over. I'm freaking out because where in WV am I going to find a place to haul and fix this bike! I pull it all apart again. Check everything put it back together and still nothing! Then a thought passes through my brain... as my buddy was on the other side of the bike and had been starting it... hey, did you hit the kill switch? Huh? I stand up and look. It was in stop! Turned it to run and the bike starts up... my heart started beating again!

Sent from my SM-N960U using Tapatalk
 

TenereGUY

Well-Known Member
Joined
Jan 19, 2023
Messages
1,011
Location
Illinois
The power supply came in today and did a busy 12 hr day and then the mailbox was stuffed when I went after the pwr supply as it also had my neighbors mail too! Went over and delivered it and chatted. Had to leave as I said... I gotta go as I have a project in the garage that I had to get to. Put the pwr supply on and it tucked right in front of the clutch reservoir. Routed the wire along existing wire and used installed stock wire holders. Hooked it up. Decided to use Liquid Electrical Tape and cover the battery lead extensions connectors for a little more protection. Then I was encouraged by someone in this thread to try and put on the left panel with the crash bars on... and he was correct. With a little tug here and there I got it in! Thank you for that tidbit. Of course I had to clean the panel up prior to putting it in. Then cleaned and reinstalled the Puig duck bill (?) Then cleaned up the little stock air deflectors. I replaced those cheap plastic screws that someone chewed the crap out off with a wrong sized screwdriver! Won't have that problem again and they are stainless steel. Just under a buck apiece. Well worth it.
All my electric stuff checks out! Pwr source, Quad-lock wireless waterproof phone charger, heated gear pig tail, battery charger lead. I'm getting excited! The thing is starting to look like a bike again! 50°F today and I was thinking that by Saturday I might have my speed bleeders installed and I would have this baby on the road... alas it is not to be as they are now predicting 8" of wet snow Friday
Stuff left to do:
- lube clutch/brake lever
- replace clutch and brake fluid
- install speed bleeders
- install a plastic wire hook under edge of seat to hold pigtail for heated gear out of site and out of weather.
- re-install lower AltRider crash bars and then install upper AltRider bars.
- Install T-Rex racing belly pan
- perform Throttle Body Synch
- ABS mod. Need to source a better switch. Any ideas?
The list is getting very short!

List of completed items:
- Remove and install ECU
- Puig headlight protector
- LED headlights
- Quad-lock wireless phone charger
- battery lead extensions
- New K&N air filter
- Fork internals Upgrade with Traxxion Dynamics Springs and AK-20 dampers
- changed rear drive oil
- Fenda Extender installed
- Torque all spokes to correct torque
- Lube Shift Lever pivot bolt
- Lube kickstand and centerstand
- remove street tires and replace with MotoZ Tractionator Adventure
- Install AltRider lower fork protectors
- Change coolant
- Replaced inferior stock drive shaft joint protector that WILL GRAB MY RIDING PANTS LEG with an AltRider protector that doesn't stick up... what was Yamaha thinking?
20230228_210159.jpg
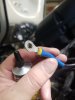
If you are ever threading wires here is a tip. Wrap them together with electrical tape and also continue and make a rat tail of the tape. Then double back on the tape to thicken/stiffen it. Then put it through those tighter spaces and pull.20230228_210222.jpg
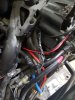
Fits right through and you're done!20230228_211859.jpg
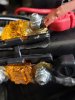
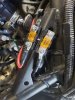
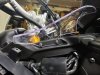
A layer of liquid electrical tape all over the shiny electrical surfaces. It will get thinner as it dries. Protection against corrosion and an accidental touch on a hot lead as it is somewhat exposed. I may change location yet but we will see.20230228_224851.jpg
Not to bad... I probably should have had the hot one behind that panel. Wasn't sure how far it would cover. Might switch when doing maintenance next winter. 20230228_213145.jpg
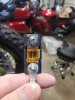
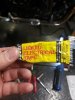
$21 pwr source with integrated voltmeter. Didn't even have to leave the house to find it and here in two days and that price includes shipping... truly a modern day wonder. Heck... my sea monkeys took almost two months back in the day! 20230228_213136.jpg
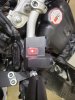
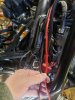
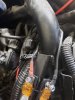
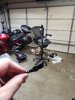
top view to show clearance20230228_214932.jpg
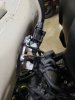
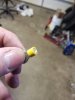
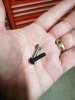
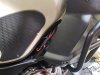
Is this just a protective device for the fuel pp connections or is something suppose to go through it?20230228_215720.jpg
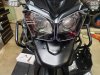
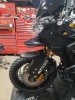
Puig Duck Bill (what is the proper name for that thing?) Installed 20230228_220814.jpg
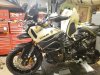
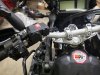
YOU CAN GET THAT PANEL ON WITH THE BARS INSTALLED... now can I get it off too?????
 

Attachments

Last edited:

TenereGUY

Well-Known Member
Joined
Jan 19, 2023
Messages
1,011
Location
Illinois
Only had 40 minutes tonight... decided to start lubing up the front brake lever. I will upgrade to different hand guards as I really don't like how the stock ones are bolted to the bars/brake lever assy.
What is it with Yamaha??? I am continually amazed that at only 13,400 miles as I take things apart that should have lube on them and find out they are dry! Both axles... and a Yamaha dealer put tires on it 1200 miles ago... shifter, now the front brake lever was dry... no lube. It really has me thinking I should have checked the head brgs while everything was apart..
I cleaned up the pivot bolt and hole with solvent and barely had any dirt. Now I know you don't want a lot of extra grease or lube as it attracts dirt too... but dry? Folks, if you haven't lubed all the points that your owners manual says to... DO IT! I had also better check the rear brake foot lever to see if that needs something too. Cleaned the right bar assembly and put everything back together.
That's it for tonight.
Cheers,
Guy

Sent from my SM-N960U using Tapatalk
 

SkunkWorks

Well-Known Member
Joined
Sep 13, 2018
Messages
1,791
Location
Colorado
Technically the "Axles" do not require any grease or lube. There is nothing that actually pivots on them.
It is usually ok to wipe a very thin coating on them, only to prevent any corrosion but is not required.
 
Top