What TenereGUY has been up too
- Thread starter TenereGUY
- Start date
~TABASCO~
RIDE ON ADV is what I do !
Founding Member
2011 Site Supporter
2012 Site Supporter
2013 Site Supporter
2014 Site Supporter
Vendor
I believe so……if not they can be picked up on the Net……… power going out, then back in to bulb. These are HID…….. not LED.Tabasco,
Those grommets... did they come with the kit?
Sent from my SM-N960U using Tapatalk
HID don’t need fans, Etc. I run stock rear covers. Not the jumbo ones.
Well, I am a little behind my schedule... my last at home kid... 17 hit a snow patch and never took his foot off the accelerator and went off the road. Missed a driveway culvert and the guys driveway reflectors then went down his row of pine trees a good 50' never hit the trunks(glanced off a few), missed the fire/police address sign and hit a stump. Car was totaled. That was yesterday afternoon and a little bit of today. Kids! He is ok.
Got in the garage by about 4 pm. Took the bike off the lift and then with the sons help I pushed it on backwards so I have clearance to easily work on the forks. Looked at the shop manual for a bit and then proceeded to remove the calipers, wheel, fender, loosened the top pinch bolt on each side and loosened the fork cap while the tube was held in place by the lower pinch bolts. People please use a torque wrench as several bolts and one fork cap were waaaay over torqued! Know your torque values too. A member on here told me that the front engine mount brackets should be 100# but I looked them up... 54#. That's quite the difference when working on anything let alone aluminum! Torque wrenches are cheap compared to the damage that can be done... ok, I am done ranting.
When I had the fender off I cleaned the inside rearward part then let it dry and cleaned it with a really good high flash alcohol to remove any greases. Opened up my Pyramid Plastic's Fenda Extender and cleaned that off. Got out some 3M Extreme double sided tape. Heated the plastic Fenda Extender up and put the tape on it. Then warmed up the fender with my heat gun and pressed the two together. Heating makes it bond better when I only have the garage heated to 55. I never drilled and screwed any of my installation of these on my bikes and none have ever even loosened... at um ah triple digit speeds. We will see what rocks do now. It produces a small gap. I might have avoided that one side by flexing in the edges until the bottom was seated all the way. Still not bad. Unpacked the front suspension upgrade kit from Traxxion. AK-20 kit. I can move these to another bike if I sell this bike in the future. Then I just have to put the old internals in and buy a new spring kit for $159 for the new bike. Being 6'3" then gear and a packed bike I have learned that stock suspension just doesn't do the job. Next year a new rear shock will go in. I have never done upside-down forks before... how hard can it be? Well, it is very different from right side up! Once the springs are out they are almost the same... but I gotta get that spring out. I need to wait for my son to get home... so I'll try to finish them up tomorrow afternoon! I have found that Yamaha likes the 6 mm and 4 mm size Allen cap and button bolts. Honda does the 5 and 6 mm. Just a difference. Besides that I have a list made out to keep track of what has got to be done. Some of you have added to the list by what I have been reading. Stuff like... clean and lube shifter bolts, check spokes, and a bunch of little things. I appreciate your knowledge, so any suggestions on little maintenance items that seem to get missed post a list and I'll get it done.
Those winglets are great but whoever put them on this bike didn't have the right size screwdriver and mangled the heads as they are plastic. I think I will try to find some stainless steel replacements.
So today:
New air filter installed
Fenda Extender installed
Front end removed.
I have never pulled apart the gooseneck and looked at those bearings. I have read that they didn't have a lot of lube on those or they weren't seated well. The handle bars moved smoothly with out any catching or notchyness.
The reason I am starting to believe the lack of lube is I pulled out the axle and it was basically dry!


Sent from my SM-N960U using Tapatalk
Not very often that something brings .e to a standstill in the garage... but as of right now I have been defeated by the simplest of things on the first fork. I cannot tighten the bolt that comes from the bottom and threads into the lower damper assembly. I have done probably 6 to 8 sets of forks in the last 10 years and even had to drill out that bottom bolt. Never done an upside-down fork though. They are a bit different. I was in the putting it all back together phase and it just wants to spin. I will do some more research on this forum for now... otherwise I have to wait until my day off (Friday) and take them to my dealer that I have dealt with for quite a while. At least he will let me watch him do it!
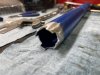
Now there is 13,400 miles on this fork oil as far as I know and 6 years... this oil looks new! Internals of the fork if someone hasn't seen the inside guts of one before. A side by side of the new kit and old. I don't like to have to drill that lower bolt out so I coat the bolt head and inside that well where the bolt head resides with anti-seize. It's my theory that people who don't change there fork oil out every two or three years let it go for a loooong time and corrosion builds up in that very small gap between two dissimilar metals and that is basically welding the bolt head in place. Because once you drill that head off and take the damper out you can then spin the bolt shaft out with your fingers... so ever since... I use the anti-seize to avoid the problem.

What looks like dirty oil was just foamy oil that came out while pumping the damper... otherwise it was clear and new looking. If it had been changed that would explain the highly over torqued fork cap.


Sent from my SM-N960U using Tapatalk
There should be little flats milled into the aluminum piece where the bolt goes in. Those flats need to be lined up in the lower half of each fork so the cylinder doesn't spin inside it. Be sure the new internals you got have the same bits milled off as what you took out!
(I also seem to remember from other USD forks that if the inner bits aren't aligned and slid in all the way, that bolt will spin and not grab onto the threads, which is by design)
(I also seem to remember from other USD forks that if the inner bits aren't aligned and slid in all the way, that bolt will spin and not grab onto the threads, which is by design)
Ok, I will check those items out tomorrow night. Bolt was definitely threaded in.There should be little flats milled into the aluminum piece where the bolt goes in. Those flats need to be lined up in the lower half of each fork so the cylinder doesn't spin inside it. Be sure the new internals you got have the same bits milled off as what you took out!
(I also seem to remember from other USD forks that if the inner bits aren't aligned and slid in all the way, that bolt will spin and not grab onto the threads, which is by design)
Thanks for the look ups!
Sent from my SM-N960U using Tapatalk
Audiowize
Saw the two flats and tried the OEM damper assembly and still couldn't get it aligned to sit down in the recess. I wonder if I could stick my boroscope camera down there??? Tried it on the Traxxion dampers and failed at that too. Tomorrow is another day. Will try and call on Tuesday my local Honda shop and ask the head mechanic. He'll help me out...
Sent from my SM-N960U using Tapatalk
Cycledude
Well-Known Member
Did my 2013 upside down forks, they are definitely more work than standard forks, I have done standard forks many times all by myself but the upside down forks I had to call one of my brothers to help put them back together. Everything turned out good.
scott123007
Well-Known Member
Sounds like the forks are your immediate problem and you have a lot of good advise on that, so let me elaborate a little on your Fenda Extenda. I see your skid plate is the stock plastic one and if you plan to do paved or mild dirt roads, that will be fine. However, if your intention is to be more aggressive with your off roading, the type of skid plate you choose will be what determines the life of your Extenda. Unfortunately, I can't tell you which skid plates work best because it takes a pretty serious bottoming out of your forks for it to happen, and if I say don't use XYZ plate, someone on here will chime in saying they have an Extenda, and that plate, and have never had a problem, which means they may not have blown through the fork stroke enough for it to happen. There are two situations that happen, to be aware of. The first, is the bottom of the Extenda "catching" on the top of the skid plate when the forks are compressed enough and getting ripped off when the forks extend again. The second is with plates with taller fronts. The Extenda presses against the skid plate upon fork compression and gets pressed into the tire which grabs it, and rips it off that way.
None of this is a huge deal either way, but I can tell by your posts that you are both experienced and meticulous when it comes to working on your bikes, I just thought I might bring this to your attention.
None of this is a huge deal either way, but I can tell by your posts that you are both experienced and meticulous when it comes to working on your bikes, I just thought I might bring this to your attention.
Last edited:
Thanks,Sounds like the forks are your immediate problem and you have a lot of good advise on that, so let me elaborate a little on your Fenda Extenda. I see your skid plate is the stock plastic one and if you plan to do paved or mild dirt roads, that will be fine. However, if your intention is to be more aggressive with your off roading, the type of skid plate you choose will be what determines the life of your Extenda. Unfortunately, I can't tell you which skid plates work best because it takes a pretty serious bottoming out of your forks for it to happen, and if I say don't use XYZ plate, someone on here will chime in saying they have an Extenda, and that plate, and have never had a problem, which means they may not have blown through the fork stroke enough for it to happen. There are two situations that happen, to be aware of. The first, is the bottom of the Extenda "catching" on the top of the skid plate when the forks are compressed enough and getting ripped off when the forks extend again. The second is with plates with taller fronts. The Extenda presses against the skid plate upon fork compression and gets pressed into the tire which grabs it, and rips it off that way.
None of this is a huge deal either way, but I can tell by your posts that you are both experienced and meticulous when it comes to working on your bikes, I just thought I might bring this to your attention.
Never worry about telling me about info that can save me frustration! I sure don't get offended easily... it may have something to do with 6 years in the military and 35 years in an industry run much like the military and with lots of veterans hired in...

I have the T-Rex bash plate in a box and that doesn't have an upper lip that juts out and it protects the engine up through the front to the engine mount bracket.
I am putting in linear springs and not the stock progressive springs. Hopefully that may help too.
What I was wondering about though...
What kind of little maintenance items need to be done before I put the bash/belly pan on. I really don't want to find out later then have to remove it again!
Anyone please chime in if you have an inkling.
Guy
Sent from my SM-N960U using Tapatalk
~TABASCO~
RIDE ON ADV is what I do !
Founding Member
2011 Site Supporter
2012 Site Supporter
2013 Site Supporter
2014 Site Supporter
Vendor
Not very often that something brings .e to a standstill in the garage... but as of right now I have been defeated by the simplest of things on the first fork. I cannot tighten the bolt that comes from the bottom and threads into the lower damper assembly. I have done probably 6 to 8 sets of forks in the last 10 years and even had to drill out that bottom bolt. Never done an upside-down fork though. They are a bit different. I was in the putting it all back together phase and it just wants to spin. I will do some more research on this forum for now... otherwise I have to wait until my day off (Friday) and take them to my dealer that I have dealt with for quite a while. At least he will let me watch him do it!
Now there is 13,400 miles on this fork oil as far as I know and 6 years... this oil looks new! Internals of the fork if someone hasn't seen the inside guts of one before. A side by side of the new kit and old. I don't like to have to drill that lower bolt out so I coat the bolt head and inside that well where the bolt head resides with anti-seize. It's my theory that people who don't change there fork oil out every two or three years let it go for a loooong time and corrosion builds up in that very small gap between two dissimilar metals and that is basically welding the bolt head in place. Because once you drill that head off and take the damper out you can then spin the bolt shaft out with your fingers... so ever since... I use the anti-seize to avoid the problem.
What looks like dirty oil was just foamy oil that came out while pumping the damper... otherwise it was clear and new looking. If it had been changed that would explain the highly over torqued fork cap.
Sent from my SM-N960U using Tapatalk
Here is the simple way to get them out, and re installed.... You need any type impact wrench / air impact. These are what I have found that can spin fast enough. When you're trying to take them apart. Some are much more difficult that others in my experience. I have the fork laying on the bench. I zap it with the impact in reverse to loosen the bolt. About 1 out of 10 times it will just zip right out. The other 9 times it will just spin. Whether Ive taken the (top) off already or not, I put it back together if I had. I turn the fork upside down where the top is now on the floor,(on a rubber pad on the floor) and the bolt you're trying to get out is aiming up in the air. While adding as much compression to the fork and compressing the spring you zap it with the impact wrench on high (speed). I sometimes have to get a bit of a rhythm with compression and the gun in unison. The bolt will pop right out... If it's being stubborn, Ive had this before, you add more compression along with the gun, and it will pop out.
Install.... You do basically the same thing... While tightening, use the impact on high (speed) to get it going. "set"... Then you can use your torque wrench for final... If it's being a PITA, you use the same technique as described above so it will stop spinning. You do basically the same exact thing. You add compression and then tighten it up. Once it's set you bring it back up to the bench and TQ it up....
I use a Milwaukee gun with 3-4 speed settings on it. Has worked flawless for this job and hundreds of other jobs.
If anyone needs more direction on this, just let me know. I got my technique down and everything, no tickling or nothing........... LOL
That was my next go round. Put it back together and put spring tension on it. Hoping there was another way. I'll let you know how it works. I have an old 1/2" drive Chicago pneumatic impact that is finally losing its umph. Got a cheap ($85) electric 1/2" that's good to 300# and then put one in each car for tire removal on car or trailer. The things work wonderful. (Anyone wants to know what it is I can take a pic of it.) Just picked up a lightly used 3/8" drive Snap On impact wrench (air) and that snapped that bolt right out. It's so fast that I didn't want to over torque the bolt while installing it... but eventually tried as it's fast... nope, didn't work. I will try that method with my little electric Rigid from Home Depot 1st then go up the ladder to find which one works. I'll let you guys know how it goes. Watched a video... (I think Skunkworks) and realized I should be using ratchet straps to compress the springs instead of muscle! That should work better...Here is the simple way to get them out, and re installed.... You need any type impact wrench / air impact. These are what I have found that can spin fast enough. When you're trying to take them apart. Some are much more difficult that others in my experience. I have the fork laying on the bench. I zap it with the impact in reverse to loosen the bolt. About 1 out of 10 times it will just zip right out. The other 9 times it will just spin. Whether Ive taken the (top) off already or not, I put it back together if I had. I turn the fork upside down where the top is now on the floor,(on a rubber pad on the floor) and the bolt you're trying to get out is aiming up in the air. While adding as much compression to the fork and compressing the spring you zap it with the impact wrench on high (speed). I sometimes have to get a bit of a rhythm with compression and the gun in unison. The bolt will pop right out... If it's being stubborn, Ive had this before, you add more compression along with the gun, and it will pop out.
Install.... You do basically the same thing... While tightening, use the impact on high (speed) to get it going. "set"... Then you can use your torque wrench for final... If it's being a PITA, you use the same technique as described above so it will stop spinning. You do basically the same exact thing. You add compression and then tighten it up. Once it's set you bring it back up to the bench and TQ it up....
I use a Milwaukee gun with 3-4 speed settings on it. Has worked flawless for this job and hundreds of other jobs.
If anyone needs more direction on this, just let me know. I got my technique down and everything, no tickling or nothing........... LOL

Sent from my SM-N960U using Tapatalk
Well, you ever have those moments in the garage when something happens and light floods in your otherwise darkened brain? If not you probably won't understand what happened tonight. I was in the garage and scoped the inside of the tube... it's flush down there. Discovered that and then a young friend came over and we were chatting away and not working and I happened to look down and low and behold!!!! Two sheets of instructions laying on the floor under the lift! Very good instructions I might add... gone were my thoughts about Traxxion Dynamics that were running along the lines of... Traxxion is usually a class act and I can't believe that these didn't come with instructions... oh, but they DID! The square tube I didn't quite now what to do with but had a suspicious idea... yep, it's a holder. Then it came with oil height and suspension settings too! Well, this should be a big help! How embarrassing... but I shall survive! 
I'll be getting these done this week now. Working 12 hr days but I will get them done... now


Sent from my SM-N960U using Tapatalk

I'll be getting these done this week now. Working 12 hr days but I will get them done... now


Sent from my SM-N960U using Tapatalk
SkunkWorks
Well-Known Member
The "Flats" on the lower valve/shim assembly do not engage with anything inside the lower fork-leg when installed. They are only for removing the valve from the Damper cartridge.
The correct Tool that you need (either Yamaha one or Motion-Pro) will hold the top of the Cartridge/Spring-Seat so that you can disassemble/reassemble that bottom bolt with the copper-washer.
I did not have one when I did my forks, so I made one from an old, no longer used, aluminum jack-handle.

And YES, Yamaha specifies Ratchet-Straps in the FSM to compress the springs..............Have a friend help when you release the tension on the straps!
The correct Tool that you need (either Yamaha one or Motion-Pro) will hold the top of the Cartridge/Spring-Seat so that you can disassemble/reassemble that bottom bolt with the copper-washer.
I did not have one when I did my forks, so I made one from an old, no longer used, aluminum jack-handle.
And YES, Yamaha specifies Ratchet-Straps in the FSM to compress the springs..............Have a friend help when you release the tension on the straps!
Thanks,The "Flats" on the lower valve/shim assembly do not engage with anything inside the lower fork-leg when installed. They are only for removing the valve from the Damper cartridge.
The correct Tool that you need (either Yamaha one or Motion-Pro) will hold the top of the Cartridge/Spring-Seat so that you can disassemble/reassemble that bottom bolt with the copper-washer.
I did not have one when I did my forks, so I made one from an old, no longer used, aluminum jack-handle.
View attachment 99102
View attachment 99103
View attachment 99104
And YES, Yamaha specifies Ratchet-Straps in the FSM to compress the springs..............Have a friend help when you release the tension on the straps!
I saw your post on this and that's where I clued in on the straps. Even though the shop manual shows them on the compression tool.
Thanks.
Sent from my SM-N960U using Tapatalk
After some email correspondence I am back on the road to success. The square black tube I wasn't sure about is a damper holder!
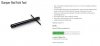
I scoped the fork tube and took a picture for Ya'll to see.. it is flat. Damper rod puller by Traxxion is a 4 in one tool. It has 4 different diameter rod threads made to fit most forks. You can see the different size diameters in the one pic if you zoom in.
Hopefully tonight I will be putting one together and getting to the other one! Then on to easier farkle mounting.


Sent from my SM-N960U using Tapatalk
Got home amidst rain and freezing rain at 7:30 pm and promptly went out to the garage. Put the first fork together and took my time double checking everything. All back together and put in the triple tree. Torqued to spec and then set rebound, damping and preload per their instructions.
Their Fork Kit for upside-down forks was invaluable and reasonable priced at ~$69 I think. Couldn't have done it without it. They gave me more than enough fork oil at 2 liters. Used one. 2nd fork went was torn down, drained a bit then put back together and I was sliding it into the triple tree inside of 50 minutes. I think tomorrow the front wheel will go back together but the fender will stay off until the belly pan is on. I may change the clutch fluid prior to the belly pan depending on coverage. I will be replacing all my bleeders with speed bleeders. Anyone want my old bleeders? Just cost you postage.
Before you fill your forks make sure they are sitting plumb (vertical) in the vise. That way when you start measuring or removing extra fluid it is a correct measurement. Use a small level on two sides 90°from each other.


I love my measurement tool. Set it at the correct mm and put something smaller but heavy to hold it flat then you suck out the extra fluid right to where you need it. This comes with the fork kit so now I have two.
Sent from my SM-N960U using Tapatalk


That damper puller tool is very handy and I put it on so I have a hand hold as I push the rod in then it is easy to align the lower damper with the lower hole to put in the damper hold down bolt.
I also put on my anti-seize to prevention that bolt head from corroding with the aluminum fork.
The ratchet straps worked so well and as I was warned... have a 2nd person to hold the tool down when you release them. Could I have done it by myself... sure but two was safe and easy.


I got about the right amount of fluid out. There was some spillage but not much. I also like to have assurances built in and I mark my forks before I take them off. Alcohol easily removes the markings. I know the axle threads into the left side if sitting on the bike but I like back up... I guess it comes from running a Nuclear Reactor for a living! Forks back where they belong now and I didn't even have to go to the dealer as I thought I might! Now to do some cleaning as I put things on. Ordered tires from Rocky Mountain ATV and a cheap $40 TPMS too.
I have them on all my bikes. I like the kind with a display monitor. Cheap, works, lasts a long time. Then I dug in a drawer and found two steel T-valve cores to mount when I change my tires. That way I never have to take the monitor off to set my air pressure!


Last edited:
SkunkWorks
Well-Known Member
Nice Job!
SparrowHawkxx
Active Member
No need to remove the bars or left side panel to get the tank off.So I'm learning a lot tonight. To get the tank up so I could run some wires under it I found that I had to take off my AltRider lower bars. All bolts except the right side... those I just had to loosen. ...
Just remove three screws on the left side panel, the three on the right side, at the top, middle, and bottom.
With these removed you can pull the panel back to get to the tank bolt with an allen wrench.
Loosen the tank bolt then you can unscrew it by hand. You may need to lift the tank slightly to get any pressure off the screw.
The left side panel can also be removed without removing the AltRider bars.... ordering a K&N air filter as long as I am in there. I really don't like the AltRider bars if I have to almost remove them to get the left side panel off. Such is life!
Its tight and some force must be applied to the panel to get by some restrictions, but I've done it several times with no issues.
This method might not be for everyone though.
.
Removing the battery with the AltRider bars in place is also easily done.
See this thread: Yuasa Battery? | Reply #9