ES Fork Cap Dissassembly
- Thread starter Bart
- Start date
Bart
Active Member
Yes, that is the rod I referred to in my opening post, it is hollow with nothing inside. Assuming there are shim stacks, they are either in the fork cap assembly or incorporated on the end of the rod.
I think if you took the forks apart it would be obvious, but it is very difficult to see from just the drawings.
I think if you took the forks apart it would be obvious, but it is very difficult to see from just the drawings.
Hei Bart,
one question as i have now acquired the bike") (it's mid 2014 ES)
(it's mid 2014 ES)

and i'm planning (among the others) for the forks complete maintenance this winter...
I have looked at the forks top caps (the ones where the plug is connected) and those have a really HUGE 44mm hex bolt that needs to be handled...somehow
May i ask what tool did you use to take them off and then torque them back at 23 Nm ?
I was thinking of a hex key for impact driver
or so but i'm not sure the cap will fit in the dome of the bit tbh
Thanks in advance !
Davide
one question as i have now acquired the bike
(it's mid 2014 ES)and i'm planning (among the others) for the forks complete maintenance this winter...
I have looked at the forks top caps (the ones where the plug is connected) and those have a really HUGE 44mm hex bolt that needs to be handled...somehow
May i ask what tool did you use to take them off and then torque them back at 23 Nm ?
I was thinking of a hex key for impact driver
or so but i'm not sure the cap will fit in the dome of the bit tbh
Thanks in advance !
Davide
Last edited:
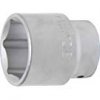
I measured the clearance depth at 1.33 inches. I found a 1-3/4" (44mm) socket at Autozone, not "impact rated" and its 3/4" drive. I need to go back and measure depth.Hei Bart,
one question as i have now acquired the bike
View attachment 60556
and i'm planning (among the others) for the forks complete maintenance this winter...
I have looked at the forks top caps (the ones where the plug is connected) and those have a really HUGE 44mm hex bolt that needs to be handled...somehow
View attachment 60555
May i ask what tool did you use to take them off and then torque them back at 23 Nm ?
I was thinking of a hex key for impact driver
View attachment 60554
or so but i'm not sure the cap will fit in the dome of the bit tbh
Thanks in advance !
Davide
I am hoping someone with the ES can measure the fill depth installed, if they are just doing a fluid change. I've seen various tools to check the height of the oil.
Sent from my SM-N950U using Tapatalk
Fill depth shall quote 148 mm
I use a large siringe with a tube attached to a plate i made myself to set the levels
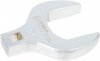
Another option for the fork caps would be a Crow Foot adapter for the dyno but it seems not existing in the fkng 44mm size (at least in Italy....)
I use a large siringe with a tube attached to a plate i made myself to set the levels
Another option for the fork caps would be a Crow Foot adapter for the dyno but it seems not existing in the fkng 44mm size (at least in Italy....)
Attachments
-
 60.4 KB Views: 34
Last edited:
jrusell
Well-Known Member
There is no need to worry about torque on the cap. There is an o-ring under the cap that seals. Just snug it up hand tight and you are good.
Just loosen the upper triple bolts before loosening the caps.
So the top of the oil is 148mm from the top of the tube (with no compression)? (Did spell check alter your wording?)Fill depth shall quote 148 mm
I use a large siringe with a tube attached to a plate i made myself...
Sent from my SM-N950U using Tapatalk
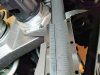
That is an option. I'm perf aware of the oring.View attachment 60564
There is no need to worry about torque on the cap. There is an o-ring under the cap that seals. Just snug it up hand tight and you are good.
Just loosen the upper triple bolts before loosening the caps.
I'm not inclined to use that wrench as it might damage the bolt (aluminium); i'll keep this as plan B in case i find no better solution.
The ideal solution would be a Crow Foot Open Key (that has a sqare hole for the dyno)
however the 44 mm variant is close to impossible to find... it seems i need to draw it in cad (which i did) and have it laser cut from a 3-4mm iron plate...
One more sorry... if anyone knows
I would like to check (on the ES model) the:
- Diameter (mm) of the compression rod - M10 ??
- Diameter (mm) of the upper part of the spacer (where the holding tool is inserted) - xx mm ??
Many thanks if anyone has a hint
I would like to check (on the ES model) the:
- Diameter (mm) of the compression rod - M10 ??
- Diameter (mm) of the upper part of the spacer (where the holding tool is inserted) - xx mm ??
Many thanks if anyone has a hint
WJBertrand
Ventura Highway
Generally these oil level specs are with the spring removed and the fork tubes completely collapsed/compressed. If you filled it that high with the legs extended you would only have 148mm (~5.8”) travel before the fork would hydraulically lock. Yamaha specs the fork travel at 7.5”.So the top of the oil is 148mm from the top of the tube (with no compression)? (Did spell check alter your wording?)
Sent from my SM-N950U using Tapatalk
Edit: actually, travel would be even less than 5.8”. First you probably can’t compress the air in there completely to “0” and second, the oil level will rise when the spring is replaced.
Bart
Active Member
Ocgeek, only just seen you post but it seems to have been answered already.
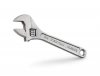
For the cap nut I just used a good quality adjustable wrench with tape on the jaw faces to protect the nut, it came loose very easily and as said above there is an o ring to seal the cap afterwards.
I think the damper rod is M10...but I normally just use a piece of wire with a hook on the end to raise the rod.
The holding tool I made had a 20mm wide slot (just been out to the garage to measure it).
I always take oil/air gaps dimensions as a guide, a bigger air gap will give a slightly softer ride and vice versa.
Nice looking bike
Thanks Man for the quotes and for the appreciation on the "new" bikeOcgeek, only just seen you post but it seems to have been answered already.
For the cap nut I just used a good quality adjustable wrench with tape on the jaw faces to protect the nut, it came loose very easily and as said above there is an o ring to seal the cap afterwards.
I think the damper rod is M10...but I normally just use a piece of wire with a hook on the end to raise the rod.
The holding tool I made had a 20mm wide slot (just been out to the garage to measure it).
I always take oil/air gaps dimensions as a guide, a bigger air gap will give a slightly softer ride and vice versa.
Nice looking bike
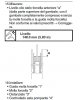
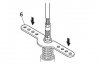
Those are exactly what i needed (i plan to have a tool laser cut from 3mm steel) ,
so to recap the rod is M10 and the spacer collar 20 mm
Something like this

One last Q if i may : Is compressing the spring from the spacer collar hard to do or it can be done "by hand" by pushing down with a fork tool ?
Cheers
Many thanks in advance
Last edited:
B
ballisticexchris
Guest
That is 100% correct and excellent advice. An adjustable wrench will work just fine. Working on the ES suspension is beyond my paygrade. I'm dropping off my whole bike at Race Tech at suspension rebuild time. I have rebuilt forks before and it's a nasty dirty job.View attachment 60564
There is no need to worry about torque on the cap. There is an o-ring under the cap that seals. Just snug it up hand tight and you are good.
Just loosen the upper triple bolts before loosening the caps.
Bart
Active Member
I've not actually measured the rod thread so cannot say 100% yes it is M10, maybe someone on here has.
Re compressing the spring, many of us use some sort of spring compressor, there are photo's on here somewhere. Two people may be able to do it by hand but have not done it that way myself.
Here you go
https://www.yamahasupertenere.com/index.php?threads/fork-work-time.25875/
Re compressing the spring, many of us use some sort of spring compressor, there are photo's on here somewhere. Two people may be able to do it by hand but have not done it that way myself.
Here you go
https://www.yamahasupertenere.com/index.php?threads/fork-work-time.25875/
Ah ok...
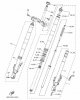
i had looked in the service book and while it says some sort of ratchet strap (English may be incorrect as i do not know the right term) is needed to compress the spring with the tool for the STD S10
it does not show the same for the ES variant; so i assumed it could be pushed by hand with the tool... if not i need to revise my multi-tool shape or make two different ones
Thanks for the link very useful.
EDIT: The link shows the compression of the spring on a STD fork not the ES. So again not sure the compressor is needed..in this case
Also in the same thread you linked i saw the hydraulic packs; those are hosted within the cartridges (it is not in the top cap). I think this was what you were trying to figure out before
I'll go read that thread now
Thanks again
Bart
Active Member
My photo in the link was of a set of Fireblade forks, I was just showing a different way to compress the forks.
Thanks Bart,
so you are saying also for the ES (i assume you open them up) i will need more than the tool (see my post #30 above) and (someone else's) hands to press the springs down , correct ?
(service book is suggesting opposite, it is unclear...why the pictured it that way)
The tool is going to look like this i believe:
Last edited:
Bart
Active Member
Yes I've opened one leg so far and had the cartridge out, two people may be able to do it but I've always used the clamps as in the other thread. Someone posted as to how much force is required to compress the spring....how strong are you feeling....your choice.