Stripped oil pan threads
- Thread starter Senor Ramon
- Start date
Senor Ramon
Member
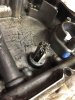
I did. I looked at the yamaha service manual and the Online Parts schematic from ROcky Mointain. Doesn't seem Like I missed any screw to unbolt. Did I?Did you remove the Strainer Cover?
There may be one or two oil-Pan bolts underneath that cover?
Attachments
-
 147.4 KB Views: 29
 -
 157.2 KB Views: 29
Senor Ramon
Member
Thank you. I watched this video several times. I wish it had a little bit more detail.
Fennellg
Well-Known Member
You can ask questions in the YouTube comment section. Tobasco is our foremost authority on all things mechanical. Private message him. Take a break or two. Fresh perspective can work wonders.
~TABASCO~
RIDE ON ADV is what I do !
Founding Member
2011 Site Supporter
2012 Site Supporter
2013 Site Supporter
2014 Site Supporter
Vendor
Hello,
Ive taken the pan off many times... If you have all the bolts out it will come right off.. It has two guide pins but they don't hold it on... I suspect there is another bolt hiding in one of the deep pockets in the middle of the pan.. I think there are two like this... Also keep track of the long bolts and short bolts. Its not absolutely critical because they can only go back in short- long,.... short - long.... But just be mindful.. I think you're just missing a bolt........
****Side note... carefully look at the oil pump intake screen with a flashlight. Other than the screen it should be 99% - 100% clean... If its not, STOP, and post photos............ Looks like 22 bolts....
If you have triple checked that all bolts are removed, Yamaha does proved a front and rear "tab" you can tap to remove. I try and never use this myself but they are there. If you do I would fashion a piece of wood or plastic to tap this this pan. I personally would not use a punch or screwdriver, Etc.
(Helpful Hint) Another Note that popped in my head that people might be reading "oil pan". Please make sure to carry quick & normal JB Weld with you. Its the insurance that can save your XXXX in a bind and it only is a few bucks. Im sure most people have read some of my stories about situations that I have been involved with or have helped with on the topic of broken oil pans and JB Weld. Please take my advice, throw some in your top case or bags.
Use a torque wrench on all those bolts when you re install it. You DO NOT want to strip out a bolt in that engine case ! This will be inch pounds.
Last edited:
Senor Ramon
Member
Thank you very much for your swift response. I will go back and check all of the screw / bolts, and then take your advice for using a peice of wood to try and get it loose. I will report back!Hello,
Ive taken the pan off many times... If you have all the bolts out it will come right off.. It has two guide pins but they don't hold it on... I suspect there is another bolt hiding in one of the deep pockets in the middle of the pan.. I think there are two like this... Also keep track of the long bolts and short bolts. Its not absolutely critical because they can only go back in short- long,.... short - long.... But just be mindful.. I think you're just missing a bolt........
****Side note... carefully look at the oil pump intake screen with a flashlight. Other than the screen it should be 99% - 100% clean... If its not, STOP, and post photos............ Looks like 22 bolts....
If you have triple checked that all bolts are removed, Yamaha does proved a front and rear "tab" you can tap to remove. I try and never use this myself but they are there. If you do I would fashion a piece of wood or plastic to tap this this pan. I personally would not use a punch or screwdriver, Etc.
(Helpful Hint) Another Note that popped in my head that people might be reading "oil pan". Please make sure to carry quick & normal JB Weld with you. Its the insurance that can save your XXXX in a bind and it only is a few bucks. Im sure most people have ready some of my stories about situations that I have been involved with or have helped with on the topic of broken oil pans and JB Weld. Please take my advice, throw some in your top case or bags.
Use a torque wrench on all those bolts when you re install it. You DO NOT want to strip out a bolt in that engine case ! This will be inch pounds.
View attachment 90349
Senor Ramon
Member
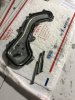
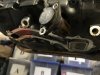
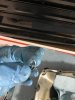
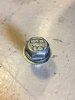
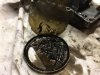
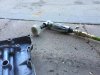
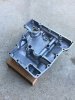
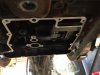
Than you so much for your help. All of you. Tabasco, you were right. There was a recessed screw hidden in the middle of the pan. Thank you. i think this was previously repaired with a helicoil (first pic). That is what came out of the pan. Cleaned the pan. Tomorrow i will start the Helicoil process. Thanks again everyone.Hello,
Ive taken the pan off many times... If you have all the bolts out it will come right off.. It has two guide pins but they don't hold it on... I suspect there is another bolt hiding in one of the deep pockets in the middle of the pan.. I think there are two like this... Also keep track of the long bolts and short bolts. Its not absolutely critical because they can only go back in short- long,.... short - long.... But just be mindful.. I think you're just missing a bolt........
****Side note... carefully look at the oil pump intake screen with a flashlight. Other than the screen it should be 99% - 100% clean... If its not, STOP, and post photos............ Looks like 22 bolts....
If you have triple checked that all bolts are removed, Yamaha does proved a front and rear "tab" you can tap to remove. I try and never use this myself but they are there. If you do I would fashion a piece of wood or plastic to tap this this pan. I personally would not use a punch or screwdriver, Etc.
(Helpful Hint) Another Note that popped in my head that people might be reading "oil pan". Please make sure to carry quick & normal JB Weld with you. Its the insurance that can save your XXXX in a bind and it only is a few bucks. Im sure most people have read some of my stories about situations that I have been involved with or have helped with on the topic of broken oil pans and JB Weld. Please take my advice, throw some in your top case or bags.
Use a torque wrench on all those bolts when you re install it. You DO NOT want to strip out a bolt in that engine case ! This will be inch pounds.
View attachment 90349
Attachments
-
 93.7 KB Views: 51
 -
 72.8 KB Views: 51
 -
 139.4 KB Views: 49
~TABASCO~
RIDE ON ADV is what I do !
Founding Member
2011 Site Supporter
2012 Site Supporter
2013 Site Supporter
2014 Site Supporter
Vendor
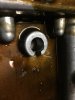
Don’t forget to also eye-ball the oil pick up screen inside. Other than the screen and motor oil it should be 100% clean. Just check while the pan is off. I have found secret surprises before that are not the good kind.Than you so much for your help. All of you. Tabasco, you were right. There was a recessed screw hidden in the middle of the pan. Thank you. i think this was previously repaired with a helicoil (first pic). That is what came out of the pan. Cleaned the pan. Tomorrow i will start the Helicoil process. Thanks again everyone.
Fennellg
Well-Known Member
With the pan off. I think you could try your hand at oil drain plug repair kit. There are some on Amazon for about $30 With decent reviews. Not wild about using with the the pan attached. Metal shavings and all. I believe a repair kit with an oversized drain plug would be a better repair than the coil. And if things it does not go your way you can always replace the pan.
I'm thinking the S10 drain plug is 12mm and if so a stripped 12mm hole is just about the perfect size to tap out to 1/2 inch. I've probably fixed a couple of dozen atv stripped drain holes this way. Get a 1/2 x 20 tap, coat it in grease to hold the shavings and tap the new threads by going in one turn, back it out a quarter of turn to cut the shavings off and go again. Get a standard 1.2x20 auto drain plug.
Fennellg
Well-Known Member
Senor Ramon
Member
Ah, the famous Scotty Kilmer vids! I watched many of his clips. Good stuff.
Fennellg
Well-Known Member
Well you seemed interested in fixing it right for as little as possible. This is the route I would go. With some care and luck you pass go. ") .
.
.SkunkWorks
Well-Known Member
I've owned my FJ1200 for a long time. When I bought it in Arizona some years ago, the very first oil-change I did I noticed it had a "single-oversize" drain plug in the Pan.
I rode it like that for years and years, and performed many oil changes during that time, until one day a couple years ago after getting home from a 6,000+ mile "Tour" the drain-plug nearly just spun out with my fingers.................................."That can't be good"
Hole in the Pan was stripped out.
I originally thought I would try a "Double-Oversize" plug to keep from having to pull the Pan, but I could not get it to even start to thread in the hole.
OK..................I gave in. Dropped the exhaust, pulled the level-sensor and the oil-cooler lines. The Pan comes off pretty easy.
I got a spare Pan from another FJ owner, but that also had damaged threads in the drain-plug hole.
I decided to give that one back, and just fix mine.
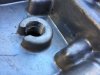
While I had the Pan off, decided to inspect the oil-pump pickup screen.
Looks clean from the outside..................................
After prying it off, I'm glad I did! What you can't see from the outside, was all the junk that was trapped up in there.........................
You can't really clean it out without ruining it, as the screen is tack-welded to the cap.
What I found in there was years and years and 150,000 miles of "Debris".
Mostly shavings of RTV-silicone and little plastic bits, which I'm convinced are most likely from the cam-chain guides. Also a few little aluminum bits of ruined threads.

Bought a new screen to put back on there.
I rode it like that for years and years, and performed many oil changes during that time, until one day a couple years ago after getting home from a 6,000+ mile "Tour" the drain-plug nearly just spun out with my fingers.................................."That can't be good"
Hole in the Pan was stripped out.
I originally thought I would try a "Double-Oversize" plug to keep from having to pull the Pan, but I could not get it to even start to thread in the hole.
OK..................I gave in. Dropped the exhaust, pulled the level-sensor and the oil-cooler lines. The Pan comes off pretty easy.
I got a spare Pan from another FJ owner, but that also had damaged threads in the drain-plug hole.
I decided to give that one back, and just fix mine.
While I had the Pan off, decided to inspect the oil-pump pickup screen.
Looks clean from the outside..................................
After prying it off, I'm glad I did! What you can't see from the outside, was all the junk that was trapped up in there.........................
You can't really clean it out without ruining it, as the screen is tack-welded to the cap.
What I found in there was years and years and 150,000 miles of "Debris".
Mostly shavings of RTV-silicone and little plastic bits, which I'm convinced are most likely from the cam-chain guides. Also a few little aluminum bits of ruined threads.
Bought a new screen to put back on there.
SkunkWorks
Well-Known Member
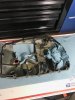
Instead of using a Helicoil or other thread-insert type of fix, due to the design of the aluminum "Boss" surrounding the drain-plug hole, I decided to just drill it out and tap it for a 16mm drain plug.
There is plenty of material around the hole to go bigger.
Used a 9/16" drill bit to drill out the hole.
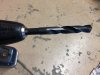
16mm Tap cut the aluminum like Butter!
The Pan offered very little resistance.
This cast-aluminum is very soft material!
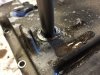
Afterwards I spent a good amount of time cleaning the pan and making sure there was absolutely nothing in the oil passages.
Did the same on the engine-side.
New 16mm hole with new threads.
You can see how the threaded-boss is "notched" to allow the oil to drain completely out of the pan. A thread-insert would have blocked this drain channel.

Pan reinstalled with new 16mm drain-plug.

Fresh oil and filter, reassemble the exhaust, and back to riding!
There is plenty of material around the hole to go bigger.
Used a 9/16" drill bit to drill out the hole.
16mm Tap cut the aluminum like Butter!
The Pan offered very little resistance.
This cast-aluminum is very soft material!
Afterwards I spent a good amount of time cleaning the pan and making sure there was absolutely nothing in the oil passages.
Did the same on the engine-side.
New 16mm hole with new threads.
You can see how the threaded-boss is "notched" to allow the oil to drain completely out of the pan. A thread-insert would have blocked this drain channel.
Pan reinstalled with new 16mm drain-plug.
Fresh oil and filter, reassemble the exhaust, and back to riding!
Nice skills!Instead of using a Helicoil or other thread-insert type of fix, due to the design of the aluminum "Boss" surrounding the drain-plug hole, I decided to just drill it out and tap it for a 16mm drain plug.
There is plenty of material around the hole to go bigger.
Used a 9/16" drill bit to drill out the hole.
View attachment 90367
16mm Tap cut the aluminum like Butter!
The Pan offered very little resistance.
This cast-aluminum is very soft material!
View attachment 90368
View attachment 90369
Afterwards I spent a good amount of time cleaning the pan and making sure there was absolutely nothing in the oil passages.
View attachment 90370
View attachment 90371
Did the same on the engine-side.
View attachment 90372
New 16mm hole with new threads.
You can see how the threaded-boss is "notched" to allow the oil to drain completely out of the pan. A thread-insert would have blocked this drain channel.
View attachment 90373
View attachment 90374
Pan reinstalled with new 16mm drain-plug.
View attachment 90375
View attachment 90376
Fresh oil and filter, reassemble the exhaust, and back to riding!
1/2 x20....not1 .2x20I'm thinking the S10 drain plug is 12mm and if so a stripped 12mm hole is just about the perfect size to tap out to 1/2 inch. I've probably fixed a couple of dozen atv stripped drain holes this way. Get a 1/2 x 20 tap, coat it in grease to hold the shavings and tap the new threads by going in one turn, back it out a quarter of turn to cut the shavings off and go again. Get a standard 1.2x20 auto drain plug.
Senor Ramon
Member
Mission accomplished. Finished it yesterday afternoon. Added fresh oil and a new oil filter. Started her up. Ran her for 10 minutes to check for leaks, then took her for a test ride. No Leaks. Let her sit overnight. Checked her again, no leaks!
Thanks again to all of you. You all make this forum awesome!
Thanks again to all of you. You all make this forum awesome!
Mission accomplished. . . .

What did you do to repair it?Mission accomplished. Finished it yesterday afternoon. Added fresh oil and a new oil filter. Started her up. Ran her for 10 minutes to check for leaks, then took her for a test ride. No Leaks. Let her sit overnight. Checked her again, no leaks!
Thanks again to all of you. You all make this forum awesome!