Installing QuadLock with wireless charging

stuartro

New Member
Joined
Jul 19, 2023
Messages
29
Location
Moncton, New Brunswick, Canada
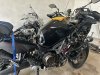
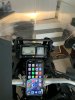
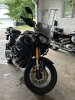
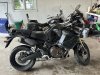
Does anyone have experience installing a QuadLock phone mount on a Tenere? The mount itself is easy but mine has a wireless charging head that I need to wire to the battery. Ideally the wiring will be cable-tied to the frame and hidden. On my old bike I removed the seats and fuel tank, attached to the battery, and ran the wiring along the frame. I see the Super Tenere 1200 has the battery inside the right faring and not under the seat.

Any thoughts on how best to run the wiring? I plan to attach the mount to the centre of the handlebar.
 

TenereGUY

Well-Known Member
Joined
Jan 19, 2023
Messages
1,011
Location
Illinois
I have mine mounted to the cross bar to the right side. Got everything from Quad-lock. Including their on/off/auto switch. Where it turns the unit off an hr after it goes below 13.1 volts. Ran the wiring down the right side then to the right side relay panel following the installed wiring. Look through or search my thread... https://yamahasupertenere.com/index.php?threads/what-tenereguy-has-been-up-too.33208/
It will be in there with pics.
 

RCinNC

Well-Known Member
Joined
Aug 30, 2014
Messages
2,886
Location
North Carolina
For any accessories I have installed in the front fairing or on the handlebars, I like to install a disconnect in the circuit that's close to the accessory. I usually use those two pin connectors (they're sometimes called trailer connectors) you find in auto parts stores. That way, if the accessory fails, it's a lot easier to replace it.
 

WJBertrand

Ventura Highway
Joined
Jun 20, 2015
Messages
4,541
Location
Ventura, CA
I have a quadlock wireless charging mount with the vibration damper on my bike. I mounted it to the left handlebar since the farkle bar was already occupied by my GPS and radar detector.

I have a power distribution block connected to the battery to which I wired a USB adapter. I located the adapter USB socket under the seat and ran the USB cable that came with the quadlock under the tank and plugged it into the adapter there. Works fine.


Sent from my iPhone using Tapatalk Pro
 

stuartro

New Member
Joined
Jul 19, 2023
Messages
29
Location
Moncton, New Brunswick, Canada
@WJBertrand, a few (perhaps dumb) questions:
  1. What is the farkle bar?
  2. How did you get the wiring under the seat? Did you have to remove the fuel tank? And if so, how?
I’m thinking to mount mine in between the forks on the handlebar but am open to better suggestions.
 

TenereGUY

Well-Known Member
Joined
Jan 19, 2023
Messages
1,011
Location
Illinois
1691544432379974390357189520291.jpg
That's the bar. You lift the tank like you're going to check the air filter. Peruse my thread. It will show you a lot and answer a lot of questions.
 

stuartro

New Member
Joined
Jul 19, 2023
Messages
29
Location
Moncton, New Brunswick, Canada
@TenereGUY, this thread? If so, I see you mention holding the tank up with a bungee cord. How do I actually get the tank off / loose in the first place? On my Boulevard it was easy… I took the seats off and loosed two bolts.

To mount on the farkle bar, did you use the regular handlebar from QuadLock or do I need a different attachment? The one I have has different sized plastic spacer rings to fit different width handlebars, but the farkle bar looks pretty thin
 

RCinNC

Well-Known Member
Joined
Aug 30, 2014
Messages
2,886
Location
North Carolina
If you mount stuff to the accessory rail (referred to as the farkle bar), it helps to have some support added to the windshield mount. Otherwise, the windshield mount and accessory rail can really vibrate when you're riding, especially if the item you have mounted is kind of heavy. I had a Droid Turbo mounted to my bars before I installed the windshield supports, and it vibrated so much that it was tough to read it. I bought the supports from a member on here named Propsoto.

These are what the supports look like:


With those in place, I don't have any problems mounting a Garmin Zumo XT on the accessory rail:


Lifting the tank is the easiest way to run wires. You don't have to remove it; it's on a hinge. There are four bolts, two on each side, near the lower front sides of the tank. If you look down between the side cowlings and the lower front sides of the tank, you'll see them. Once you remove them, you can pull the tank up on its hinge. This is how it looks when the tank is lifted:


stuartro

New Member
Joined
Jul 19, 2023
Messages
29
Location
Moncton, New Brunswick, Canada
Thanks @RCinNC. Super helpful. Amazing to see just how much “stuff” / engineering is packed into the bike. I’m gonna try my QuadLock on the accessory bar and see how I fare. My phone + QuadLock mount / wireless charger isn’t too heavy, I think. If it vibrates too badly then I’ll see about getting those supports.
 

WJBertrand

Ventura Highway
Joined
Jun 20, 2015
Messages
4,541
Location
Ventura, CA
@WJBertrand, a few (perhaps dumb) questions:
  1. What is the farkle bar?
  2. How did you get the wiring under the seat? Did you have to remove the fuel tank? And if so, how?
I’m thinking to mount mine in between the forks on the handlebar but am open to better suggestions.
Some call it a navigation bar, the 1/2” bar that’s horizontal above the instrument cluster.

The USB adapter had leads long enough to reach from under the seat to the distribution box I mounted forward of the battery.

You can just lift the front of the tank to route wires.


Sent from my iPhone using Tapatalk Pro
 

TenereGUY

Well-Known Member
Joined
Jan 19, 2023
Messages
1,011
Location
Illinois
@TenereGUY, this thread? If so, I see you mention holding the tank up with a bungee cord. How do I actually get the tank off / loose in the first place? On my Boulevard it was easy… I took the seats off and loosed two bolts.

To mount on the farkle bar, did you use the regular handlebar from QuadLock or do I need a different attachment? The one I have has different sized plastic spacer rings to fit different width handlebars, but the farkle bar looks pretty thin
Yes, that's the thread. I documented taking this bike almost apart as far as most people will ever have to do and back together.
Take the two side panels off. Then there are two bolts. One on each side up front. They are a button head bolt with an Allen drive. Remove them. Then loosen the pivot bolt at the rear of the tank. I would suggest that you take one of the front bolts to a good hardware store and replace them with a stainless hex head bolt. That way you don't have to totally remove the left panel if you have crash bars on it that makes panel removal a pain on the left.
 

TenereGUY

Well-Known Member
Joined
Jan 19, 2023
Messages
1,011
Location
Illinois
Post 97 shows the hoses you need to remove from a holder bracket before lifting the tank. Post 108 shows the front side bolts that I changed to hex head
 

stuartro

New Member
Joined
Jul 19, 2023
Messages
29
Location
Moncton, New Brunswick, Canada
Yes, that's the thread. I documented taking this bike almost apart as far as most people will ever have to do and back together.
Take the two side panels off. Then there are two bolts. One on each side up front. They are a button head bolt with an Allen drive. Remove them. Then loosen the pivot bolt at the rear of the tank. I would suggest that you take one of the front bolts to a good hardware store and replace them with a stainless hex head bolt. That way you don't have to totally remove the left panel if you have crash bars on it that makes panel removal a pain on the left.
Yeah, I have crash bars installed (see obligatory “brag” photo below … yeah, I’m proud of her). Good suggestion.
 

Attachments

TenereGUY

Well-Known Member
Joined
Jan 19, 2023
Messages
1,011
Location
Illinois
And, yeah, one headlight bulb needs replacing
Someone's on here said to use Oxilam LEDS instead stock bulbs. I looked on Ebay and sure enough $18 for a set. Put them in and they are waaaay brighter than stock. So far they have gone from Northern Illinois to Prudhoe Bay, Alaska and down the west coast from Vancouver then inland from Crescent City CA to Redding, CA and they haven't failed yet. Well worth the 18 dollars.
 
Top