What you did to your Tenere today??!!

SJC

Member
Joined
Feb 7, 2019
Messages
90
Location
Kitchener, Ontario, Canada
Ya, me too. I rode my new '18 Tenere home from London, Ontario on Tuesday (3 C) and aside from a short ride yesterday afternoon I've been in the garage busy adding some farkles.
Three LED lights, as the OEM lights are shit. I removed the plastic panniers and hid them in the basement.
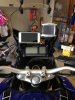
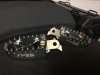
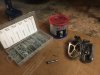
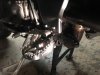
Added an extra 12 volt socket outlet on the handlebars to power an air pump, tubeless tyres ya know. Buy yourself a pump Walmart $20. along with a tubeless tyre repair kit and install a socket outlet capable of powering the pump. The bike's OEM aux plug is fused at 2 or 3 AMPS only, insufficient to power an air pump.
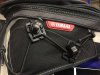
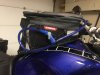
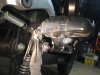
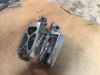
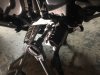
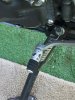
Also too, I put my SW MOTECH crash bars on.
Note: you can remove and install the RH panel that covers the electrical and fuse areas, but the LH side is different.
You must remove the crash bar on the left side to remove the left panel. FYI. I speak from experience.
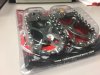
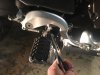
Got a set of soft waterproof saddlebags from Amazon today.
Haven't figured out if they will fit onto the Tenere.
So, congratulations on your new S-10. I'm looking forward to another great season of riding.
Ah shit, looked outside and it is snowing.
SHUMBA


Sent from my SM-T380 using Tapatalk
Snowing here too.
I have tubeless tire repair kit.
Battery tender direct connection will power my air pump and/or heated vest.
My new Garmin GPS is also wired directly to the battery.
My only use for the auxiliary plug will be to power my phone.
 

SHUMBA

Well-Known Member
Joined
Dec 29, 2018
Messages
1,242
Location
ONTARIO, CANADA
Snowing here too.
I have tubeless tire repair kit.
Battery tender direct connection will power my air pump and/or heated vest.
My new Garmin GPS is also wired directly to the battery.
My only use for the auxiliary plug will be to power my phone.
Hmmmm, any plug or auxiliary outlet must be fused.
SHUMBA

Sent from my SM-A520W using Tapatalk
 

RobinHartley

New Member
Joined
Mar 17, 2019
Messages
19
A couple more additions to the S10 today.

Received my Wind-Deflectors from "Slipscreens"

View attachment 53961

Installation was super-easy, using the longer screws that were provided with the Wind-Screen Braces.

View attachment 53962

View attachment 53963

Since it snowed here this afternoon, I'll have to wait till it warms up to try them out.

I'll be curious as to how they affect airflow...............Paired with a cheap $39.00 "knock-off" Wind-Screen extension that I ordered off Ebay. (it looks like an MRA Xcreen deflector, but it's a Chinese copy)
This is the kind that clamps to the top edge of any Wind-Screen.
I installed it a few weeks ago, and it reduced the buffeting I was getting by about 75%.

View attachment 53964

View attachment 53965
nice, I was really pleased these were fitted to the bike I bought already. I'd resent paying full whack for them new, as most touring bikes already have this part of the fairing covered
 

richarddacat

Well-Known Member
Joined
Jan 27, 2015
Messages
574
Location
Tennessee
Installed my HeliRiser today , Test rode and give it a 2 thumbs up. Nice improvement. On a side note , when removing the existing cap , only found one bolt tight out of the four. Need to spend some time with the bike and go over every nut and bolt on it !
I found the two handlebar cap-clamps were installed backwards and snug not tight on my new bike. I also found the front axel pinch bolts snug, not tight as well as the headlight assy, fender and windshield. I would just about say that everything the dealer had to install out of the crate was not torqued. Oh and the tires were set at 25psi.

I noticed this after I trailered it home and happen to notice the dimples on the handlebar clamps were to the rear, I then started looking closer.
I let the dealership know but it didn't seem to be a big deal to them.
Can't trust anyone it seems these days.

A guy on ADVrider went to change his oil after the dealers first service and found his drain bolts were stripped. :mad:
 

Traveler

Active Member
Joined
Jan 19, 2019
Messages
110
Performed the seat mod , simply cut down the rear bumpers on my bandsaw and re-installed. Seat now sits flat and level.
 

SkunkWorks

Well-Known Member
Joined
Sep 13, 2018
Messages
1,791
Location
Colorado
Installed my new RAM mount for my Garmin Zumo, and clips on the Tank-Bag to hold my Camelbak Hose.

When I bought the bike, it came with a Zumo Cradle mounted to the Handlebars. The included Zumo was busted, but I have a good Zumo-550 that I use on my FJ. I figured I would just repurpose the Cradle, but mount it up on the Accessory-Bar.

I needed to buy this mount. It was just under $20.
IMG_4003.JPG

IMG_4004.JPG

I ended up trying it in a couple different locations, but this is what I settled on.
I moved my iphone mount to the left side.
IMG_4005.JPG

Here's my forward view now with everything mounted and wired-up.
The Garmin powers on and off with the ignition.
IMG_4006.JPG

After that, I removed the two clips intended for a hydration-bladder hose off of a worn-out Rapid-Transit Tank-Bag, I have been using on my FJ.
I used the side-bungees on the Super Tenere Tank-Bag to attach them.
Now I can use my 3-liter Camekbak Bladder inside the Tank-Bag. I just run the hose out of the zipper opening and clip it in place. Although, I just realized I will probably want to move them to the Bungees on the "Clutch-Side" of the Bag.

IMG_4009.JPG

IMG_4007.JPG
 

holligl

Find the road less traveled...
Joined
Nov 13, 2015
Messages
2,259
Location
IL/AZ
I just run the hose out of the zipper opening and clip it in place. Although, I just realized I will probably want to move them to the Bungees on the "Clutch-Side" of the Bag.

View attachment 54066

View attachment 54067
I use a 2.5L bladder the same way, hose out about 2:00, then just wrap it around the back of the OEM tank bag, under the carring handle, and tuck it under one of the elastic bungees. Left hand access then. One of those clips would be a little more convenient.

Sent from my SM-N950U using Tapatalk
 

SkunkWorks

Well-Known Member
Joined
Sep 13, 2018
Messages
1,791
Location
Colorado
Installed new Foot-Pegs today.

The one time I had the bike in a little bit of mud, and had to dab a foot down a time or two was enough to convince me that I needed different Pegs. The factory ones do not inspire much confidence standing on them with a muddy boot!

I received these today.......................................
The package was a little beat-up, and it was missing the Springs. I was impatient, so I just reused the OEM springs.

IMG_4014.JPG

This is the part-number that I bought.
IMG_4029.JPG

IMG_4017.JPG

Got right to work as soon as I got home from my Day-Job.

This was super easy!.................easier than I was expecting actually.
These Pegs were $65.00, and are a direct swap with no modifications necessary. (I have a 2014 bike. I'm not sure if the Gen-1 bikes are the same?)

Remove factory cotter-pin. (not sure why the OEM foot-peg on this side is missing the road-feeler?)
IMG_4018.JPG

Pull the pivot-pin free.
IMG_4019.JPG

The OEM Spring just transfers right over.
IMG_4021.JPG

Just a thin film of grease on the pivot-pin and a new cotter-pin, and New Foot-Peg!
IMG_4022.JPG

IMG_4023.JPG

The "Shifter-Side" Peg requires you to remove the Shifter pivot-bolt in order to slide the peg-pin out. Use this as an excuse to clean and grease the Shifter Pivot.
IMG_4025.JPG

Both sides done!
IMG_4026.JPG
 

Travex

Lost is my destination.
Joined
May 7, 2012
Messages
832
Location
Western New York State
Had a Zumo 350 for too long so I got a 396. Have been using an SW-Motech mount on the accessory crossbar which had an issue when installing the new model. Although the Garmin cradle fits both models, its now used horizontally rather than vertically. Before, the power connection cleared the SW backing plate, but now it ended up in the center of things. Machined-out a corresponding rectangle from the backing plate and all is good with a touch of primer and paint.

For anyone with a 396 that doesn't prefer the ball mount, the SW still works great with minor modification. It's a tight-in, rigid, low vibration mounting solution. Even better with the 396 being an ounce lighter.
 

SHUMBA

Well-Known Member
Joined
Dec 29, 2018
Messages
1,242
Location
ONTARIO, CANADA
Snowing here too.
I have tubeless tire repair kit.
Battery tender direct connection will power my air pump and/or heated vest.
My new Garmin GPS is also wired directly to the battery.
My only use for the auxiliary plug will be to power my phone.
Make sure that everything is fused

Sent from my SM-A520W using Tapatalk
 

SkunkWorks

Well-Known Member
Joined
Sep 13, 2018
Messages
1,791
Location
Colorado
Vest has an in-line fuse as do all of my electric farkles.
The new Garmin has built in protective circuitry which negates the need for a fuse.
Make sure that everything is fused

Sent from my SM-A520W using Tapatalk
Please heed this warning....................

The Garmin may have circuitry to protect itself, but if that "direct-to-battery" wire ever rubs through on any part of the chassis it will only take about a half-second to heat up enough to burn off all the insulation..................If it is laying across any other wire, it will also burn that insulation off. You will instantly have multiple power-shorts, and multiple possibilities for an electrical fire.

Put an inline fuse AT the battery......................period.
 

Tenman

Well-Known Member
Joined
Dec 7, 2013
Messages
2,112
Location
Natchez Ms USA
Installed new Foot-Pegs today.

The one time I had the bike in a little bit of mud, and had to dab a foot down a time or two was enough to convince me that I needed different Pegs. The factory ones do not inspire much confidence standing on them with a muddy boot!

I received these today.......................................
The package was a little beat-up, and it was missing the Springs. I was impatient, so I just reused the OEM springs.

View attachment 54085

This is the part-number that I bought.
View attachment 54086

View attachment 54087

Got right to work as soon as I got home from my Day-Job.

This was super easy!.................easier than I was expecting actually.
These Pegs were $65.00, and are a direct swap with no modifications necessary. (I have a 2014 bike. I'm not sure if the Gen-1 bikes are the same?)

Remove factory cotter-pin. (not sure why the OEM foot-peg on this side is missing the road-feeler?)
View attachment 54088

Pull the pivot-pin free.
View attachment 54089

The OEM Spring just transfers right over.
View attachment 54090

Just a thin film of grease on the pivot-pin and a new cotter-pin, and New Foot-Peg!
View attachment 54091

View attachment 54092

The "Shifter-Side" Peg requires you to remove the Shifter pivot-bolt in order to slide the peg-pin out. Use this as an excuse to clean and grease the Shifter Pivot.
View attachment 54093

Both sides done!
View attachment 54094
Nice farkles you got there. If you are itching for something else. Woodcraft folding tip $22. I bent my lever twice before I scored one.IMG_4753.JPGIMG_4753.JPG
 

holligl

Find the road less traveled...
Joined
Nov 13, 2015
Messages
2,259
Location
IL/AZ
yes. Some riders use a tapered screw that fits flush. I did mine with a left over bolt laying around
Skunkworks, you get to AZ, I can show you the mod. It saved my shifter on Montana Mountain. Thought it was damaged but the hinge was just jammed full of grit.

Sent from my SM-N950U using Tapatalk
 
Top