Update:!
I finally got around to changing out the Valves and putting the cylinder head back on. I'm doing the valve clearance checks and have some questions.
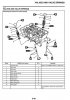
The existing valve spacers(Pads) in the bike are
^Front of Bike^
192, 194, 192, 191
205, 206, 208, 208
Measurements taken with feeler guages
0.23,0.16 0.16,0.27
0.08,0.14 0.09,0.11
But the replacement spacers from yamaha are rounded to the nearest 5. 190, 195, 200(1.9mm,1.95mm, 2.0mm) etc. I wanted to aim at the middle of the tolerance range of 0.10-0.16 for the intake and 0.22-0.28 for the exhaust but It looks like you can only get it into the range by rounding up or down to the nearest 5.
Here are what I should end up after replacing the spacers, some will stay where they are, 1 will move and some new ones. ...
Clearances as follows
0.25(190), 0.25(185), 0.23(185), 0.27(191)
0.14(200), 0.14(206), 0.12(205), 0.14(205)
1. Are these spacers only available from Yamaha?
2. Does it matter if my clearances fall into the lower of the limit VS the high end of the limit? or as long as they are within the range im good.
Thanks