labradorian70
Member
I believe im posting is the right area and not the Tech forum,....
I'm about to remove the cylinder head of my 2012 supertenere for the first time and just have a few questions.
I do have the service manual but its can be a little vague.
1. Do i need to drain the coolant? I disconnected the hose on the rear side of the cylinder head and drained what i could from the hose.
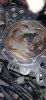
2. I unbolted the exhaust pipes from the cylinder head. but Can the cylinder head slide off without having to remove the entire exhaust system?
3. Do i need to support the motor when removing the bolts on the sides of the cylinder head attached to the frame?
4. To get at the smaller cylinder head bolts #1 and 2(see service manual) between the timing chain and the housing where the battery etc is, Im assuming this whole housing has to be removed, or will it swing out of the way enough to get at those bolts.
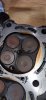
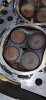
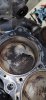
The reason I'm removing the Cylinder head is because the chain tensioner failed and the timing chain jumped and I'm certain my valves impacted the pistons. I was 4300kms into a 6000km trip(though Newfoundland and Labrador) last july when i went to start the bike and heard a clunk. and it stopped cranking. At the time I thought the starter has siezed or something... I put on a power pack to help crank and that's when the valves contacted the pistons. (not knowing the timing chain had jumped)
After removing the cylinder head cover i checked the timing and it was indeed off.
So i want to see what damage there is.
Any tips are greatly appreciated. Thanks
I'm about to remove the cylinder head of my 2012 supertenere for the first time and just have a few questions.
I do have the service manual but its can be a little vague.
1. Do i need to drain the coolant? I disconnected the hose on the rear side of the cylinder head and drained what i could from the hose.
2. I unbolted the exhaust pipes from the cylinder head. but Can the cylinder head slide off without having to remove the entire exhaust system?
3. Do i need to support the motor when removing the bolts on the sides of the cylinder head attached to the frame?
4. To get at the smaller cylinder head bolts #1 and 2(see service manual) between the timing chain and the housing where the battery etc is, Im assuming this whole housing has to be removed, or will it swing out of the way enough to get at those bolts.
The reason I'm removing the Cylinder head is because the chain tensioner failed and the timing chain jumped and I'm certain my valves impacted the pistons. I was 4300kms into a 6000km trip(though Newfoundland and Labrador) last july when i went to start the bike and heard a clunk. and it stopped cranking. At the time I thought the starter has siezed or something... I put on a power pack to help crank and that's when the valves contacted the pistons. (not knowing the timing chain had jumped)
After removing the cylinder head cover i checked the timing and it was indeed off.
So i want to see what damage there is.
Any tips are greatly appreciated. Thanks
")