Those are old Photobucket photos when it use to be free...so they are "blocked" nowWhy are the pics blurry?
ECU Removal
- Thread starter Rasher
- Start date
s.ga.rider
Well-Known Member
It wasn’t that bad and as long as you know the general location its no problem.
Welp, it was pretty easy, thought I might as well add some pics.
I took off the three or four bolts for the whole back panel, it gave me more clearance to get to the hex bolt on the wheel well side. Ended up busting one of the pins on the left side of the ecu cover plate, managed to get the other pin out though.
I took off the three or four bolts for the whole back panel, it gave me more clearance to get to the hex bolt on the wheel well side. Ended up busting one of the pins on the left side of the ecu cover plate, managed to get the other pin out though.
Your post saved me a LOT of time! This was way easier than I though it would be. Got my ECU out in :15! Thanks everybody!No need to pull all the electrical off, only the one on the far right that is blocking access to the Christmas tree fastener. Once the fasteners and the back allen bolt are taken out then the whole tray will lay back (wiring and all) allowing access to the ECU.
Basilton
New Member
- Joined
- Nov 18, 2020
- Messages
- 19
This was super helpful thank you!I just followed Carsons simple instructions:-
http://www.yamahasupertenere.com/index.php?topic=7356.0
And took a few pictures as I went, as he implied it was so easy I decided to have a look and to blast some compressed ACF-50 around all the connectors whilst I was at it. As stated it is quite easy, maybe half an hour, probably less if your good at this sort of thing, took me about an hour to remove, oil up and put back together.
You may want to have some spare Xmas Tree fasteners in case you trash / lose any, one of them is a little awkward to reach and looked about secondhand after I had set about it.
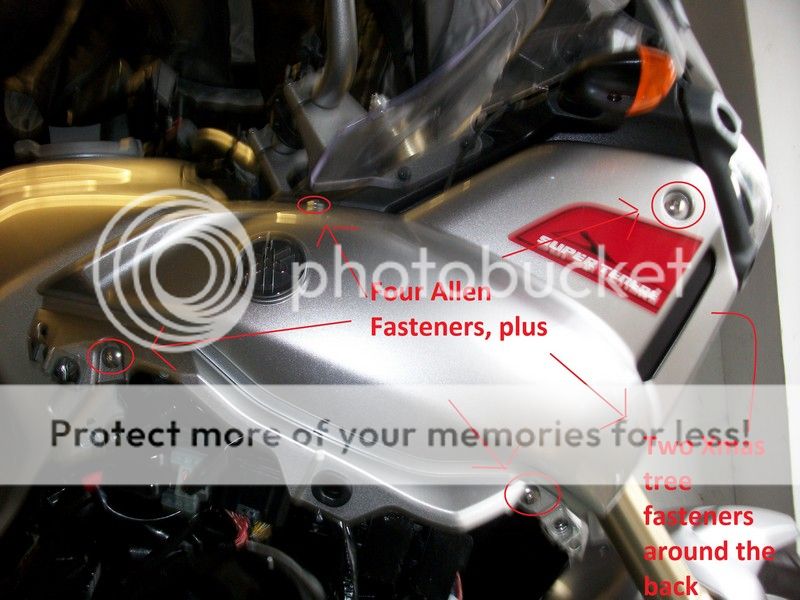
1. Remove side cover
2. Remove RHS Fairing, this is quite easy, four allen bolts which are easy to spot, but there are twon Xmas tree fasteners around the back where the "air intake" sits, these are really easy to pop out.
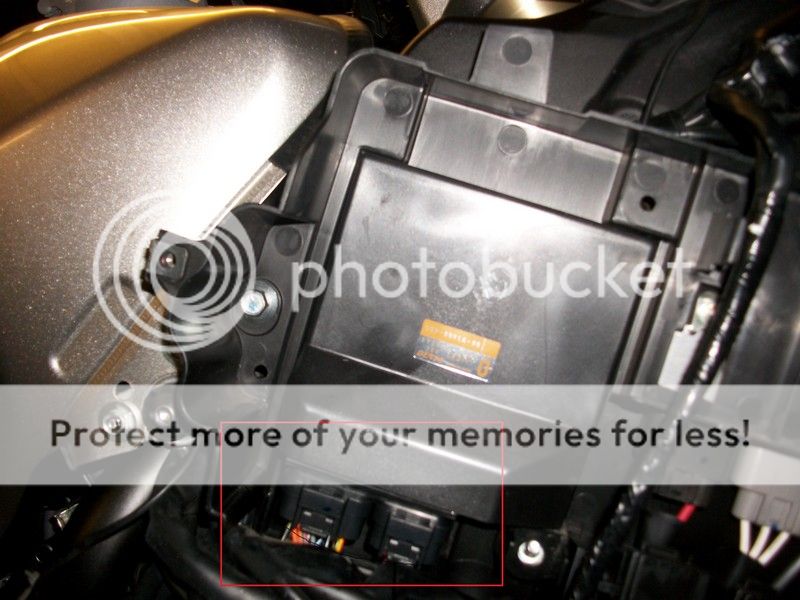
3. Pull off all the top electrical gubbins, most pull straight out, but one of the blocks needs sliding up, easy to identify as it is the one that does not easily pull off.
4. Remove the two Xmas Tree fasteners, the top right one is easy, the bottom left one is protected by surrounding plastic and took me a bit longer to ease out, if you make a mess of any of them this will most likely be it.

5. Remove Allen bolt, from the front you can see where this screws into a metal clip, but to undo it you need to go around the other side, it is not too bad, I got it out with a ball end allen key quite easily, it was more difficult to get a clean photo of it however!
6. Now you can remove the tray to expose the ECU and two connectors
Most the electrics are downward facing which is nice, a couple look a bit more at threat of water in particular the accessory power lead, I put a load of ACF-50 Corrosion block grease around this, the rest looked pretty good so they just got a top up of ACF-50 mist - I do this regularly anyway as it only takes 10 seconds to pop off the side cover when applying ACF t the rest of the bike.
The ECU connectors are well burried away, but glad I took the trouble to get in here and spray some ACF around as it is nice to know they are not going to corrode for sure, I would probably do this every 2 years during a winter deep clean to make sure they stay in tip top order, but they really are well tucked up and protected from the elements - just as well at £1600 ($2500) a piece!
Kenny O
New Member
What is ACF, I was thinking dialectic grease or something? The clips holding the ECU on where a real pain in the rear end! But it's done and will be sent off to AC shortly, can't wait to see the difference you can it!This was super helpful thank you!

Sent from my Redmi Note 7 using Tapatalk
mrauenzahn
New Member
Thanks for this write up. Worked perfectly!I just followed Carsons simple instructions:-
http://www.yamahasupertenere.com/index.php?topic=7356.0
And took a few pictures as I went, as he implied it was so easy I decided to have a look and to blast some compressed ACF-50 around all the connectors whilst I was at it. As stated it is quite easy, maybe half an hour, probably less if your good at this sort of thing, took me about an hour to remove, oil up and put back together.
You may want to have some spare Xmas Tree fasteners in case you trash / lose any, one of them is a little awkward to reach and looked about secondhand after I had set about it.
1. Remove side cover
2. Remove RHS Fairing, this is quite easy, four allen bolts which are easy to spot, but there are twon Xmas tree fasteners around the back where the "air intake" sits, these are really easy to pop out.
3. Pull off all the top electrical gubbins, most pull straight out, but one of the blocks needs sliding up, easy to identify as it is the one that does not easily pull off.
4. Remove the two Xmas Tree fasteners, the top right one is easy, the bottom left one is protected by surrounding plastic and took me a bit longer to ease out, if you make a mess of any of them this will most likely be it.
5. Remove Allen bolt, from the front you can see where this screws into a metal clip, but to undo it you need to go around the other side, it is not too bad, I got it out with a ball end allen key quite easily, it was more difficult to get a clean photo of it however!
6. Now you can remove the tray to expose the ECU and two connectors
Most the electrics are downward facing which is nice, a couple look a bit more at threat of water in particular the accessory power lead, I put a load of ACF-50 Corrosion block grease around this, the rest looked pretty good so they just got a top up of ACF-50 mist - I do this regularly anyway as it only takes 10 seconds to pop off the side cover when applying ACF t the rest of the bike.
The ECU connectors are well burried away, but glad I took the trouble to get in here and spray some ACF around as it is nice to know they are not going to corrode for sure, I would probably do this every 2 years during a winter deep clean to make sure they stay in tip top order, but they really are well tucked up and protected from the elements - just as well at £1600 ($2500) a piece!
EternalGarage
Member
Another quick note about that hard-to-access allen head on the back side. You can more easily access from the top! Turn the handlebars full-lock to the left and there's more room to see and work. And those Xmas fasteners are simple to deal with. Push the tiny button in the middle with an awl, punch, paperclip, etc. and they pop off. To put them back in, push the pin back up with your fingers and they snap back in.
EternalGarage
Member
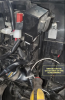
Before I have to go crawling to a dealer or deciphering an exploded parts view, after I reinstalled the flashed ECU (which is GREAT, BTW), I had - embarrassingly - one bolt left. While this has happened a few times over the years, I've always found a place for "extra" parts. But this time, I searched a dozen times for that one unaccompanied threaded hole and found nothing, even taking it apart again. The good news is, nothing at all seems to be wiggly, and it's a unique bolt: black 12mm (see pic). If it wasn't relatively substantial, I'd frankly write it off since things are very solidly attached. But it's too big to ignore. Anyone know where this damn thing goes?!
Attachments
-
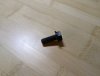 149.8 KB Views: 14
EternalGarage
Member
I'll check it again today, but I think that one I got. In that pic - if I'm looking at the right one, to the upper-left - also looks to be silver. I didn't have any silver ones left ") . The one I have is the only one like it in all the fasteners I took off.
. The one I have is the only one like it in all the fasteners I took off.
. The one I have is the only one like it in all the fasteners I took off.EternalGarage
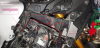
Member
Everything in this layer - just underneath the bodywork - is fastened. No empty holes here except for the bodywork. Any guesses/suggestions for the next layer before I pull stuff apart again?I'll check it again today, but I think that one I got. In that pic - if I'm looking at the right one, to the upper-left - also looks to be silver. I didn't have any silver ones left
Attachments
-
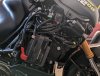 178.2 KB Views: 7
EternalGarage
Member
Good suggestion. This time...I actually also changed out the battery, so that was buttoned down.