What you did to your Tenere today??!!

Cycledude

Well-Known Member
Joined
Jan 29, 2016
Messages
4,034
Location
Rib lake wi
Ok, not quite in one day...more like a week or so.

I sanded down perfectly good 2012 paint because I like yellow....

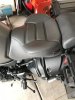
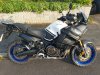
I did the Velocity Yellow (2005 Corvette) in base-clear. Created my own "World Crosser" style stickers and had them cut in vinyl by a local shop. I have attached the full size pdf file if anyone wants to have them. I didn't want to step on any Anniversary Edition guys' toes, so I painted the front fender and made the graphics in Gen 1 fashion.

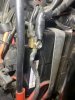
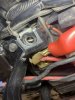
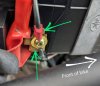
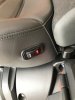
Something to note. The lower edges of the tank were rusted under the rubber edging. Seems to be a common thing. I sanded out the rust as best as I could, painting in some etching primer before repaint. Before installing the rubber edging, I drilled a series of small holes along the bottom of edging. I coated the tank flange with Vaseline before installing the edging.

View attachment 104408View attachment 104409View attachment 104410View attachment 104412
Definitely looks better than the anniversary 2016, I always thought Yamaha screwed up by not painting the front fender yellow.
I believe Yamaha could have sold waaaay more Super Tenere’s if they would have invested a little more money in paint.
 

Sierra1

Well-Known Member
Joined
Nov 7, 2016
Messages
15,029
Location
Joshua TX
. . . . I always thought Yamaha screwed up by not painting the front fender yellow. . . .
King Kenny's race bike had the black fender. My kid's R6 60th Anniversary also has the black fender; gloss. A agree that their paint jobs have gone downhill. They've always been top notch. But I assume that it was the easiest way to keep the price down. Paint jobs are expensive.
 
Last edited:

holligl

Find the road less traveled...
Joined
Nov 13, 2015
Messages
2,255
Location
IL/AZ
I haven't tested my bars out yet. How did they do? (I have the same ones)
Mine are well tested and have done the job over the years. Slow/no speed drops. Scratches on the bars are worse if I have to drag it around to get the tires pointed downhill. I would prefer better radiator coverage for some protruding rock, but don't want to pay for the upgrade.
 

Muybig

Active Member
Joined
Aug 16, 2021
Messages
233
Location
Montreal
Last Saturday I installed a NOCO NLP14 lithium battery. My 2016 OE Yuasa finally signed off. Topped the NOCO off out the box and flattened the positive terminal wire connector to get a good fit on the new battery's fancy post. Used one included 17mm spacer and installation was good to go. Performance-wise, nothing negative to report so far. Cranks fast and I shaved off 5+ lbs; and any bit helps with this heavy a** armored personnel carrier. Lol!

View attachment 104067

View attachment 104068
Plenty o' spacers included.

View attachment 104069
I suppose as batteries go, it looks good! I really like the terminal connection options.

View attachment 104074
Took about 15 minutes to top it off out the box.

View attachment 104070
Vs. the 2.58 lbs weight of the NOCO NLP14.

View attachment 104071
Positive wire connector flattened out.

View attachment 104072
View attachment 104073
Compact and light. Now I feel like I have to lighten up the other side and to the rear. Maybe an Akrapovic slip-on will be a nice weight loss companion for the NOCO battery :D
Streethawk - I'm seriously looking at this battery can you elaborate on what you meant by flattening the connectors ?
 

BWC

Active Member
2011 Site Supporter
2012 Site Supporter
2013 Site Supporter
2014 Site Supporter
Joined
Jul 31, 2011
Messages
490
Location
Canada
Also running the noco nlp14 for two years now without issue. I did find a way to mount to the noco terminal posts without
modifying the stock connectors by mounting to the side of the battery post for the positive connection as noco allows the posts to be reconfigured if needed.
IMG_5369.jpegIMG_5369.jpeg
 

Attachments

Streethawk

Well-Known Member
Joined
Aug 26, 2020
Messages
251
Location
San Antonio, Texas, United States
Streethawk - I'm seriously looking at this battery can you elaborate on what you meant by flattening the connectors ?
Muybig, I took the left and right "fins" of the positive wire connector and straightened them upwards to look more like wings. I used vise grip pliers and regular pliers to carefully bend the fins upward. I hope the marking on the attached photo helps. If not, just let me know.

Initially I attempted to basically just twist the wire around and lay it "upside down" on the battery terminal; so no modification would be needed, but it seemed to stress the wire a bit and I didn't want to risk cross threading the screw, with that resistance (from the twisting wire). I figured if the connector needs to go back to the OE shape, it can be reshaped or a new connector purchased and crimped on. I probably over thought it (lol!) but I definitely did not strip a screw or threads on the terminals post (!) :p

So far the battery has been great. Holding up and performing well in 50+ straight days triple digit heat in Texas!

PXL_20230722_173051299~2.jpg
 

Muybig

Active Member
Joined
Aug 16, 2021
Messages
233
Location
Montreal
Muybig, I took the left and right "fins" of the positive wire connector and straightened them upwards to look more like wings. I used vise grip pliers and regular pliers to carefully bend the fins upward. I hope the marking on the attached photo helps. If not, just let me know.

Initially I attempted to basically just twist the wire around and lay it "upside down" on the battery terminal; so no modification would be needed, but it seemed to stress the wire a bit and I didn't want to risk cross threading the screw, with that resistance (from the twisting wire). I figured if the connector needs to go back to the OE shape, it can be reshaped or a new connector purchased and crimped on. I probably over thought it (lol!) but I definitely did not strip a screw or threads on the terminals post (!) :p

So far the battery has been great. Holding up and performing well in 50+ straight days triple digit heat in Texas!

View attachment 104584
Thanks
 

holligl

Find the road less traveled...
Joined
Nov 13, 2015
Messages
2,255
Location
IL/AZ
Changed the oil and replaced front wheel bearings. I've had the bearings for some time anticipating a need. With badly placed ear plugs yesterday, there was a rumble/hum at 60 mph I had not noticed before. Figured it was either tires or the bearings. Spinning the wheel with calipers removed there was a slight noise, but they were still smooth. At 91.5K miles, I figured it was time. With new bearings installed, it was totally quiet. I have not road tested yet.

I did notice the manual calls out removing the sensor ring, probably to prevent any damage. I left it in place and took care to avoid damage. It was a little tricky to seat the second bearing while centering the spacer. I used the axle.
 
Last edited:

PhilCEE

Member
Joined
Dec 28, 2022
Messages
17
Location
Glastonbury
Added a Baglux Tank Cover. Had one on my old Blackbird and the tank was still immaculate after 65k miles and 25 years. I'm currently using the original bag, which unsurprisingly doesn't sit right but will be investing in something a bit more vertical when funds allow.
 

Attachments

POG

Member
Joined
Aug 17, 2021
Messages
53
Location
Southern Maine, USA
Added Helibar risers to the S10. For this 5'10" rider, the controls are now served up to me in a much more comfortable way. No more shaking my hand out to get blood into my pressed palm. Felt really nice and the install was easy. I have a gen2 ES bike and some of the instructions didn't apply for my bike. I love when an already comftable ride become even more comfortable and accommodating to the rider.

After and before shots.


Sent from my SM-S918U using Tapatalk
 
Top