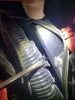
I told them if they fixed a few problems and changed fluids that I would pay them asking price of $6,000. They said... deal give us two weeks and we will have it done. It was repossessed and no keys. Had a switch to turn on to bypass the ignition switch and then bike fired up by pushingthe start button. They are putting in a new ignition and two keys come with it. As the sales guy and I were walking up to it to put the sold sign on it another guy was really checking it out. Sorry, just sold it to him as he pointed at me. The other guy said... oh, thought I might be taking this home today. The guy already had one but couldn't believe the price with all the accessories on it. He showed me other stuff that had been done to it too. He saw the Hypertech shock spring. I told him it is coming off as it is not sprung for my weight. Immediately he asked if I would be willing to sell it to him once I removed it. Sure!
What TenereGUY has been up too
- Thread starter TenereGUY
- Start date
Holligl is coming over on Dec 10th at 9 am to guide me through my first valve check on the ST. Just ordered plugs and a valve cover gasket. I have a heated garage and a few extra rooms if anyone wants to be involved. I'll have as much stuff pulled off as I can before he gets here.
Also will report back after I have successfully done a valve shim replacement. I put it back and I have one valve that isn't letting me get a feeler gage in. So taking it apart again. I didn't rotate the bucket so it may be binding or the shim wasn't placed just right. I had two other forum members helping me. Holling and Want2.
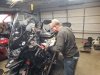
Want2 on the left. Hollig on the right
Now this wire clamp is tricky. You have to use a small screwdriver to depress Tab A. Where in the H### is tab A? Now you know. Also
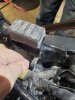
Down the same frame rail from Tab A holder is this reusable zip tie... Except it is facing down and was a real joy to try and get it loose. I rotated it 180 degrees so it will be much easier to release next time.
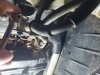
Now good thing Hollig was there because I thought this meant to remove from the starter. Nope, just remove the wire holder so you can remove the Valve cover.
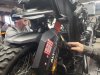
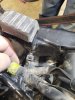
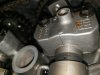
This is in front of the engine and it would have been hard to find from the Shop Manual illustration but Glen knew what it was and found it. So in front of enging in the middle above front fender.
Above pic and the next pic is showing how we have wires Zip Tied just before we removed the valve cover. Glen's guidance was very helpful in this as the valve cover was fairly easy to remove. So, I am sharing that knowledge.
Want2 on the left. Hollig on the right
Now this wire clamp is tricky. You have to use a small screwdriver to depress Tab A. Where in the H### is tab A? Now you know. Also
Down the same frame rail from Tab A holder is this reusable zip tie... Except it is facing down and was a real joy to try and get it loose. I rotated it 180 degrees so it will be much easier to release next time.
Now good thing Hollig was there because I thought this meant to remove from the starter. Nope, just remove the wire holder so you can remove the Valve cover.
This is in front of the engine and it would have been hard to find from the Shop Manual illustration but Glen knew what it was and found it. So in front of enging in the middle above front fender.
Above pic and the next pic is showing how we have wires Zip Tied just before we removed the valve cover. Glen's guidance was very helpful in this as the valve cover was fairly easy to remove. So, I am sharing that knowledge.
Last edited:
More pictures of the job.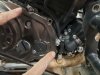
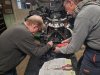
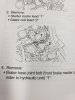
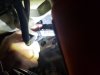
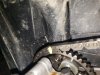
Don't forget that when you remove the clutch cover that these two bolts have clamps on them
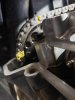
This is how you are supposed to have the Intake cam positioned prior to removing cams. See the small hole or indentation in the cam (near the gear side) and the alignment ridge on the cam cap assy? Align those two along with the required alignment inside the clutch cover.
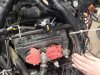
Now marking the cam chain and I have the intake gear and chain zip tied in two spots so that won't move. Used my daughters yellow nail polish after cleaning the chain and sprocket with a rag that had brake cleaner on it.
Now you can see both markings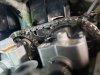
Zip tied intake cam gear. A little blurry...
Don't forget that when you remove the clutch cover that these two bolts have clamps on them
This is how you are supposed to have the Intake cam positioned prior to removing cams. See the small hole or indentation in the cam (near the gear side) and the alignment ridge on the cam cap assy? Align those two along with the required alignment inside the clutch cover.
Now marking the cam chain and I have the intake gear and chain zip tied in two spots so that won't move. Used my daughters yellow nail polish after cleaning the chain and sprocket with a rag that had brake cleaner on it.
Now you can see both markings
Zip tied intake cam gear. A little blurry...
Attachments
-
 107.6 KB Views: 15
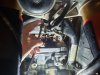
I went back in and removed the exhaust cam and pulled the bucket out with a magnet. The shim was not centered correctly. It is now and everything is within spec. Slowly going through the disassembly process in reverse. Throttle Bodies are in and now tightening down the throttle cables. We took pictures of them prior to removing them so I can count threads and get it close. will report back this evening.
PSA: a fellow member messaged me and brought up something I could have explained a bit better. Prior to removing cams there are marks on the right side of the cam gears. I and E have marks you must have aligned correctly prior to removing both cams. I zip tied the chain to the Intake so I knew it wouldn't move as I wasn't removing it. I still went through the hassle of making sure those two marks were in the correct position because I am paranoid and don't want to ruin my engine. I used a flashlight and a mirror to see them. wasn't the easiest thing to do but I figured it was easier than removing the right side electrical panel... even though I did end up removing the mounting bolts for that panel so I could get a better look at the valve cover gasket once the cover was in place. I also used a boroscope to ensure the gaskets were in place for the plug wells. You can now get a fairly in expensive camera that plugs into your phone. Replaced plugs as two had wear on them. They all looked good as far as the coloring went although one had water intrusion indications under the coil pack. I put Dielectric grease in the sealing flange so now I have a bit of grease in a ring around the sealing flange. Will see how this works when I take them out in another 30,000 miles.
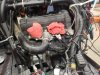
You can see the shim is off center
When loosening or tightening this line fitting below the triple clamp it would be a very good idea if you have an 8 mm flexible ratchet wrench in your toolbox.
PSA: a fellow member messaged me and brought up something I could have explained a bit better. Prior to removing cams there are marks on the right side of the cam gears. I and E have marks you must have aligned correctly prior to removing both cams. I zip tied the chain to the Intake so I knew it wouldn't move as I wasn't removing it. I still went through the hassle of making sure those two marks were in the correct position because I am paranoid and don't want to ruin my engine. I used a flashlight and a mirror to see them. wasn't the easiest thing to do but I figured it was easier than removing the right side electrical panel... even though I did end up removing the mounting bolts for that panel so I could get a better look at the valve cover gasket once the cover was in place. I also used a boroscope to ensure the gaskets were in place for the plug wells. You can now get a fairly in expensive camera that plugs into your phone. Replaced plugs as two had wear on them. They all looked good as far as the coloring went although one had water intrusion indications under the coil pack. I put Dielectric grease in the sealing flange so now I have a bit of grease in a ring around the sealing flange. Will see how this works when I take them out in another 30,000 miles.
You can see the shim is off center
When loosening or tightening this line fitting below the triple clamp it would be a very good idea if you have an 8 mm flexible ratchet wrench in your toolbox.
Last edited:
gv550
Well-Known Member
The shim often sticks to the bucket when removed, but you should be placing the shim into the recess of the valve keeper when installing it. That almost eliminates the chances of having it sit crooked.
Almost is the key word in your post! I put it on top of the stem and spring, not on the bucket. I just wasn't paying close enough attention I guess. All good now!The shim often sticks to the bucket when removed, but you should be placing the shim into the recess of the valve keeper when installing it. That almost eliminates the chances of having it sit crooked.
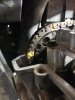
I avoided the garage today as I was missing a bolt for the crash bars and I had an extra bolt that had an 8 mm chrome head. I searched for a long time over two days. Called Want2 because he pulled that bolt out. He thought about it and called me back and told me the two places he thinks it came from... which were the same places I had been looking. I decided I needed time away from it. I said a prayer and went out late in the day and looked all around the neck again. Then I went to the other side of the bike and looked at the hose holder for the 3 brake, clutch lines (?). I looked at it and immediately knew the problem. I had put the wrong bolt in to hold that holder in place. I had put the button head bolt for the crash bars there... so I found my missing bolt and I also know where the extra bolt goes now! I was so happy! So tomorrow afternoon I may go at it a bit or wait until Monday. But I know where every bolt goes from here on out. It's always a danger when more than one person is pulling off parts and bolts. They were doing a lot of the tear down and I was busy writing clarifying notes in the FSM. The only tough part will be trying to align the front engine mount/T-Rex bash plate/AltRider bars. They all mount on the lower front engine mount bolts... and the bars are not virgin bars anymore so they will take some tweaking to align.
Oh, here is another point of interest. When I mentioned that I was putting a K&N filter in the bike... well thst stirred up a fee people and they let their opinions be known about the filters. I cleaned it after the 13,000 mile Alaska trip. So, last fall. Now a year later after Georgia dirt and gravel fire "roads" and a week in dusty UT with a lot of sand... I removed the filter and it was 50%covered with dust and sand. The clean side of the box, my TB and everything else down stream of the filter... was spotless. Yep, super clean. Even Glen commented on how clean it was. You can use a K&N or not. Just letting you know my results. Same results in the AB after Alaska. But this time doing valves I pulled it down more. I did see the top of my pistons had a coating of carbon on them. So I will use some chemtool additives to clean that out.
OK, I was wrong about finding the solution for the extra bolt. I called Want2 up and asked him to come down and give it a look as he was removing bolts on tear down day on the left side. He looked for about 2 minutes and said... Here is where it goes!
It was on the right side of the neck and went through a block that holds a hydraulic line on. It was tucked up under the front right wiring harness. He said he had a glimmer of a memory of Holligl removing something from up there. Then we found my missing crash bar bolt. It was still on the crash bar that was laying on the garage floor waiting for assembly. All other bolts were in the magnetic bowls. Happy days! Moving along the clutch cover is on and halfway torqued down. Will torque all the way once I know everything is good. gas tank hooked up. Turned the key on and didn't hear the fuel pump fire up. will look for that problem tomorrow. Two steps forward and one step back today... but progress!
It was on the right side of the neck and went through a block that holds a hydraulic line on. It was tucked up under the front right wiring harness. He said he had a glimmer of a memory of Holligl removing something from up there. Then we found my missing crash bar bolt. It was still on the crash bar that was laying on the garage floor waiting for assembly. All other bolts were in the magnetic bowls. Happy days! Moving along the clutch cover is on and halfway torqued down. Will torque all the way once I know everything is good. gas tank hooked up. Turned the key on and didn't hear the fuel pump fire up. will look for that problem tomorrow. Two steps forward and one step back today... but progress!
Ok, I tried to crank it and it didn't fire. I didn't here the fuel pump so I will connect it tomorrow as I know I forgot... but the big deal was I got a code 060. Dug into the manual and it is for the YCC-T system. Google said that was the Throttle body program. Ahhhhhh, I was confused as there were two connectors that both fit on #2 cylinder left coil pack or the TB solenoid. I had them hooked up and then switched them. Guess I need to switch them back! And I also know why no fuel pump! I got so excited about solving the bolt dilemma that I slapped the tank on, hooked up the hose... and skipped plugging in the fuel pump...
I see the light and I don't think it's a train at the end of a tunnel! Can't wait to dig in tomorrow morning.
Found this old thread from 2014 and it confirmed what I was thinking. Thank you to the members of this forum for the informationyou exchange!!!!
I see the light and I don't think it's a train at the end of a tunnel! Can't wait to dig in tomorrow morning.
Found this old thread from 2014 and it confirmed what I was thinking. Thank you to the members of this forum for the informationyou exchange!!!!
So it has been a month and a half since I was in the garage due to other priorities. Those were now completed. Took a window out and replaced it with an 8' sliding patio door and replaced a sliding door in the kitchen. Then stained them and the trim along with applying several coats of polyurethane. All good and trim installed. Took several hours to clean my garage as I just put stuff out there when done with a project. Back to the normal mess now!
Got the FSM out and found the correct drawing for the coils almost right away. Then I remembered that in the very back of the manual there is a legend for the wire colors and color abbreviations. Then I went looking for a diagram which would tell me about the plug on the Throttle Body. Turned out to be the TB servo motor plug. After looking at the wiring colors I found out that yep, I had plugged the servo motor plug into the #2 cylinder (right) right coil pack and had the coil pack plugged into the TB Servo motor. Put it back together and rotated the tank back into position and turned the key. No 060 code showing up. Cranked it and it tried to start. All the gas lines had been drained so no luck yet. My tank is flashing reserve as I wanted it as light as possible when having to remove it. Will report back after putting 2 gallons in tomorrow.
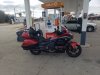
It was 34°F out today with a wind but I put some air in the tires of the Wing and rode out to a place 40 miles away to grab something to eat. Then went and got some groceries. Nice to get out in February! Rained the day b4 so no salt.
If anyone needs me to take a pick of the color description legend I can do that. Just let me know.
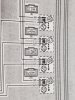
The 4 coil packs. They all have a Red/Black
Top to bottom for the other wires Orange, Gray/Red, Orange/Green, Gray/Green
Out and about today.

I always like the old tin ceilings. 1st winter beard ever. May be the last one too.

I just love their Horsey dipping sauce. Hey, I had to have a destination and I figured 40 some miles away at 34 degrees was far enough!
Got the FSM out and found the correct drawing for the coils almost right away. Then I remembered that in the very back of the manual there is a legend for the wire colors and color abbreviations. Then I went looking for a diagram which would tell me about the plug on the Throttle Body. Turned out to be the TB servo motor plug. After looking at the wiring colors I found out that yep, I had plugged the servo motor plug into the #2 cylinder (right) right coil pack and had the coil pack plugged into the TB Servo motor. Put it back together and rotated the tank back into position and turned the key. No 060 code showing up. Cranked it and it tried to start. All the gas lines had been drained so no luck yet. My tank is flashing reserve as I wanted it as light as possible when having to remove it. Will report back after putting 2 gallons in tomorrow.
It was 34°F out today with a wind but I put some air in the tires of the Wing and rode out to a place 40 miles away to grab something to eat. Then went and got some groceries. Nice to get out in February! Rained the day b4 so no salt.
If anyone needs me to take a pick of the color description legend I can do that. Just let me know.
The 4 coil packs. They all have a Red/Black
Top to bottom for the other wires Orange, Gray/Red, Orange/Green, Gray/Green
Out and about today.
I always like the old tin ceilings. 1st winter beard ever. May be the last one too.
I just love their Horsey dipping sauce. Hey, I had to have a destination and I figured 40 some miles away at 34 degrees was far enough!
Last edited:
mybackhurts
Well-Known Member
Was 86f here in the shade today. I salute you.So it has been a month and a half since I was in the garage due to other priorities. Those were now completed. Took a window out and replaced it with an 8' sliding patio door and replaced a sliding door in the kitchen. Then stained them and the trim along with applying several coats of polyurethane. All good and trim installed. Took several hours to clean my garage as I just put stuff out there when done with a project. Back to the normal mess now!
Got the FSM out and found the correct drawing for the coils almost right away. Then I remembered that in the very back of the manual there is a legend for the wire colors and color abbreviations. Then I went looking for a diagram which would tell me about the plug on the Throttle Body. Turned out to be the TB servo motor plug. After looking at the wiring colors I found out that yep, I had plugged the servo motor plug into the #2 cylinder (right) right coil pack and had the coil pack plugged into the TB Servo motor. Put it back together and rotated the tank back into position and turned the key. No 060 code showing up. Cranked it and it tried to start. All the gas lines had been drained so no luck yet. My tank is flashing reserve as I wanted it as light as possible when having to remove it. Will report back after putting 2 gallons in tomorrow.
It was 34°F out today with a wind but I put some air in the tires of the Wing and rode out to a place 40 miles away to grab something to eat. Then went and got some groceries. Nice to get out in February! Rained the day b4 so no salt.
If anyone needs me to take a pick of the color description legend I can do that. Just let me know.
View attachment 119139
The 4 coil packs. They all have a Red/Black
Top to bottom for the other wires Orange, Gray/Red, Orange/Green, Gray/Green
View attachment 119140
Out and about today.
View attachment 119141
I always like the old tin ceilings. 1st winter beard ever. May be the last one too.
View attachment 119142
I just love their Horsey dipping sauce. Hey, I had to have a destination and I figured 40 some miles away at 34 degrees was far enough!
Want2
Well-Known Member
Now that’s a pile of heart burn!!! ")
That's the beauty of AZ in the colder months. Its the +100 days down there that hurt.Was 86f here in the shade today. I salute you.
You're the one who introduced me to them. Luckily no heart burn.Now that’s a pile of heart burn!!!
I GOT IT STARTED!
Ok, took the airbox off to start looking at the plugs to see if they got wet. It wouldn't even pop when I squirted a little either down the airbox snorkels. After the airbox was off I looked at the butterflies and they seemed to be fully closed. Used the throttle to crack them a bit and in 2 turns it spluttered to life then a second later roared. Let it warm up a bit and runs well... but when I take my hand off the throttle it dies as the butterflies go fully closed. I guess I need to adjust my throttle cables. Looking in the FSM to see what the measurements should be for a gap in the butterflies. Also Looking at how to properly adjust the cables. Progress... I was Sooooo happy when it fired up and ran great as I was seriously thinking about how I messed up the timing.
Ok, took the airbox off to start looking at the plugs to see if they got wet. It wouldn't even pop when I squirted a little either down the airbox snorkels. After the airbox was off I looked at the butterflies and they seemed to be fully closed. Used the throttle to crack them a bit and in 2 turns it spluttered to life then a second later roared. Let it warm up a bit and runs well... but when I take my hand off the throttle it dies as the butterflies go fully closed. I guess I need to adjust my throttle cables. Looking in the FSM to see what the measurements should be for a gap in the butterflies. Also Looking at how to properly adjust the cables. Progress... I was Sooooo happy when it fired up and ran great as I was seriously thinking about how I messed up the timing.
Last edited:
It was running poorly and Want2 came down and looked things over. the one thing he did that I didn't do was that while idling roughly he adjusted the throttle cable adjustment up by the throttle grip and that changed the idle and he tweaked it in and it sounded good and it starts well. Now putting all my accessories power wires back on and will be completed soon. then I'll need a 2nd person while putting on the crash bars and belly pan. Making progress and that makes it