okiegtrider
Active Member
Nice job. I doubt anyone minds the photos at all. Sharing this kind of thing is what we are here for. Still sorry that harness never made it down there to you.
Awesome write up. Thanks!!View attachment 94413
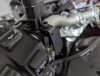
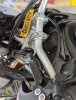
Overview.
View attachment 94414
1. PIAA harness relay (attached via Velcro)
2. PIAA harness hot/ignition wire
3. Modified reused 3 pin female connector, connecting to bike's Accessory Light connector #105
4. PIAA harness fuse
5. PIAA harness black wire to negative terminal of motorcycle's battery
6. PIAA harness white wire to positive terminal of motorcycle's battery
7. Butt connection (wrapped in tape) and connecting PIAA harness hot/ignition wire to reused female connector.
8. PIAA harness light switch wire, hot/ignition wire and lamp wires (bundled for vertical position stowage forward of toolkit bag).
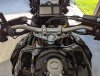
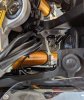
View attachment 94415
PIAA harness black and white battery terminal wires orientation (secured using battery's retaining strap).
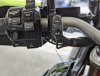
View attachment 94416
PIAA harness switch wire clamped into bike's right grip brake hose/wires bundle and then routed up to the handlebar.
View attachment 94417
PIAA harness switch temporarily (Velcro) mounted to front brake reservoir (currently sourcing a single switch mounting plate).
View attachment 94419
Panel installed no wires/component exposure. No resistance while installing.
View attachment 94420
Front view of upper right cowling to show even mating with no wires/component exposure. No resistance while installing screws or quick rivets.
View attachment 94421
Front view. Tubing helps protect lamp wires and hide the lamp's more obvious white wires.
View attachment 94422
All done. Looks good enough to meAfter a few rides and maybe a wash, I'll pull panels and inspect all connections to see if any adjustments need to be made.
If anyone sees anything I may have done wrong or unsafe, please let me know. Don't want this black beauty to blow up on me unexpectedly! Lol!

Lucky guy, even if it didn't work out after all. I've been looking for one of those plug-and-play harnesses for several years now. When I put my Eager Beaver block in, I spent the extra dosh to put in the Y-plug so the factory harness would still fit whenever I found one. I only need the wires because I have a bar switch already and I plan to mount a Rough Country lightbar rather than the spots. Ah well, the search continues...You, my fellow rider, are an awesome human being!
yes the bracket that holds them on has a screw each side undo those 2 screws and they pull apartFantastic write up! Quick question, I have a 2012 with 530s on my S10 that I bought used. Lights are not too bright so I thought about changing bulbs but couldn’t figure out how to open the housings. Anyone know the secret?
i see the screws ro remove the housing from the bracket, and dont see any other screw to open the housingyes the bracket that holds them on has a screw each side undo those 2 screws and they pull apart
done this a few times
rob
when you remove those 2 screws from the bracket the light just pulls apart no more screws, its those 2 screws that goes through the bracket that holds the light together,i see the screws ro remove the housing from the bracket, and dont see any other screw to open the housing
Thank you very much for taking the time to post all this - details are amazing.View attachment 94413
Overview.
View attachment 94414
1. PIAA harness relay (attached via Velcro)
2. PIAA harness hot/ignition wire
3. Modified reused 3 pin female connector, connecting to bike's Accessory Light connector #105
4. PIAA harness fuse
5. PIAA harness black wire to negative terminal of motorcycle's battery
6. PIAA harness white wire to positive terminal of motorcycle's battery
7. Butt connection (wrapped in tape) and connecting PIAA harness hot/ignition wire to reused female connector.
8. PIAA harness light switch wire, hot/ignition wire and lamp wires (bundled for vertical position stowage forward of toolkit bag).
View attachment 94415
PIAA harness black and white battery terminal wires orientation (secured using battery's retaining strap).
View attachment 94416
PIAA harness switch wire clamped into bike's right grip brake hose/wires bundle and then routed up to the handlebar.
View attachment 94417
PIAA harness switch temporarily (Velcro) mounted to front brake reservoir (currently sourcing a single switch mounting plate).
View attachment 94419
Panel installed no wires/component exposure. No resistance while installing.
View attachment 94420
Front view of upper right cowling to show even mating with no wires/component exposure. No resistance while installing screws or quick rivets.
View attachment 94421
Front view. Tubing helps protect lamp wires and hide the lamp's more obvious white wires.
View attachment 94422
All done. Looks good enough to me
If anyone sees anything I may have done wrong or unsafe, please let me know. Don't want this black beauty to blow up on me unexpectedly! Lol!
Super clean installation!View attachment 94413
Overview.
View attachment 94414
1. PIAA harness relay (attached via Velcro)
All done. Looks good enough to me
If anyone sees anything I may have done wrong or unsafe, please let me know. Don't want this black beauty to blow up on me unexpectedly! Lol!
Bensonic, my apologies for the late reply! Not a dumb question by any means. It's kind of busy on that wiring diagramDumb question by me-- is the only reason for line item "3. Modified reused 3 pin female connector, connecting to bike's Accessory Light connector #105" so you can recieve a hot trigger signal from the "key on" position?
But yes; that is the exact reason I utilized that 3 pin connector (line item #3). Thanks for your question and your appreciation of the post. Have a great day! nycwalt, to my best knowledge, a relay will be needed. I checked out the Eastern Beaver 4CS (which has a relay) and that looks like exactly what you need to establish normal powered operation for your PIAA lights. It's like their version of the PIAA MLR-4E relay kit. To be sure though, I'd email Eastern Beaver; I'm sure they could confidently provide an answer.I have very little electrical experience. Question: Can I eliminate the corroded relay, and power PIAA via aux without the relay?