Forks doing racetech compression values only?

miningminer

New Member
Joined
May 28, 2022
Messages
14
Location
Canada
Hi all, looking for some advice as money is tight. I’m not happy with sharp hits on the forks and I understand it’s primarily a compression issue. My plan was to refresh the oil, seals and bushings, install new springs and do the RT compression valves only. Any thoughts on this? At the same time I’m rebuilding the stocker rear shock and adding a remote reservoir. Would love to send it away but the reality is this is one of several bikes in the garage that gets ridden on a few long trips a season and I can’t justify a couple thousand on suspension.
 

jrusell

Well-Known Member
Joined
Aug 23, 2017
Messages
460
Location
Dartmouth, Nova Scotia, Canada
Racetech valves are a huge improvement especially when combined with a proper set of straight rate springs.
Stock compression piston has extremely small ports which are giving you that harsh feeling. The larger ports on the race tech or other aftermarket valves help with this issue.
I did compression and rebound gold valve kits, but doing just the compression will give you great results.
Biggest decision is deciding on what valve stack you build on the valve.

I would suggest you do not drill the bleed holes that is sometimes suggested in the race tech instructions.
If you haven't done a revalve before just take your time and get some of the proper cartridge tools before you start the job or make your own. Take some pics as you go and only do one fork at a time so you have a reference in case something doesn't seem correct.

If you need help or advice feel free to contact me.
 

Paul466

Well-Known Member
Joined
Mar 16, 2013
Messages
523
Location
Littleton, Colorado
Hi all, looking for some advice as money is tight. I’m not happy with sharp hits on the forks and I understand it’s primarily a compression issue. My plan was to refresh the oil, seals and bushings, install new springs and do the RT compression valves only. Any thoughts on this? At the same time I’m rebuilding the stocker rear shock and adding a remote reservoir. Would love to send it away but the reality is this is one of several bikes in the garage that gets ridden on a few long trips a season and I can’t justify a couple thousand on suspension.
Consider experimenting with different fork oil viscosity, also the dual rate springs are garbage imo, straight rate springs made a difference for me on gen 1
 

miningminer

New Member
Joined
May 28, 2022
Messages
14
Location
Canada
I’m a bit confused as I’m in Canada and it’s better for me to order thru eBay or Amazon rather than directly from RT. The valve kit they list is FMGV s2040 but it lists fitting many brands. Do they typically come with a bunch of shims and you measure/fit yourself?
 

jrusell

Well-Known Member
Joined
Aug 23, 2017
Messages
460
Location
Dartmouth, Nova Scotia, Canada
I’m a bit confused as I’m in Canada and it’s better for me to order thru eBay or Amazon rather than directly from RT. The valve kit they list is FMGV s2040 but it lists fitting many brands. Do they typically come with a bunch of shims and you measure/fit yourself?
I hate dealing with any source that might lead to brokerage fees when things get shipped across the border, so I try to stay away from eBay etc.
I purchased through Fortnine so there was no chance of extra charges.
All of those parts are also available through your local motorcycle shop as well.
Parts canada, Motivan, Kimpex, Fullbore etc all have online catalogues. Go to their pages and look in the catalogues and just take the part numbers to your local dealer and get a price.

The FMGV S2040 is the correct part #.
They fit hundreds of bikes, they come with generic instructions and a bunch of shims.
In the package they come with a DVS access code(digital valving search). You go to the race tech website plug in the access code and load your personal data etc and it will design a valve stack for you. Then you can save the file or print it out for future reference.
I didn't use the stack they suggested for a number of reasons, but I am not that far from what they suggested.
The online calculator is a one time access so remember this when you do your access.

You should have a decent set of Calipers to measure the shims as you build your stack. There are a few things you need to be careful with when you build the base valve, but I have pics of mine and can point those out if you need help.

Where are you located?
 

miningminer

New Member
Joined
May 28, 2022
Messages
14
Location
Canada
That makes sense, I’m in Edmonton. I’m assuming they come with enough shims in the kit to work with the set they recommend and I wouldn’t have to order more.
 

miningminer

New Member
Joined
May 28, 2022
Messages
14
Location
Canada
Racetech valves are a huge improvement especially when combined with a proper set of straight rate springs.
Stock compression piston has extremely small ports which are giving you that harsh feeling. The larger ports on the race tech or other aftermarket valves help with this issue.
I did compression and rebound gold valve kits, but doing just the compression will give you great results.
Biggest decision is deciding on what valve stack you build on the valve.

I would suggest you do not drill the bleed holes that is sometimes suggested in the race tech instructions.
If you haven't done a revalve before just take your time and get some of the proper cartridge tools before you start the job or make your own. Take some pics as you go and only do one fork at a time so you have a reference in case something doesn't seem correct.

If you need help or advice feel free to contact me.
I have the fork apart to the damper rod sitting on the bench but I was not able to find a good set of instructions on how to continue disassembly to remove the cartridges. AFAIK I need the damper rod tool to disassemble the rod but which end is the compression valve? Also confused at how the adjuster on the lower fork leg is meant to work as it didn’t present any resistance to pulling the damper rod.
 

SkunkWorks

Well-Known Member
Joined
Sep 13, 2018
Messages
1,781
Location
Colorado
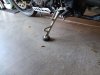
The Adjuster on the lower Fork-Leg is basically just a "Bypass" Orifice. The Adjuster uses a tapered Pin to close, or open, or partially-close the bypass channel to adjust "COMPRESSION" damping levels.
It is not physically connected in any way to the Damping-Rod assembly.

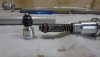
You will need a Damper-Rod tool if you are removing the "Spring-Seat" Cap off the top of the Damper-Rod assembly to get to the "REBOUND" Valve.
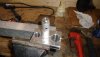
I did not have one, and nobody had one in stock locally when I needed one, so I made my own from an old aluminum Jack-Handle that I was no longer using.
IMG_2966.JPG

IMG_2967.JPG

IMG_2964.JPG

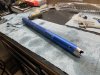
This Tool is also technically required (or it helps to have this) to remove the Damper-Rod assembly from the lower Fork-Leg, by removing the allen-head Bolt at the bottom (the one with the Copper-Washer), and also for reassembly it helps.


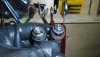
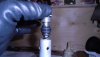
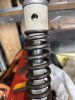
You will definitely need a way to hold the Damper-Rod assembly securely enough to get either the Top-Cap off, or the lower Compression-Valve assembly undone.
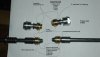
this is the "Proper" tool. You use it in a Vice to clamp the Damper-Rod assembly.

Cartridge tool.JPG

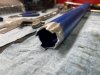
A regular open-end wrench or adjustable wrench is used to unscrew the "Compression" Valve from the bottom of the Damper-Rod assembly.

IMG_2962.JPG

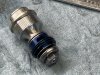
There is Threadlock on these from the factory. Some people have used heat to loosen this before disassembly, but I did not need to use heat on mine when I removed them.

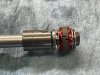
I'm not familiar with how the Racetech Valves come, as I used Penske ones.
The Mount-assembly shown for the Compression-Valve is aluminum, and the nut that holds the Valve to the Mount is "Staked" in place.
You will need to file the staked part flush with the Nut first before removing that Nut.
Failure to do this step may result in you just twisting the shaft off and breaking the Mount piece. DO NOT skip this step!

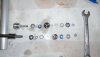
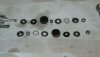
Once you have everything apart, make sure to take a picture of all the parts, so as to reassemble everything back the way it goes when finished.
Use some threadlock on that Nut when you put it back together.
 
Last edited:

jrusell

Well-Known Member
Joined
Aug 23, 2017
Messages
460
Location
Dartmouth, Nova Scotia, Canada
I am very sure there are other posts I or others have posted on this site with detailed instructions and pictures of the rebuild you are going to attempt.

If you have the cartridge out and you are only doing the compression as mentioned before you need to secure the cartridge in a vise or holding tool and unscrew the bottom of the cartridge. I would strongly suggest getting a proper cartridge holding tool. Motion pro makes a nice one or make one of wood.
Be extremely careful to not over tighten the cartridge as you could easily bend the cartridge and damage it beyond repair. Also individual parts are not available, so if you damage a part you will need to buy an entire fork or find a used one to fix yours.
I can't stress this enough, be careful and do not damage any parts or this will turn into an expensive exercise.

The factory uses lock tight on the threads so use a heat gun or a propane torch to heat up the bottom of the cartridge lightly. This will soften the lock tight and ease the holders removal.
There is also an o-ring in there as well and you do not want to damage this with excess heat. Be careful.

What you are unscrewing is the cartridge holder. The entire assembly is the compression valve assembly.

With the holder in your hand you will see a nut threaded on the end holding everything together.
As mentioned the nut is staked to prevent it from unthreading.
You must use a flat file to remove the staking. File it down completely flat all the way to the nut, then carefully unthread the nut from the shaft. I tis extreemly soft aluminum so be careful not to bend the shaft. Go back and forth to slowly work the nut from the threads.

Work on one fork at a time so that if you make a mistake you can go back to the stock assembly for reference.

Take lots of pictures ,lay everything out in order, take more pictures.
I would strongly suggest you completely understand the process before you start taking things apart. Decide on the shim stacks you will be building before you start the work.

Here are some pics. Ignore the valve on the damper rod as this is the rebound valve you are not working on.

AF4234B3-E7D1-4279-BF8C-2071343F5AF7.jpeg1E5004C1-F189-47D4-B0AB-C0AD0FFD5892.jpeg10AE8193-57F0-4823-9508-351DFF4B4714.jpeg72D953A7-A662-4674-A988-DD253CF3E92D.jpeg82A3B310-7684-4990-8CEB-A701796D9572.jpegB29E2F0C-8580-4D1E-9BCD-742939603B19.jpeg7CF43E30-430A-4DC5-A08F-1FB81E41D4C8_1_201_a.jpeg
 

miningminer

New Member
Joined
May 28, 2022
Messages
14
Location
Canada
Thank you, enormously helpful. I also ground a “tool” out of aluminum tubing, reminding me how much I hate working on suspension. I had to heat the end until it was smoking hot as well.
 

miningminer

New Member
Joined
May 28, 2022
Messages
14
Location
Canada
I unfortunately had to break the compression cartridge open again because I screwed it up. I'm posting this hoping to save someone a lot of headache.

The racetech "instructions" that ship in the gold valve kit are NOT complete instructions. I say again, do NOT attempt to do the revalve with these as a guide. Further poking around on the racetech website revealed a completely different set of instructions. While still not complete, they were much better. Some notes:

-you must drill the hole in the race tech piston if not already predrilled. A big F U to racetech for not predrilling this nor providing the proper drill bit, it must have not been in the margin for a $200 piece of machined aluminum and some metal shims.

-the only stock parts you reuse on the stock cartridge are the check plate and the check bushing/sleeve. If you reuse other stock parts such as the base plate (thick washer) it will cause you to have to add additional spacer shims.

-the entire nut/torque on the end of the cartridge is very confusing, and the description is also quite poor. Basically it boils down to you need to have no slack or play in the shims once the nut is tightened. If you do, you ran out of thread and must make it up with additional shims.

- the "full" instructions on RT website say it is CRITICAL to get the torque right on the cartridge nut, mention using a torque wrench, and then don't mention the torque figure. I googled a different set of instructions that gave 31 in/lb which seemed to feel in the right ball park.

I'll be honest, I have a stocked garage, a nice well lit work bench, vise, shop air, lots of tools. I've been turning wrenches on my own bikes for 15 years. Next time I'm paying for someone to do this. It's such a PITA, everything requires a dumb special tool X or Y or Z. I'm reminded of this because I have a drawer in my tool chest I once filled with one-off tools to rebuild KTM forks, none of which fit these forks, neither will they fit anything other than that one specific generation of KTM.
 

jrusell

Well-Known Member
Joined
Aug 23, 2017
Messages
460
Location
Dartmouth, Nova Scotia, Canada
I mentioned it before and will repeat it again.
DO NOT DRILL THE HOLE IN THE PISTON AS the RACETECH instructions RECOMMENDS.

The hole serves a s a bleed around the shims and reduces compression damping. If you drill the hole you can never get this compression damping back.
Your forks have a compression adjuster which is a bleed valve and does exactly the same as drilling the hole.

If you want to reduce the compression damping open up the adjuster a few clicks more.
 

miningminer

New Member
Joined
May 28, 2022
Messages
14
Location
Canada
I guess thus is the problem with trying to collect instructions from multiple sources and only having so much time to dedicate to doing it yourself. I am paying Racetech for the R&D because the money certainly isn't going towards a generic machined aluminum piston and a handful of washers/shims. So basically the R&D is bad and the instructions are bad from the so-called experts?

The holes have already been drilled. At this point I'm sick of dealing with them and not going to break the forks apart again.
 

miningminer

New Member
Joined
May 28, 2022
Messages
14
Location
Canada
image.jpg
Here’s another time saver:

take a sharp exacto and cut half an inch off the bottom of this useless guide covering the nut. Then you can slip a slim wrench or pliers in to loosen the top cap off without another once a decade tool purchase (spring compressor). A couple of heavy duty zip ties around the spring coil work the same for a strap to hook onto.
 

Duken4evr

New Member
Joined
Apr 25, 2020
Messages
2
Something simple after all that complexity. I did the Sonic straight rate fork springs and Stoltec Moto valving kit up front and a Penske shock out back and ya, it rides 10x better.

The center stand still works great, actually it rolls up much easier because once you get proper springs in it and set the laden sag properly to 2.25 inches, you will likely find that the bike sits taller. The downside of the fortified suspension is the kickstand is too short. Adding a hockey puck under the kick stand is my "KLR Engineering" solution to that problem. In addition to a nicely bigger footprint, the hockey puck material, under the crushing weight of my Super T, has a nice "soft and sophisticated" touch down feel as well ;)
 

Attachments

Top