SkunkWorks
Well-Known Member
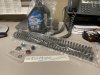
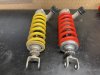
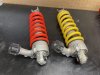
I have been collecting the parts to do this for the past year or so.
This past weekend my friend Cap'n Ron and I spent our Saturday getting it done.
The Forks were already off the bike. I removed them when I did the valve-clearance check a few weeks ago.
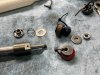
I grabbed one, got it set up in the vice, removed the top-cap, and got the spring compressed.

Disassembly is pretty easy and straightforward. The Yamaha service-manual is pretty simple to follow, and will get you "most of the way".
If you are only doing fork-seals and bushings, it will get you all the way.
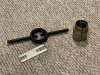
One thing I found out pretty quickly that I needed and didn't have was this "Damper Rod Tool". I checked all the bike shops in town, but nobody had one in stock.
It's not very expensive, and I should have just ordered one ahead of time.
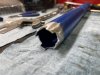
Since I really wanted to get the forks done that day, Ron and I decided to just make one.
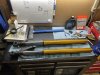
We took some measurements, and found a suitable piece of material to "Modify"
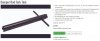
I ended up using a section of aluminum "Jack-Handle" from an old floor-jack that was no longer useable.
We even gave it a part-number")
You may or may-not need this tool to remove the bottom bolt that holds the damper assembly into the bottom of the fork assembly (the one with the copper washer under it).
I did not find that bolt to be installed very tightly from the factory. It helps to hold the damper assembly from spinning, and makes removal easy.
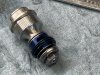
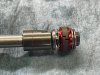
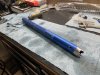
You will definitely need it to remove the spring-seat/damper piston assembly from the damper-rod/tube. It is very tight, and was installed with thread-lock from the factory.
You also need a way to hold the damper-tube solidly to remove the lower compression valve, as it's also installed very tightly. We got creative and made a "strap wrench" with the end of one of my ratchet-straps, and got the job done. I did not have the proper damper-rod holder either.
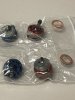
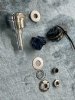
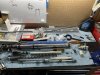
Completely disassembled.
This past weekend my friend Cap'n Ron and I spent our Saturday getting it done.
The Forks were already off the bike. I removed them when I did the valve-clearance check a few weeks ago.
I grabbed one, got it set up in the vice, removed the top-cap, and got the spring compressed.
Disassembly is pretty easy and straightforward. The Yamaha service-manual is pretty simple to follow, and will get you "most of the way".
If you are only doing fork-seals and bushings, it will get you all the way.
One thing I found out pretty quickly that I needed and didn't have was this "Damper Rod Tool". I checked all the bike shops in town, but nobody had one in stock.
It's not very expensive, and I should have just ordered one ahead of time.
Since I really wanted to get the forks done that day, Ron and I decided to just make one.
We took some measurements, and found a suitable piece of material to "Modify"
I ended up using a section of aluminum "Jack-Handle" from an old floor-jack that was no longer useable.
We even gave it a part-number
You may or may-not need this tool to remove the bottom bolt that holds the damper assembly into the bottom of the fork assembly (the one with the copper washer under it).
I did not find that bolt to be installed very tightly from the factory. It helps to hold the damper assembly from spinning, and makes removal easy.
You will definitely need it to remove the spring-seat/damper piston assembly from the damper-rod/tube. It is very tight, and was installed with thread-lock from the factory.
You also need a way to hold the damper-tube solidly to remove the lower compression valve, as it's also installed very tightly. We got creative and made a "strap wrench" with the end of one of my ratchet-straps, and got the job done. I did not have the proper damper-rod holder either.
Completely disassembled.