What you did to your Tenere today??!!

~TABASCO~

RIDE ON ADV is what I do !
Founding Member
2011 Site Supporter
2012 Site Supporter
2013 Site Supporter
2014 Site Supporter
Vendor
Joined
Apr 4, 2011
Messages
7,342
Location
TEXAS
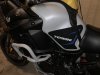
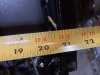
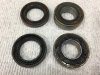
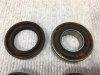
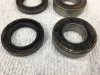
Popped out the front wheel bearings tonight... I already have the parts and changing them out no-mater. When I popped these out I was a bit shocked. These have 40K on them. They are a bit crunchy and not 100% smooth. Im GLAD im flipping some new ones in there. I DO NOT want to get caught out with a wheel bearing issue out 150 miles from pavement and a zillion miles from any freaking town. I ride in those places, and I have been with friends that blew up the rear wheel bearing recently. We were only 20 miles away from the paved road and it tore up a ton of parts on his bike...... NO THANKS !

Dont these look good ? LOL

For the folks that don't know me, no power washing and bike is ridden hard and ridiculously pampered with service .

The top right bearing feels kinda dry and the bottom right feels "OK" but all the grease is on the out side ???? What the heck ?

ST120013.JPG

ST120014.JPG

ST120015.JPG
 

~TABASCO~

RIDE ON ADV is what I do !
Founding Member
2011 Site Supporter
2012 Site Supporter
2013 Site Supporter
2014 Site Supporter
Vendor
Joined
Apr 4, 2011
Messages
7,342
Location
TEXAS
Thanks for the heads up on the bearing. I will change it with my next rear tire change. Should put me at 28k. Anything else I should look for other than normal clean up ?
Rear disc thickness and rear pads. If you have not already, flush rear brake fluid while your back there... The front disc and pads wear like IRON, the rear disc and pads wear much faster and need to have an eye kept on them.
 

Fordf350

Well-Known Member
Joined
Oct 29, 2019
Messages
175
Location
Pinehurst Texas
@~TABASCO~ thanks ,yes I have already flushed front rear brakes and clutch fluids twice on my 2015. Are you buying your bearings from dealer or some one like all ballz to try to avoid the cheaper Chinese products?
 

~TABASCO~

RIDE ON ADV is what I do !
Founding Member
2011 Site Supporter
2012 Site Supporter
2013 Site Supporter
2014 Site Supporter
Vendor
Joined
Apr 4, 2011
Messages
7,342
Location
TEXAS
@~TABASCO~ thanks ,yes I have already flushed front rear brakes and clutch fluids twice on my 2015. Are you buying your bearings from dealer or some one like all ballz to try to avoid the cheaper Chinese products?
I throw in OEM from an on line parts house.
 

yoyo

Well-Known Member
Joined
Jan 30, 2016
Messages
915
Location
Swansea UK
Had a busy couple of days. After starting a thread about my rusty header flange I took Gunslingers advice and intended on cleaning up the flanges, nuts and studs before applying ACF50 but as the coolant was due for a change and the steel pipe between the radiator and water pump needed painting I decided to remove the headers which made cleaning them a lot easier. While the headers were off I thought I'd paint the engine as the missing paint was looking really tatty. It's not brilliant but it's better than it was.


Sent from my ELE-L29 using Tapatalk
 

bimota

Moderator
Staff member
Global Moderator
Joined
Dec 10, 2017
Messages
6,622
Location
bridgend, Wales, UK
Had a busy couple of days. After starting a thread about my rusty header flange I took Gunslingers advice and intended on cleaning up the flanges, nuts and studs before applying ACF50 but as the coolant was due for a change and the steel pipe between the radiator and water pump needed painting I decided to remove the headers which made cleaning them a lot easier. While the headers were off I thought I'd paint the engine as the missing paint was looking really tatty. It's not brilliant but it's better than it was.


Sent from my ELE-L29 using Tapatalk
nice job Ade,

looks great in the picture

rob
 

Johnwesley

Well-Known Member
Joined
Aug 2, 2020
Messages
233
Location
Mena, Ar
I installed a light bar on my tenere. Got this one off of Amazon, same one I showed earlier for my wife’s bike. This one I did a little differently and will probably go back and redo Holly’s. I noticed I couldn’t get the beam at the height I wanted on holly’s bike. It was shooting higher than I wanted. The back of the led bar was hitting the plastic headlight assembly. So I slotted the mounting arms making the brackets adjustable. The arms sit to wide using the stock mounts for the air dam that sits below the head lights so I put a dog leg in the mounting brackets to make everything fit up tight. The relay was mounted to a bolt that sticks thought the voltage regulator, very clean mounting and allows the wiring to fit neatly where the tools use to be, mine are under the seat. The three prong connector is a 20amp constant hot and that is where I got power and also the plug I used to ground with. I pulled the switched power for the relay off the pink wire that activates the high beam shutte. Really all basc stuff for amounting the light bar. I just don’t see the need for a led bar with out the high beams on. If a car is coming and I need to dim the lights then I want the led bar off as well. The led is a spot beam to help punch through the night. Anyway here are a few pics.

relay mount


factory plug for spot lights, I use marine heat shirk to help seal and give strain relief.


connection for the led bar


Slotted bracket via drill press


Dogleg in mounting bracket with a vice and hammer :)


Mounts for the factory air dam under the headlights. Notice the back mount is not using the factory bolt. The kit comes with longer bolts and work great for mounting the light with.


finished mounting.
 

McJeep

Active Member
Joined
Nov 17, 2020
Messages
114
Location
Victoria BC, Canada
too sick to DO anything so instead did some more farkle shopping lol - ordered oberon screw in gas cap - if I'm not on the mend when it gets here it will get added to the new gps and heli risers that are already sitting on the bench :/ - to he77 with this winter crud that seems to have gotten a grip on me :(
 

Xclimation

Well-Known Member
Joined
Aug 17, 2016
Messages
652
Location
Ft. Worth, Texas
What is the deal with wheel bearings these days?! I cant keep a set in either of my HDs also.... Never used to have an issue with bearings. Seems like the only time I replaced wheel bearings in my older bikes was powder coating wheels. Now it seems Im replacing em every other tire change.
My guess is that bikes are more powerful and weigh more than they used to....And the manufacturers haven't seemed to upgrade bearings for newer bike tolerances? Modern day computerized machining should make better bearings.
 

Johnwesley

Well-Known Member
Joined
Aug 2, 2020
Messages
233
Location
Mena, Ar
So. . . . how did you pull this off? It says they do not ship to the U.S.
:D I didn’t read that so just ordered and payed for it, waited two months and it arrived. Maybe I was the first USA customer and it cost to much to ship. I don’t know. I went to my order to get the right link, so I know that’s what I ordered. It even has 3m backing so I expect it to be good adhesion.
 

Sierra1

Well-Known Member
Joined
Nov 7, 2016
Messages
14,958
Location
Joshua TX
Yeah, when I hit "add to cart", that's as far as it let me get. I think you're right that they changed their mind to serve US.
 

Kyle_E

Well-Known Member
Joined
Mar 3, 2019
Messages
672
Location
I'm Bad, I'm Nationwide.
Yeah, when I hit "add to cart", that's as far as it let me get. I think you're right that they changed their mind to serve US.
Here's a couple that will ship to the US.


Johnwesley

Well-Known Member
Joined
Aug 2, 2020
Messages
233
Location
Mena, Ar
Put on a set of Happy Trail pannier racks today. Did some minor adjustments and was able to narrow them by 3”. First thing was to eliminate The grab handles and then take the provided spacers and cut them in half. Once mocked up I needed to tweak the front mount and the rear bumper. The front mounts need to be bent toward the out side to line up and the rear bumper needed to be bent to narrow the mounting points. All in all about a 3hrs. So nothing to difficult.

When mounting the racks in this fashion you have to reuse the factory mounting bolts.


Front mount


Upper front mount where the factory grab handles are the silver spacer there was cut in half


Same for this upper rear mount. This is about as tight as you can mount it with out modifications to the rear plastics.


Mak10

Well-Known Member
Joined
Aug 20, 2018
Messages
2,567
Location
SE Idaho
Really like my happy trails setup. In the stock setup it allows me to mount a tool box inside. I carry tire pump, plug kit, tool kit, leatherman, flashlight, lighter in there. Always with the bike and if I moved it in the rear caliper would likely hit. 3E218345-D7F0-4A6E-A763-918E3E4E9E6E.jpeg23F0FD70-3D76-435D-91E1-A11F3B4A18AB.jpeg
 

Johnwesley

Well-Known Member
Joined
Aug 2, 2020
Messages
233
Location
Mena, Ar
Really like my happy trails setup. In the stock setup it allows me to mount a tool box inside. I carry tire pump, plug kit, tool kit, leatherman, flashlight, lighter in there. Always with the bike and if I moved it in the rear caliper would likely hit. View attachment 75759View attachment 75760
Holly’s bike is stock HT set up. I’ve been running their kits since 07’. I have my repair kit in the glove box. Compared to your setup I’m just a little more than 3”.

HT set up is the best kit I have ever run strong dependable and water proof.
 
Top