What you did to your Tenere today??!!
- Thread starter biting_point
- Start date
SHUMBA
Well-Known Member
Ha ha, you mean WD 40 is "finger lickin good" ??A little bit of Vienerslickem never hurts in tight spots.
SHUMBA
Sent from my SM-A520W using Tapatalk
SHUMBA
Well-Known Member
Additionally, wienerslidder is a slightly more efficient product.Ha ha, you mean WD 40 is "finger lickin good" ??
SHUMBA
Sent from my SM-A520W using Tapatalk
SHUMBA
Sent from my SM-A520W using Tapatalk
whisperquiet
Well-Known Member
I installed/balanced a new set of Bridgestone Battlewings + removed the driveshaft/pumpkin to check the condition. Everything was rust free and clean. I then disassembled all of the shock/suspension bolts/sleeves, cleaned everything up, greased as required, and re-assembled. The only corrosion was on the lower shock bolt. It was cleaned up, greased, and installed. The other parts were very clean with my bike having 37,600 miles on it.
I removed the fork legs and drained them with out disassembling them......350 cc of old fork fluid came out and I re-filled with 350 cc of BelRay 5w fork oil. The steering stem was not greased as I had previously removed the stems on my previously owned '12 and '13 S10s....both has adequate lube when checked. The stem of my current '15 feels snug and smooth = no removal.
Put everything back together and re-checked all of my work! I should be good to go until the next valve clearance check at 55,000 miles.
My S10 is used as a street bike by me with minimal gravel road use.
Ossaboy2867
Active Member
Not to continue the WD40 debate, but the one thing it excels at better than anything is cutting fluid for Aluminum. On a bed type CNC mill without flood coolant, you can spray WD40 while your machining and triple your speeds and feeds. It makes for the best finishes. And when your cutting heavy dodging those hot chips, the wasp spray characteristics of that folding tip are the best!
Ossaboy2867
Active Member
We must have the same service plan hahaI installed/balanced a new set of Bridgestone Battlewings + removed the driveshaft/pumpkin to check the condition. Everything was rust free and clean. I then disassembled all of the shock/suspension bolts/sleeves, cleaned everything up, greased as required, and re-assembled. The only corrosion was on the lower shock bolt. It was cleaned up, greased, and installed. The other parts were very clean with my bike having 37,600 miles on it.
I removed the fork legs and drained them with out disassembling them......350 cc of old fork fluid came out and I re-filled with 350 cc of BelRay 5w fork oil. The steering stem was not greased as I had previously removed the stems on my previously owned '12 and '13 S10s....both has adequate lube when checked. The stem of my current '15 feels snug and smooth = no removal.
Put everything back together and re-checked all of my work! I should be good to go until the next valve clearance check at 55,000 miles.
My S10 is used as a street bike by me with minimal gravel road use.
Ossaboy2867
Active Member
One thing I forgot to mention to everyone on here, and I failed to get the pictures when I found this was heavy corrosion on 2 of the 4 plugs.
I found that the rubber ring on the top of the coil had allowed water/mud inside there only to boil away and corrode the coil sleeve and plug really bad. So, after the valve job, when installing the new coils I used some yamabond sealant and glued those rubber rings on to the coil. The lip on the valve cover seals well when installed, but around the coil shaft, they leak.
I seem to never look before I post, but Im sure there is a thread on here about this.
Tenere man
Member
Its sounds like a bead of silcone sealer around the top might be a good idea, for when the plug caps are 1st ever removed at servicing time, thoughts ?
Put on a Altrider gaurd, and some new sw-motech pannier top bags.
The bags look awesome, one can be used as a tail/rack bag. I love the fact I can access stuff in my panniers without unstrapping the bag.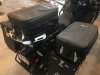
The bags look awesome, one can be used as a tail/rack bag. I love the fact I can access stuff in my panniers without unstrapping the bag.
Last edited:
jrusell
Well-Known Member
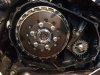
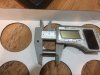
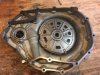
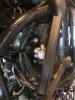
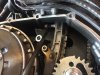
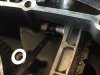
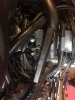
Took the Clutch cover off to address the possible long dowel issue others have had. I noticed a slight weep of oil last summer at the lower dowel position. Never bad, just annoying. Bolts were checked at the time and were fine.
Dowel measured 20mm long total, 9mm extending out of cover. Measured the hole in the case and it was 9mm as well.
Took 1mm off the overall length and it should be fine now.
Had a look at the cam chain and guides as well. I have a manual tensioner sitting on the bench and need to get off my butt and put it in soon. Was hoping to make a spacer to hold the guide and chain nice and tight when swapping. Really don't want to strip it down to zip tie the cams and chain, but might be necessary just to be safe.
Attachments
-
 194.2 KB Views: 69
 -
 193.9 KB Views: 70
 -
 189.5 KB Views: 64
 -
 255.4 KB Views: 65
scott123007
Well-Known Member
Installing a Manual CCT is easy. You can either make the spacer as you say, or use a strong tie wrap around the cam chain on one side of the drive sprocket and then around the guide that presses against the cam chain on the other side. Do it as high as you can, to get the best leverage. The reason the MCCT is easy is because you can install it and adjust it while everything is being held together with the tie wrap. Unfortunately, with an OEM tensioner, it is a crap shoot, because you have to release the tie wrap in order to smack the guide to release the tensioner. That is when the cam chain might jump a couple of teeth depending on the position of the cam when the tie wrap is released.Took the Clutch cover off to address the possible long dowel issue others have had. I noticed a slight weep of oil last summer at the lower dowel position. Never bad, just annoying. Bolts were checked at the time and were fine.
Dowel measured 20mm long total, 9mm extending out of cover. Measured the hole in the case and it was 9mm as well.
Took 1mm off the overall length and it should be fine now.
Had a look at the cam chain and guides as well. I have a manual tensioner sitting on the bench and need to get off my butt and put it in soon. Was hoping to make a spacer to hold the guide and chain nice and tight when swapping. Really don't want to strip it down to zip tie the cams and chain, but might be necessary just to be safe.
navynuke
Well-Known Member
Finally back together after my cow run in 4 or 5 weeks ago.
Except for 1 sticker, the super tenere sticker on the top right piece of bodywork that i ordered was black/silver/gold instead of black/red/white. Any idea what PN i need?
Plus wife approved of seat concepts seats. Passenger seat is done, rider seat tomorrow. Can't believe I lived with the stock seat slope for 30k miles.


Sent from my SM-G892A using Tapatalk
bnschroder
2014 Super Tenere ES
What is the "long dowel issue" and how does it present itself? Is it a Gen 1 issue or on all S10s possible?Took the Clutch cover off to address the possible long dowel issue others have had.
I did some research on this and trying to decipher Yammy paint codes is a bit convalutedFinally back together after my cow run in 4 or 5 weeks ago.
Except for 1 sticker, the super tenere sticker on the top right piece of bodywork that i ordered was black/silver/gold instead of black/red/white. Any idea what PN i need?
Plus wife approved of seat concepts seats. Passenger seat is done, rider seat tomorrow. Can't believe I lived with the stock seat slope for 30k miles.
Sent from my SM-G892A using Tapatalk
but I think these are indeed the correct part numbers below.
It seems the correct color code for a US spec '13 S10 in Pearl White is: BWC1 (Bluish White Cocktail).
the other available color for a US spec '13 was Matt Gray: MNM3 (Matt Gray Metallic).
The "Super Tenere" decal you described in black/silver/gold is for the Matte Gray version.
The Matt Gray S10s did not have the Yamaha Speed Block decals on the cowls below the "Super Tenere" decal.
I believe the correct "Super Tenere" sticker for you would be:
Yamaha Part #
23P-28391-30-00 GRAPHIC 1 UR FOR BWC1 (left side upper cowl)
23P-28392-30-00 GRAPHIC 2 UR FOR BWC1 (right side upper cowl)
BTW, I also have a '13 in Pearl White!

navynuke
Well-Known Member
Thanks, selected color code for partzilla but gotI did some research on this and trying to decipher Yammy paint codes is a bit convaluted
but I think these are indeed the correct part numbers below.
It seems the correct color code for a US spec '13 S10 in Pearl White is: BWC1 (Bluish White Cocktail).
the other available color for a US spec '13 was Matt Gray: MNM3 (Matt Gray Metallic).
The "Super Tenere" decal you described in black/silver/gold is for the Matte Gray version.
The Matt Gray S10s did not have the Yamaha Speed Block decals on the cowls below the "Super Tenere" decal.
I believe the correct "Super Tenere" sticker for you would be:
Yamaha Part #
23P-28391-30-00 GRAPHIC 1 UR FOR BWC1 (left side upper cowl)
23P-28392-30-00 GRAPHIC 2 UR FOR BWC1 (right side upper cowl)
BTW, I also have a '13 in Pearl White!
23P-28392-40-00 instead.
However the red checkers were right. Not enough $$ to be super upset but just a bit frustrating
Sent from my SM-G892A using Tapatalk
Kyle_E
Well-Known Member
Thanks, selected color code for partzilla but got
23P-28392-40-00 instead.
However the red checkers were right. Not enough $$ to be super upset but just a bit frustrating
Sent from my SM-G892A using Tapatalk
I believe @MFP has the right part numbers! Had looked for those before and never found them. On partzilla like @navynuke said the 40-00 is the wrong one for our white bikes.Yamaha Part #
23P-28391-30-00 GRAPHIC 1 UR FOR BWC1 (left side upper cowl)
23P-28392-30-00 GRAPHIC 2 UR FOR BWC1 (right side upper cowl)
BTW, I also have a '13 in Pearl White!
Thanks @MFP
jrusell
Well-Known Member
Some owners have experienced a small oil leak at the bottom of the clutch cover. There is a locating dowel at the top and bottom of the cover to keep it centered properly when installed. You can see these in my pics.What is the "long dowel issue" and how does it present itself? Is it a Gen 1 issue or on all S10s possible?
It appears that on some bikes the cases were not drilled deep enough and the pin bottoms out in the hole before the cover is fully seated. Doesn't happen to everyone. My understanding is it's a first gen only issue and fixed in 2013. As far as I know it hasn't been seen on any 2014 or newer models.
Grumpy
Getting old is not for wimps
More like what I will do next month, remove the hugger when the back end gets serviced. This is after a 40-mile trip, about 10 were
on damp roads with a few puddles. A waste of money
on damp roads with a few puddles. A waste of money
jrusell
Well-Known Member
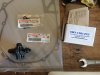
Installed the Graves manual Tensioner.
Copied the spacer idea I saw in an older post by Limey. Worked good with no issues. Too darn cold to start the bike up today, maybe we will have a warmer day soon and I will throw the battery back in and start it up.
Copied the spacer idea I saw in an older post by Limey. Worked good with no issues. Too darn cold to start the bike up today, maybe we will have a warmer day soon and I will throw the battery back in and start it up.
Attachments
-
 155.7 KB Views: 70
 -
 170.6 KB Views: 72
 -
 215.5 KB Views: 75
 -
 154.2 KB Views: 73
 -
 133.4 KB Views: 72
 -
 96 KB Views: 73