Valve adjustment - more lessons learned

markjenn

Active Member
Founding Member
Joined
Oct 22, 2010
Messages
2,427
Location
Bellingham, WA
You can overthink this. Only Yamaha has any real data and their judgment is that a motor that is within spec at X miles will be safe to ride for X + 26K more miles before clearances are enough out of tolerance for there to be an engine longevity or reliability problem. That doesn't mean each and every S10 will be absolutely safe to go this long, but it means the vast majority are safe and the cost of more frequent valve checks for the outliers isn't justified by the benefit to the majority.

For a screw-locknut bike with no shims (e.g., a BMW oilhead) fine-tuning valve clearance to the exact middle of the spec makes some sense, but for a shim-adjusted bike, I take the mfg at their word - if a valve is within spec, even at the upper/lower limit, LEAVE IT ALONE, especially if they're all within spec and you can avoid the hassles (and opportunity for problems) with pulling and re-timing cams. And if you are using Yamaha shims, "fine tuning" within the spec isn't really possible as the variation between shims is essentially the same as the tolerance. You'd be adjusting from near the limit on one side to near the limit on the other which is pretty pointless. (Many believe that the tight side of spec is "dangerous" and should avoided, but individual engines wear their valve trains differently and while tightening is somewhat more common that loosening, it's not always the case.)

Now a little heresy: Given what a hassle valve adjustment is on the S10 and the general robustness of the engine, I think you can make a valid case just to take your chances and not bother with valve checks at all. It's not ideal and you might get (literally) burned, but I'd bet the vast majority of bikes would make it through their useful lives without a problem. And if you're not a good mechanic or don't have a good one to rely on, I also think you can make the case that the risk of screwing up the adjustment is higher than the risk of skipping it.

- Mark
 

SilverBullet

Well-Known Member
Joined
Dec 30, 2014
Messages
1,175
Location
Harmaston, TX
markjenn said:
You can overthink this. Only Yamaha has any real data and their judgment is that a motor that is within spec at X miles will be safe to ride for X + 26K more miles before clearances are enough out of tolerance for there to be an engine longevity or reliability problem. That doesn't mean each and every S10 will be absolutely safe to go this long, but it means the vast majority are safe and the cost of more frequent valve checks for the outliers isn't justified by the benefit to the majority.

For a screw-locknut bike with no shims (e.g., a BMW oilhead) fine-tuning valve clearance to the exact middle of the spec makes some sense, but for a shim-adjusted bike, I take the mfg at their word - if a valve is within spec, even at the upper/lower limit, LEAVE IT ALONE, especially if they're all within spec and you can avoid the hassles (and opportunity for problems) with pulling and re-timing cams. And if you are using Yamaha shims, "fine tuning" within the spec isn't really possible as the variation between shims is essentially the same as the tolerance. You'd be adjusting from near the limit on one side to near the limit on the other which is pretty pointless. (Many believe that the tight side of spec is "dangerous" and should avoided, but individual engines wear their valve trains differently and while tightening is somewhat more common that loosening, it's not always the case.)

Now a little heresy: Given what a hassle valve adjustment is on the S10 and the general robustness of the engine, I think you can make a valid case just to take your chances and not bother with valve checks at all. It's not ideal and you might get (literally) burned, but I'd bet the vast majority of bikes would make it through their useful lives without a problem. And if you're not a good mechanic or don't have a good one to rely on, I also think you can make the case that the risk of screwing up the adjustment is higher than the risk of skipping it.

- Mark
Need a "like" button for this post.

_

Sent from my SM-G860P using Tapatalk
 

eemsreno

Well-Known Member
Founding Member
2011 Site Supporter
2012 Site Supporter
2013 Site Supporter
2014 Site Supporter
Joined
Nov 25, 2010
Messages
3,227
Location
On your way to everywhere, , Iowa
markjenn said:
Now a little heresy: Given what a hassle valve adjustment is on the S10 and the general robustness of the engine, I think you can make a valid case just to take your chances and not bother with valve checks at all. It's not ideal and you might get (literally) burned, but I'd bet the vast majority of bikes would make it through their useful lives without a problem. And if you're not a good mechanic or don't have a good one to rely on, I also think you can make the case that the risk of screwing up the adjustment is higher than the risk of skipping it.

- Mark
I agree 100% with this statement!
And it is starting to be proven to be true by a lot of self inflicted foul ups.
 

SilverBullet

Well-Known Member
Joined
Dec 30, 2014
Messages
1,175
Location
Harmaston, TX
Nikolajsen said:
The worst that can happen is actually if the valve if to less in gap...
Then the valve will burn, and you might not feel anything before it is to late.
And when to less gap= no noise :mad:
Cold starts get difficult when this happens I believe.

Sent from my SM-G860P using Tapatalk
 

Next

Member
Joined
Dec 11, 2017
Messages
34
Location
Western NC
Hello all,

Just to add some user info. I just bought a 2014 with 50k miles on the clock and decided to get the valves checked. This was the bikes first valve adjustment and was performed by the dealer.

Results: 5 of the 8 valves had tightened past factory recommended tolerance (one exhaust valve was at .10, pretty tight) and the bike was running very well with no noticeable valve clatter when I brought it in. It took the tech about 10 hours to adjust everything, throw some plugs in, and sync the throttle bodies... but they only charged me the 5.5 hours they quoted which was still close to $650 with new plugs, gaskets, taxes, etc.

This is a service you only do a few times over the life of the bike. For me, it's worth the money to let the dealer do it so I don't grenade the engine. That said, I do just about everything else myself. I will be pulling the forks for an oil change, bleeding the brakes and clutch, changing out brake pads, and greasing the rear swing arm and steering head bearing this weekend if the garage isn't too cold. The only other thing I'll pay for is letting Touratech service the rear shock this winter. They quoted me $100 plus shipping both ways to service one of their Explore units. Money well spent in my book since it should make the thing good for another 40k miles. I'll probably check the valves around that same time again... which will be a while.

Don't know if this helps anybody, but thought I'd throw it into the mix.
 

Bug Dr.

Member
Joined
Apr 16, 2014
Messages
136
Location
Southern Ozarks
wfopete said:
I ain't touching my valves; just buying a new Tenere' when the time comes instead.
That sounds reasonable to me since I'm on my second Tenere. I live near Pete and I can't think of anyone that I would trust to check them in our area (maybe he knows of someone). I don't redline the motor but it does get ridden pretty hard at times on the twisty roads in the Ozarks though. Mostly, it is a big Swiss Army touring bike for me.
Mike
 

wfopete

Suffer Fools; Gladly!
Joined
Jun 29, 2012
Messages
330
Location
Somewhere North of Dover, Arkansas
Bug Dr. said:
That sounds reasonable to me since I'm on my second Tenere. I live near Pete and I can't think of anyone that I would trust to check them in our area (maybe he knows of someone). I don't redline the motor but it does get ridden pretty hard at times on the twisty roads in the Ozarks though. Mostly, it is a big Swiss Army touring bike for me.
Mike
No suggestions. I think one tech at our local Yamaha shop would do a reasonable job but they are under the hourly rate pressure. I would consider meeting with the dude after biz hours and see if he would do the job on the side. I would compensate him the full dealer labor cost for it...as long as I would get his best work. But in reality, I would probably do it myself. It might take a week and a bit of research on my part but in the end I would know what happened and who would be to blame for the success or failure of the work done.
 

tntmo

Well-Known Member
Joined
Nov 10, 2017
Messages
649
Location
San Diego, CA
I did my valve check / adjustment today along with a manual CCT install. My bike has a bit over 20k mile but I'm planning a long trip and just didn't want to worry about this while on the road.

I started at about 0900 and my friend came over about an hour after that. I helped him change out both tires on his Africa Twin at some point in the day. One exhaust valve was just below the minimum and one intake valve was a good amount over the maximum. I can't recall ever having a loose valve before on any bike I've worked on. I zip tied the chain to the cams and paint marked it, no issues. After the job was done, I also swapped out both tires for a set of Mitas E-07 Dakars, checked all the spokes and swapped the rear brake pads.

Not bad, even with beer breaks I was done about 1700. I think just the valve check would take 4-5 hours going slow and methodical.
 

MidlifeMotor

Member
Joined
Mar 31, 2012
Messages
383
Location
Mesa, AZ
With the help of a long time Kawasaki mechanic, we did the valve check and adjustment on my 2012 ST. Replaced all clutch plates (clutch was fried), the battery (second battery since purchased in 20120, and the CCT. There were no performance issues other than slow to start. 29,729 miles on it.

I have never done anything this extensive and read the thread prior to the job and it didn't mean as much as when I went back and read it again after removing everything and checking the valves. All four exhaust valves were tight and all four intake valves were fine. I was lucky in that we did not have to remove the intake cam and left it alone other than zip tying the chain to the sprocket. We also zip tied the chain to the exhaust cam sprocket and had plenty of room to lift the exhaust cam in place to get to the buckets and shims. There was so much good advice in this thread it made the job a success. However, that being said, my buddy the Kawi mechanic said he is never doing another Yamaha valve check again it was such a PITA. Between the removal/installation of the valve cover and gasket to the cam sprocket marks on the outside where they couldn't be seen it was a challenge. Here are highlights from our experience that echo all the good advice from earlier posters.

1. Remove the four bolts to the engine mount which is just in front of the valve cover. It gives you way more room to work with the mount removed.
2. Remove the four bolts securing the electric tray and pull it to the side for more room.
3. Clear the hydraulic lines from the left side of the bike as much as possible. Clear as much of the wiring harness on the right side as possible.
4. Budget a lot of time to learn as you do this job. It took us two days but we could turn right around and do it in half or less of the time on the second go. My buddy said it would have been easier to drop the engine out of the bike first and we might try that next time.
5. Pay close attention with how the service manual tells you how to set the crank to check the number one cylinder valves. It can be misread very easily and you will be checking clearances with the lobes in the wrong place. The exhaust cam has two decompression dowels that open two exhaust valves way beyond the specs and if the crank is not rotated exactly by the instructions you will get a false reading.

As an earlier poster stated, this job is not for the faint of heart. I learned a ton doing this, but I had an incredible mechanic as a safety blanket. The good news is the bike starts and runs excellent. I took it on a 150 mile ride this morning, rode it hard, and not a drop of anything in the driveway two hours after the ride. I was really worried about that valve cover gasket. As hard of a job as this was, I am glad we did it and have a lot of peace of mind it's done and the CCT is changed out.

Sean
 

Don in Lodi

Well-Known Member
Founding Member
2012 Site Supporter
2013 Site Supporter
2014 Site Supporter
Joined
Feb 1, 2011
Messages
5,780
Location
Lodi Kalifornia
LOL, the tech that did my 40k check swore he'd never do another one.
 

MidlifeMotor

Member
Joined
Mar 31, 2012
Messages
383
Location
Mesa, AZ
Haha my buddy the Kawi mechanic who swore he would never do another S10 valve check/adjust has already sent me a text saying a customer wants one done on a 2014 S10. Gotta do some research on potential differences in the 2012 and 2014 for this job. Anybody done a check on both years?
 

Don in Lodi

Well-Known Member
Founding Member
2012 Site Supporter
2013 Site Supporter
2014 Site Supporter
Joined
Feb 1, 2011
Messages
5,780
Location
Lodi Kalifornia
The motor is the same. I don't think the ES electronics intrude into that space.
 

HeliMoto

Member
Joined
Jan 5, 2015
Messages
53
Location
Sault Ste Marie,On.Canada
I just finished up checking my valves, replacing the 2012 cam chain tensioner with the 2014 model, swapping out the spark plugs, and performing a throttle body sync. Luckily my valves were within specifications with the exhaust averaging around .23. The bike has 26k miles on it so I decided against trying to move the valves more into the middle of the spec. I’ll see how they look in another 24k miles.

I have a few thing to add for those about to embark on this procedure but I just want to warn everyone this process is not for the faint of heart. Please just bring your bike to the dealer if you’re not completely comfortable cracking open an engine. There’s just so many ways to screw this one up.

1) Write everything down as you dissemble the bike. Even if you are familiar with engines, I highly suggest you take notes are you take the bike apart. The manual is pretty good but it’s all over the place. You’ll find yourself switching page to page to page. I suggest you just highlight the major parts. Example:
  • Removed plastics
    Removed gas tank
    Removed airbox (one electrical connector, one hose)
    Remove throttle bodies (x amount of connectors, throttle cables)
2) Label your electrical connections and cables with blue painters tape and sharpie.

3) Take a ton of pictures as you disassemble to assist you with the reassembly process. I can’t stress this enough.

4) It was suggested earlier in the thread you blow into the valve cover to see if there’s an air leak after reinstalling the valve cover. I suggest you try this before you take the valve cover or clutch cover off. You’ll notice it’s like blowing up a balloon. You blow, it fills up with air, and then when you take your mouth off the air rushes back out at you.

5) Remove the front engine mount plate (four 17mm bolts) to gain better access to the front of the engine. It’s not necessary to support the engine since there so many other bolts holding the beast in the frame. Again, support if you don’t feel comfortable but note I moved the bike without the mount (engine not running) with no issues.

6) Many folks mention unbolting the electrical tray on the right side. I can’t agree more since it allows you pull a bunch of the wiring through the frame and out of the valve cover area. It also allows you see the right side of the valve cover which is critical when reinstalling the cover. Please note it is not necessary to remove the bolt that comes in from the inside of the fairing which can be a bitch to reinstall. Only the four 10mm, easily accessible bolts on the right side. They are different sizes/types so write down where they go.

I removed the battery to reduce the amount of force pulling on the electrical assembly. I also left the top right bolt in unless I need access to the valve cover area. It helps take the weight off the wiring.

7) When I was reviewing the process for checking the valve clearances two things came up I think is worth mentioning:
* The service manual tells you to put the engine in TDC, then rotate 71 degrees. This is the point where you check all the valves in cylinder one (left one while sitting on the bike), and then rotate 270 degrees and check all the valves on cylinder two. I bring this up because I started checking my valves at the TDC position. Whoops. The manual is just getting you the TDC position to ensure you are at the correct starting position.
* Yes, you check the intake and exhaust valves for cylinder one after rotating 71 degrees and the intake and exhaust valves for cylinder two after rotating 270 degrees. This might throw folks coming from the V-Strom. That rotation process wasn't so simple.

8) I used a new valve cover gasket and found it near impossible to get it stay on the cover one you tip it upside down. I used some Permatex Ultra Grey Gasket Maker to hold the gasket in place while I wrestled the POS valve cover into position. I know using this does not jibe with the manual but I didn't have access to a Honda or Yamaha dealership. Use at your own risk.

9) Various things:
* When removing the plastics, there’s four plastic pins (under headlights, two each side). To remove the pins you push the center of the pin, the center piece will push down and then you simply remove the pin. To reset you pull the center pin out a bit, install the pin, and push the center in till it’s flush. Makes a lot more sense once you see the little buggers. Busted a few of these on my V-Strom till I figured them out.
* When tilting the gas tank if you feel tension, it’s probably the two breather tubes that run down the left side of the bike. Feed them up to create slack.
* When removing the airbox cover, there’s a hidden screw under the rubber plug. The rubber plug just pulls out with needle noses pliers.
* If you have never done a throttle body sync take a close look at the throttle body when you get the airbox assembly off. You’ll get a great view.
* Once you get everything off, I suggest you check your steering stem bearings since you’ll have great access if it needs to be tightened.
* I had never removed ignition coils (sit on top of spark plugs) before. Dead simple. Remove 10mm bolt and pull straight up with a twisting motion. Note the bolts are not easy to get out because of the Loctite material left on the bolts.
* My sparkplugs looked awesome after 26k miles. I had new ones so I put them in but if not, I would have had no issues putting the old plugs back in.

Material list for valve check and possible adjustment:
• New valve cover gasket
• New clutch cover gasket
• Spark plugs, if due.
• Air filter, if due
• Oil and filter (you have to drain oil to remove clutch cover)
• Loctite (blue)
• Yamaha bond 1215 (for the valve cover gasket)
• Zip ties (hold wiring and brake lines out of the way)
• 2014 cam chain tensioner, gasket and bolts (optional of course but if you’re already there…)
• Valve shims if adjustment is necessary

Links I found useful besides this one:
• Valve Adjustment Nightmare (lesson things to check when swapping out CCT). http://www.yamahasupertenere.com/index.php?topic=9344.0
• 2014 Cam Chain Tensioner http://www.yamahasupertenere.com/index.php?topic=12650.0
• Check your shims! http://www.yamahasupertenere.com/index.php?topic=10371.0
• Another Way to Retract the CCT. http://www.yamahasupertenere.com/index.php?topic=10578.0
• Greg’s Valve Adjustment write up. http://thetenerist.wordpress.com/2013/10/29/tenere-valve-check-and-adjustment/
• Boogered the valve inspection (crushed dowel pins). http://www.yamahasupertenere.com/index.php?topic=13370.0

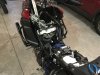
Dear Lord what have I done.


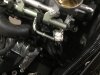
If you're wondering where the CCT lives look just to the right of the 2nd red rag. It's the silver bit with two bolts.


CCT removed


Ignition coils


This is why you remove the front motor mount and disconnect the electrical panel.


Motor at TDC position


Notice the zip ties? You'll need them to pull everything to the sides to make room for the Son of Satan (aka Valve Cover)


Sparkplugs after 26k miles.
Read the manual, valves are checked at TDC.
A much simpler explanation,piston at TDC with cam lobes pointing AWAY from each other and your good to check.
 

tntmo

Well-Known Member
Joined
Nov 10, 2017
Messages
649
Location
San Diego, CA
LOL, the tech that did my 40k check swore he'd never do another one.
Sound like shitty techs. It's really not that difficult, I can't understand all the hate towards the job. The only part that really frustrates me is the fact that Yamaha put the timing marks on the outside of the cams rather than the inside.
 

WJBertrand

Ventura Highway
Joined
Jun 20, 2015
Messages
4,528
Location
Ventura, CA
Read the manual, valves are checked at TDC.
A much simpler explanation,piston at TDC with cam lobes pointing AWAY from each other and your good to check.
My manual says to rotate the additional 71 degrees. I tried checking the clearance at the initial position and found the clearance huge. I think the decompression feature is engaged at the initial position to hold the valve open for easier cranking.


Sent from my iPhone using Tapatalk Pro
 

BWC

Active Member
2011 Site Supporter
2012 Site Supporter
2013 Site Supporter
2014 Site Supporter
Joined
Jul 31, 2011
Messages
490
Location
Canada
My manual says to rotate the additional 71 degrees. I tried checking the clearance at the initial position and found the clearance huge. I think the decompression feature is engaged at the initial position to hold the valve open for easier cranking.
The decompressor feature used for starting is actuated by the steel dowel pressing down on the exhaust valve lifter as shown next to the exhaust cam lobe in this pic.
If it’s pointing straight down and pressing on the valve lifter you will get a false reading on a valve clearance check.


And just for general info. those two oil return holes shown in the inspection mirror are just waiting to swallow a valve shim that will often be stuck to the underside of the valve lifter when you remove the lifter. Next stop for the adjusting shim would be somewhere in the sump. I put a rag there, just in case.


whisperquiet

Well-Known Member
Joined
Feb 20, 2011
Messages
736
Location
Southern Illinois
It is a rainy, 55 degree day at my house + my 2015 S10 has 26,710 miles on it and an almost empty fuel tank.
Time for the first valve clearance check. I had previously done one on my 2013 S10 at 27,000 miles and found all to
be in spec. But, I had forgotten what a PITA it is to get to the valve cover and remove it. I was able to see the valve train after about two hours of methodical, picture taking work. I rode the bike earlier in the day and about 4 hours after the ride, it looks like all eight valves will be in spec.......will check tomorrow when the engine is absolutely at room temperature (garage at 55 degrees).

Open heart Super Tenere pictures attached:

B4709F65-69A7-4110-9A06-12FDBDC5A6FF.jpeg9F4555E2-1B65-42C0-B508-C8B8A957A950.jpegD559E20D-B4F5-4746-9913-7DCFAD598C5D.jpeg
 
Top