Valve adjustment - more lessons learned

bnschroder

2014 Super Tenere ES
Joined
Nov 17, 2014
Messages
559
Location
Atlanta
After perusing this thread, I think I may just skip the valve adjustment overall and ride my bike like Longhaul Paul - 170,000 miles with not adjustment. That should last me over a decade, and I don't need to worry about me or a mechanic screwing up, or paying for a mechanic who will likely not be doing anything after all. I am not riding the bike very hot, so chances are, the motor will be just fine.
 

BWC

Active Member
2011 Site Supporter
2012 Site Supporter
2013 Site Supporter
2014 Site Supporter
Joined
Jul 31, 2011
Messages
490
Location
Canada
Any chance when you reinstalled the exhaust cam that some of the slack in the timing chain between the exhaust cam sprocket and the lower crank shaft sprocket wasnt correct? If the chain was loose there it could make the cam chain on the tensioner side short and not tighten correctly when the CCT was "set"
Just trying to think what might cause the chain to be noisy if the chain looked and felt tight after the CCT was reinstalled.
There should be no resistance when installing the CCT and threading in the bolts. With the cam cover off and a mirror, you can look down the chain tunnel to make sure the chain guide is in the correct position and the CCT is ready to be "set" which tensions the chain per the manual.
I just did a valve adjust on my new to me 13 and installed the new style tensioner.
Last pic shows the new tensioner on the left ready to be installed and the old style "set" or fully deployed after removal.
Hope some of this might help.


steve68steve

Active Member
Joined
Oct 23, 2014
Messages
441
Location
Seacoast, NH
Any chance when you reinstalled the exhaust cam that some of the slack in the timing chain between the exhaust cam sprocket and the lower crank shaft sprocket wasnt correct? If the chain was loose there it could make the cam chain on the tensioner side short and not tighten correctly when the CCT was "set"
I don't think so: I cranked the it around manually several times and there was no slack. The timing seems 'on" - it's running well, just noisy.

Just trying to think what might cause the chain to be noisy if the chain looked and felt tight after the CCT was reinstalled.There should be no resistance when installing the CCT and threading in the bolts. With the cam cover off and a mirror, you can look down the chain tunnel to make sure the chain guide is in the correct position and the CCT is ready to be "set" which tensions the chain per the manual."

I'm hoping with the clutch cover off and a mirror I'll be able to tell. It's a lot of work to re-do to pull the valve cover... again.
 

ace50

Active Member
Joined
May 19, 2015
Messages
640
Location
VA
bnschroder said:
After perusing this thread, I think I may just skip the valve adjustment overall and ride my bike like Longhaul Paul - 170,000 miles with not adjustment. That should last me over a decade, and I don't need to worry about me or a mechanic screwing up, or paying for a mechanic who will likely not be doing anything after all. I am not riding the bike very hot, so chances are, the motor will be just fine.
Makes me think about delaying it too!
 

Checkswrecks

Ungenear to broked stuff
Staff member
Global Moderator
2011 Site Supporter
Joined
Mar 7, 2011
Messages
11,515
Location
Damascus, MD
bnschroder said:
After perusing this thread, I think I may just skip the valve adjustment overall and ride my bike like Longhaul Paul - 170,000 miles with not adjustment. That should last me over a decade, and I don't need to worry about me or a mechanic screwing up, or paying for a mechanic who will likely not be doing anything after all. I am not riding the bike very hot, so chances are, the motor will be just fine.

That's just not a good idea.


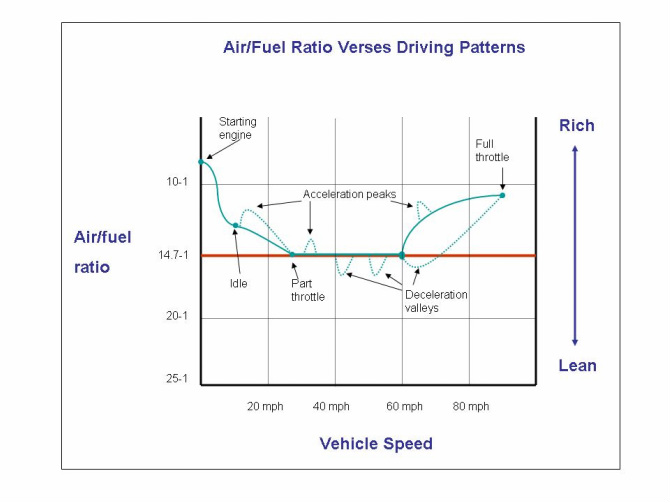
While Paul got away with it, he is actually very easy on his engine. He generally gets up to speed on the highway and drones on for hours. You almost certainly do a LOT more up and down throttle, tach it up occasionally, etc. Changing throttle changes the air fuel ratio (shown below), which changes the gas temp across the exhaust valves and leads to stem stretch and face wear.


Meanwhile we've had numerous other owners find a valve or two out of spec at the 26,000 and certainly by the 52,000 mile check.
 

steve68steve

Active Member
Joined
Oct 23, 2014
Messages
441
Location
Seacoast, NH
steve68steve said:
I don't think so: I cranked the it around manually several times and there was no slack. The timing seems 'on" - it's running well, just noisy.

I'm hoping with the clutch cover off and a mirror I'll be able to tell. It's a lot of work to re-do to pull the valve cover... again.
Ok, final update (unless it later explodes).


I was scared/ paranoid enough by a sound after finishing that I took the clutch cover off and pulled the CCT to confirm I didn't have a twisted chain, a chewed up CCT, a misaligned chain guide, an un-deployed CCT, or any other craziness which would account for the timing chain slapping around and making this new noise.


Everything looked like it should. One eureka moment: I zip-tied the two halves of the timing chain together just above the drive sprocket to take out slack so as to not lose timing. When doing this, the tension on the zip tie pinches the chain loop closer together right above the drive sprocket. This turns out to be a problem because with slack taken off BOTH sides, the intake side doesn't have enough slack in it to allow the guide to move, or the CCT to be installed without popping. You CAN install the CCT with the chain in this condition, but it won't seat all the way against the machined flat on the engine unrestrained. It will fit in the hole but stick out a little. As you tighten the bolts, the CCT's anvil makes contact with the chain guide, causing it to deploy. Since it's all under tension, you don't hear it or notice any change in chain slack. Then when you try to push the guide in to deploy the CCT, it won't move (because the CCT is already deployed and there's ZERO slack in the chain). This was confusing to me because I didn't know the CCT had deployed and thought something was wrong (like it wasn't seated against the guide, the guide was binding, or it wasn't deploying).


So, I cranked the engine a few degrees to pull all the slack out of the exhaust side (no chain deflection - chain in a straight line from the drive sprocket up to the exhaust cam). Doing this made the zip tie re-position itself a little, and it gives just enough slack for the chain guide to pivot and the reset CCT to sit flush on its mount without the bolts installed. From there, everything will make sense and act like the manual suggests it should act: the CCT can be installed, the guide can be pushed over into it, and so doing will make the CCT pop open.


LESSON LEARNED: a tiny amount of timing chain deflection on the exhaust side takes up slack which the intake side NEEDS to allow proper CCT install and deployment.


I just got back from a VERY short ride (like, maybe 1/2 mile). There's still an new noise, but my paranoia level is down: I'm content to decide the noise is my larger valve gap being slappier. Timing is on, CCT is doing its thing.
 

Midnightventure

New Member
Joined
Feb 20, 2016
Messages
15
Location
Eldon, Mo close to the Lake of the Ozarks
I just replaced my CCT last night and this is why I decided not to use zip ties. I just took it out and put the new one in. Wacked the guide and rotated the engine a couple of revolutions with a wrench. Put it back together and fired it up. Rode it 75 miles today.
 

steve68steve

Active Member
Joined
Oct 23, 2014
Messages
441
Location
Seacoast, NH
BWC said:
Sorry for not letting this thread die, but I've had another thought.


Look at the lower quoted pic that shows the CCT from the plunger side. There are 4 holes. The 9 o'clock and 3 o'clock holes are mounting bolt holes. The 1 o'clock hole is the oil inlet - it lines up with a hole in the engine block and there's a hole in the gasket, so oil is pumped into the CCT thru this hole. On the top pic you can see the material on the casting which leads from this oil supply hole to the center of the CCY. A hole is drilled thru that material to form a pathway; the hole is plugged by a screw. That all makes sense.


I guess that as RPM gets higher, higher pressure oil is fed to the CCT via that 1 o'clock hole. The increased oil pressure would make the CCT stiffer to counteract higher forces from the chain which are also resulting from the same increase in RPM. As RPM drops, oil pressure drops allowing a softer "push" against the chain. With engine off, only the spring inside the CCT is doing the pushing.


That 12 o'clock hole - there's no hole in the gasket under it, so oil can't flow anywhere from here. There's also a set screw plugging it.
All I can think of is that it's some means to regulate the pressure in the CCT - like maybe a ball check valve.
The manual (5-19) says to replace the CCT if it's cracked, damaged, or the plunger doesn't easily function... but I've read a few posts about chain noise getting fixed by replacing a CCT (which presumably isn't cracked, or doesn't function), implying that even tho a CCT is mechanically functioning, it's hydraulic function may degrade. Maybe adjusting that setscrew it a "fix" they don't want the user fiddling with (it being set at manufacture).


I'm not taking my bike back apart to check, but if anyone knows or has an old take-off one laying around...
 

4jranch

Active Member
Joined
May 11, 2014
Messages
283
Location
Brenham, Texas
Lots of great help on this site for this difficult job. Thought I might add my input.
After reading about changing shims without actually removing the cams completely I thought I would give it a try.
I took off the cam cap on the exhaust cam and then took off the left and middle caps on the intake cam. I then loosened the right cap on the intake cam. This would allow the intake cam to rotate up slightly and the exhaust cam to rotate up a lot. I could then get to the offending exhaust shins that needed changing. I suggest zip tying the chain to both cam sprockets before trying this. It did work for me even changing the shim on the far right.


Sent from my iPhone using Tapatalk
 

4jranch

Active Member
Joined
May 11, 2014
Messages
283
Location
Brenham, Texas
Here is my simplified step by step check list;


Super Tenere valve clearance check:

1. Remove all covers.

2. Remove gas tank- first loosen 2 drain hoses from below, 2 bolts on sides, one in rear, unplug gas line leave on throttle body, disconnect electric plugs, green on left.

3. Remove airbox- 2 bolts, 2pin black connector, disconnect hose to valve cover.

4. Remove throttle bodies- remove 4 rubber straps, disconnect all electric plugs, disconnect throttle cables and mark the top one, loosen clamps at neck.

5. Disconnect electrics from crossbar- d/c 2 connectors on the front left.

6. Take loose large wire bundle from frame on right.

7. Loosen stator wires low at back base of cylinders.

8. D/C clutch and brake lines, all 3, from each side and front of frame.

9. Remove lines from triple clamp at back and remove triple clamp.

10. Loosen rear clamp on clutch line at left rear.

11. Remove front motor mount- loosen engine guards on both sides.

12. D/C electric side box- remove 4 bolts.

13. D/C plug wires, remove plug caps, loosen all spark plugs leave in place.

14. Zip tie wires back on right side & 3 brake and clutch lines back to left.

15. Remove clutch cover plug on right side.

16. Remove valve cover- leave gasket in place, watch for spark plug gasket.

17. Measure clearances per manual 3-5.

18. If ok have a beer and reverse process.


Super Tenere valve shim change:

1. Measure and record all clearances- manual 3-5.

2. Remove clutch cover- plan for some oil leak.

3. Move cams to correct position- K at side mark, manual 5-16.

4. Tighten spark a few turns- to prevent shims from falling into the engine

5. Mark cams, chain and bottom sprocket- take photos.

6. Zip tie- IN cam sprocket & chain in 2 spots, EX cam in 1, lower sprocket in1.

7. Remove cam chain tensioner.

8. Remove EX cam cap.

9. Remove IN cam left and middle caps and loosen right side cap but leave attached.

10. Gently lift left side of EX cam, lift the left side of the IN cam slightly and remove valve caps and shims with a magnet. Try not to displace EX cam too much.

11. Measure and replace shims as needed (smaller shims please).

12. Replace cam caps and carefully put the cams back in place. Make sure they have not moved. Torque bolts 10Nm.

13. Reset tensioner- tighten in the vise with rubber on the plunger end. This requires patience, tightening & turning, loosening slightly and turning while tightening slowly. What a pain but it does work. Manual 5-22.

14. Install and release tensioner. Manual 5-22.

15. Check cam chain tensioner guide and confirm it is in place.

16. Check all marks, make sure all are correct, cut and remove zip wraps, loosen spark plugs but leave in place. Turn over motor and check valve clearances per manual 3-5.

17. Reverse process if all good....
 

WJBertrand

Ventura Highway
Joined
Jun 20, 2015
Messages
4,532
Location
Ventura, CA
What is the triple clamp? I assume you are not referring to the fork clamp?


Sent from my iPhone using Tapatalk Pro
 

4jranch

Active Member
Joined
May 11, 2014
Messages
283
Location
Brenham, Texas
The triple clamp I am referring to holds the three metal lines (brake and clutch) to the frame on the back left. It may not be necessary to remove it, just take all the lines out so they move freely out of the way when you zip tie them to the left side of the frame farther forward. Removing it just gave me a little more room. I has such trouble getting the head cover in and out last time I decided to free everything up as much as possible. This time the cover was easier to get in and out. :)
 

WJBertrand

Ventura Highway
Joined
Jun 20, 2015
Messages
4,532
Location
Ventura, CA
4jranch said:
The triple clamp I am referring to holds the three metal lines (brake and clutch) to the frame on the back left. It may not be necessary to remove it, just take all the lines out so they move freely out of the way when you zip tie them to the left side of the frame farther forward. Removing it just gave me a little more room. I has such trouble getting the head cover in and out last time I decided to free everything up as much as possible. This time the cover was easier to get in and out. :)
OK thanks.
 

holligl

Find the road less traveled...
Joined
Nov 13, 2015
Messages
2,249
Location
IL/AZ
Question #1: How far out of spec could valves be before problems develop? If one were at the lower end of the spec (but still in spec), and the next check would be in ~26Kmi, normal wear might take them more significantly out of spec.
Question #2: What is the worst out of spec you have seen, without adverse results?
 

SilverBullet

Well-Known Member
Joined
Dec 30, 2014
Messages
1,175
Location
Harmaston, TX
holligl said:
...
Question #2: What is the worst out of spec you have seen, without adverse results?
Or asked another way...if no adverse conditions exist could the valve lash possibly be a problem?

A bike that starts, idles and runs flawlessly hot or cold; no extra noises or vibes; better mpg than new; no oil consumption; no overheating; no power loss; no hard starts; no fueling issues, etc.

Wouldn't something from above list start appearing long before valve lash was an issue?

_

Sent from my SM-G860P using Tapatalk
 

Nikolajsen

"Keep it simple"
Joined
Jul 1, 2017
Messages
2,046
Location
Denmark
The worst that can happen is actually if the valve if to less in gap...
Then the valve will burn, and you might not feel anything before it is to late.
And when to less gap= no noise :mad:
 

Checkswrecks

Ungenear to broked stuff
Staff member
Global Moderator
2011 Site Supporter
Joined
Mar 7, 2011
Messages
11,515
Location
Damascus, MD
1. The gap is specified to provide the tightest possible valve operation when the engine is hot and running. The valves stretch, the cylinder stretches a different amount, etc, and all these tolerances stack up. Then the engineers add some value for wear between checks. We as owners and maintainers don't have the engineering or test data to say specifically 0.XY" is the absolute limit.


2. It's also not really a question of how "out of spec" has anybody seen before becoming an issue, because there is a curve of time and use to balance against how tight the gap (or lack of) is. As the effective gap during operation (not what you set it to) is eliminated by wear, there will be a gradual leaking of the hot erosive exhaust gasses past the valve(s). If you normally ride fairly easy and with less revs than another person, the temperature and time for the valve and seat to heat will have less erosion than the other guy with the exact same gap. His will wear and erode faster and so his answer will be different than yours.


Clear as mud, right? If you are within the lower spec and don't constantly rev the engine hard, you ought to make it to the next check. But if you've already got the rocker cover off and are right near the limit, why push and risk it when you have the hard part done?
 

holligl

Find the road less traveled...
Joined
Nov 13, 2015
Messages
2,249
Location
IL/AZ
Checkswrecks said:
Clear as mud, right? If you are within the lower spec and don't constantly rev the engine hard, you ought to make it to the next check. But if you've already got the rocker cover off and are right near the limit, why push and risk it when you have the hard part done?
I had the check done by a dealer at 30k miles. One valve was about 13% from the lower spec so they buttoned it up. I try to ride hard enough to avoid both carbon deposits and speeding tickets!

Sent from my SM-N950U using Tapatalk
 
Top