Two Amigos explore southern Utah. Super-Tenere and V-Strom 650.

SkunkWorks

Well-Known Member
Joined
Sep 13, 2018
Messages
1,771
Location
Colorado
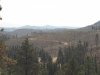
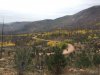
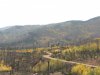
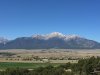
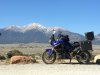
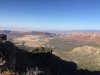
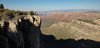
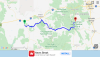
This trip took place September 26th thru August 4th 2020

It started a couple weeks before that with some much-needed pre-trip maintenance.....................

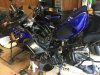
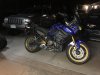
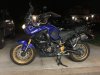
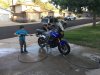
My 10-yr old son Jacob helped me first wash all the Montana and Colorado dirt off of it.
(I posted my Montana trip-report on ADV-rider. https://advrider.com/f/threads/three-amigos-invade-beartooth-pass-july-2020.1480487/
If this link is not allowed, mods-feel free to delete it. I'm "Skunk-Works" over there as well.)

IMG_7437.JPG

IMG_7438.JPG

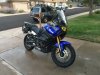
Now that it was clean, I could start work on it.

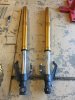
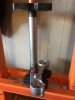
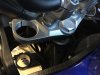
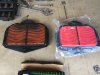
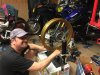
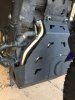
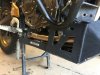
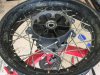
Since I would be doing both Tires, I removed the rear wheel first.

IMG_7439.JPG

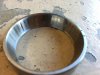
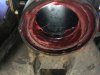
After removing the Tire, I decided to do something about the chipping paint on the rear wheel.
It had been like this since I bought the bike, and had bugged me ever since.
I wasn't sure if it was from stones? or possibly something that the previous owner tried to clean it with?

IMG_7442.JPG

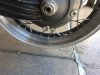
I first tried to use a spray-can of "Aircraft Stripper". I sprayed it on and let it sit for about an hour....................It did absolutely nothing to the black paint finish!
I originally was going to just re-spray it Black again with some wheel-paint.
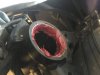
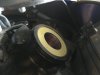
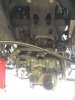
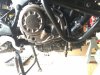
I mounted the wheel assembly back on the bike, and ran it in 2nd-gear while using various grits of sandpaper and a wire-wheel in my cordless drill.


IMG_7443.JPG

I de-laced the wheel so I could get the paint off the center spoke-rib.

IMG_7444.JPG

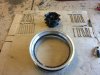
The wire-wheel seemed to work the best, and was the quickest way to get the paint off.

IMG_7445.JPG

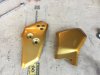
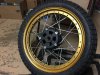
It was at this point that I decided, instead of painting it..................I might as well get it Powder-Coated.
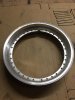
And if I was going to have the rear wheel Powder-Coated, I might as well get the front wheel done as well!
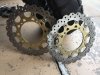
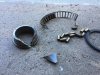
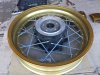
So I de-laced the front also.

IMG_7449.JPG

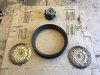
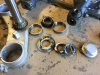
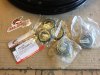
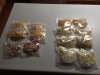
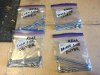
I made sure to bag-up and label all the spokes, so I wouldn't get them mixed up when i went to reassemble them.
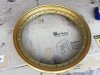
I also made sure to record a picture of both sides of the front and rear wheels before disassembly, so I could be sure of the pattern.


IMG_7451.JPG

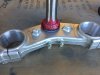
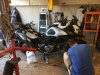
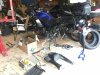
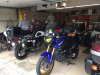
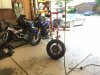
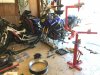
My Garage-Floor was now starting to fill up with shedding bike-parts.

IMG_7450.JPG
 
Last edited:

SkunkWorks

Well-Known Member
Joined
Sep 13, 2018
Messages
1,771
Location
Colorado
Next-up: The Brake Rotors.

I measured all three of them to make sure they were still within spec.
All 3 were good, so I used my coarse and medium "Flex-Hones" to remove any glazing and transfer-layer from both sides of all of them.

IMG_7446.JPG

I sprayed all the residue off and wiped them down with brake-cleaner, then set them aside.

IMG_7515.JPG

Next was remove the Forks and service the Steering-Stem Bearings. (they had a distinct "Notch" feeling in the center of the steering swing.

IMG_7452.JPG

What you see is all the grease that came in there from the factory!

IMG_7453.JPG

I couldn't really feel a distinct groove with my fingernail, but you could see where the bearing rollers live for most of the time while riding.

IMG_7454.JPG

Both Races came out fairly easily.
I decided the quickest way to get the lower bearing off the Steering-Stem was to cut it off with my Dremel.

IMG_7455.JPG

It came right off!

IMG_7456.JPG

I used the All Balls bearing set to reassemble it.

IMG_7457.JPG
 
Last edited:

SkunkWorks

Well-Known Member
Joined
Sep 13, 2018
Messages
1,771
Location
Colorado
Cleaned everything up nice, packed the lower bearing with Mobil-1 Synthetic grease, and pressed it and the lower seal on with a length of steel-pipe.

IMG_7463.JPG

IMG_7464.JPG

IMG_7473.JPG

While I was working, I had the upper and lower Races chilling in the freezer.
It helped them go in a little easier into the Frame.
Coated them with a good amount of fresh grease, installed the upper bearing and seal, and reassembled the Steering Stem with the Top-Clamp.

IMG_7465.JPG

IMG_7466.JPG

IMG_7467.JPG

IMG_7468.JPG

It was at this time that I removed the T-Rex Racing Skid-Plate, and the Factory exhaust Header.
I had planned to replace the front engine-mount bolts with Studs. I used some red loctite to install them.

IMG_7516.JPG

IMG_7517.JPG

I also used this time to pound out a few dents in the skid-plate while I had it off.

My Friend Cap'n Ron arrived a week before our trip with his V-Strom 650.
He needed to do some maintenance as well, which included the Valve-clearance check/adjustment, Spark-plugs, oil change, and various other items.
My Garage was quite a full work-shop at this point.

IMG_7539.JPG
 

SkunkWorks

Well-Known Member
Joined
Sep 13, 2018
Messages
1,771
Location
Colorado
I moved on to the rear of the bike once again.
Took the Swingarm and the whole rear Suspension off the bike to inspect and service all the pivot-points and bearings.

IMG_7519.JPG

I thoroughly cleaned everything, and although there wasn't much grease in there from the factory, at 22,000 miles all the bearings and bushings/sleeves looked good.
They all pivoted smooth with no notchiness.
I used plenty of fresh grease upon reassembly, and used some Moly-grease on the driveshaft splines when putting that back together. (I made sure to leave the 4 cap-nuts loose for the rear pumpkin assembly, as I wouldn't be putting the wheel back on for a few more days)

Next was a new Air-Filter.
I went with "Hi-Flow" as it was half the price of the Yamaha one, and looks identical.

IMG_7522.JPG

There was only about a teaspoon full of engine oil in the bottom of the filter-box. I took the clear cap off and cleaned it out really good.

IMG_7523.JPG

I even counted the pleats and compared the old vs new.............Same number.

IMG_7521.JPG

I also changed the Oil and Filter at this time.
I used a Napa-Gold (Wix) filter.

IMG_7526.JPG

Then moved on to the Arrow Header...........................Installation was about as easy as it gets!

IMG_7527.JPG

IMG_7528.JPG

I put a little anti-seize on the Oxygen-sensors before screwing them back in.

IMG_7531.JPG

Put the Skid-Plate back on, and the bike was starting to come back together!

IMG_7532.JPG
 

SkunkWorks

Well-Known Member
Joined
Sep 13, 2018
Messages
1,771
Location
Colorado
While Cap'n Ron and I worked in the Garage, I had a baby 7-lb Brisket in the Smoker.

IMG_7520.JPG

I had my Wifi-Meat Thermometer in the Garage so I could monitor the temps while we worked.
I think this ended up at around 10-hours cook time.
(I know..................................This should go in "Food-Porn)

IMG_7524.JPG

IMG_7525.JPG

I had to wait a few more days for the wheels to come back from the Powder-Coater, but I eventually got them back with a couple days to spare before our trip.

Since I am not really a fan of Black wheels in general, this is the color I chose.

IMG_7533.JPG

I also dropped off the driveshaft and rear brake master-cylinder Guards to have coated in the same color, since the Black coating was being rubbed-off by my boots.

IMG_7540.JPG

Cap'n Ron is a "Spoke-Genius" (he used to own a Bicycle Shop), so when he offered to do the spokes for me, I did not refuse!

IMG_7534.JPG

One Tire mounted.............

IMG_7535.JPG

Rear wheel laced-up, ready for a Tire and the Brake Rotor.

IMG_7541.JPG

I cleaned all the dust and grit out of the wheel-seals, and put a thin coat of grease on them before assembling the wheels back on the bike.
Made sure to torque the wheel-axle first before tightening the cap-nuts that hold the pumpkin to the swingarm.
 

SkunkWorks

Well-Known Member
Joined
Sep 13, 2018
Messages
1,771
Location
Colorado
The last order of business was new brake-pads all around.
The rear ones were completely worn down to the backing-plates.
The front ones had some life left, but replaced them with new anyway.

IMG_7410.JPG

I went with EBC HH-Sintered both front and rear.
I'm a huge fan of these brakes, and have used them for years on my FJ1200.
Since I have R1-Calipers on my FJ, my Super-Tenere and that bike use the same front pads!

IMG_7542.JPG

IMG_7543.JPG


Double/Triple-checked everything to make sure I did not forget any steps during reassembly.
Got the bike all put back together a night early...................(I would ride it to work my last day of work before the Trip as kinda a "shakedown" to make sure everything worked as it should, and then recheck the spokes when I got home.)

New Studs for the Skid-Plate worked out well.
IMG_7549.JPG

IMG_7550.JPG

MAN!..............................Look at that Beast!............................................SEXY-SEXY!

IMG_7544.JPG

IMG_7547.JPG
 

SkunkWorks

Well-Known Member
Joined
Sep 13, 2018
Messages
1,771
Location
Colorado
When I plan to do a Motorcycle Trip that involves camping, I usually like to take a bunch of pre-packaged, freeze-dried backpacker meals along with me.
They are an easy way to bring food with you without having to worry about its "shelf-life". You just need to boil water, and you've got yourself a meal......

IMG_7304.JPG

There are a couple things I don't like about them:
When you buy them, they are typically always "2-servings". This is fine if you are always sharing them, but if you are camping alone you've got more food than you need.

IMG_7301.JPG

You can always just eat the whole bag yourself, but they get pricey that way..........................I like to eat, but sometimes a whole bag is too much even for me.
The other thing I don't like about them is that they mainly contain a lot of starches and a little bit of protein.................They don't have very much vegetables in them.
This is probably due to their being geared towards the energy needs of someone who is back-packing through the forest or mountain trails.....
I just feel that when I'm on the road I don't get enough fruits or veggies in my diet..(at what point did you ever think you'd hear yourself saying that?)

Before I went on this trip I decided to try something new.
I ordered a selection of freeze-dried vegetables and fruits from a company called "North Bay Trading Company" They specialize in selling various dried food items.

IMG_8517.JPG

I also ordered a couple multi-packs of single-serving size "Boil-safe" resealable bags from a different company.

IMG_7493.JPG

I bought my usual selection of backpacker meals, but this time I divided them up into two equal single-serving packages, and added various servings of vegetables to each of them!

IMG_7551.JPG

This actually worked out great!
They took up less space in my panniers, and I felt like I was getting a full meal with added fruits and veggies. Win-Win!

I almost always bring a selection of Tuna-packets on the trip also.
They take up no room whatsoever, and you can either eat them as a snack, or add them to your meals for added protein.
They also have like a 3-year shelf-life, and you don't have to refrigerate them.

IMG_8518.JPG
 
Last edited:

SkunkWorks

Well-Known Member
Joined
Sep 13, 2018
Messages
1,771
Location
Colorado
And now, on to the Trip itself!

Day-1
240 miles

After packing the bikes with all our gear the night before, it was an easy morning of getting ready with just some last-minute stuff and checking over our lists one last time.
We were ready to go!

IMG_7552.JPG

We said goodbye to my Wife and Kids, and hit the road!

It was an easy ride to the Interstate, where we headed south out of town for a bit before turning into the Mountains.
We rode through Deckers before heading off-pavement for awhile.
The road we chose takes you through the Hayman-Fire burn area. This fire happened in 2002, and is still just barely recovering. It's a slow process.
Since it was late-September, the little pockets of Aspens were changing to their signature golden color.

IMG_7553.JPG

IMG_7555.JPG

The road is very easy, and a great way to get our "Dirt-Legs" back under us on these fully-loaded bikes.

IMG_7556.JPG

IMG_7558.JPG

Cap'n Ron riding ahead up the road.

IMG_7562.JPG

Another shot of Cap'n Ron on the road below me.

IMG_7565.JPG

IMG_7567.JPG

This road meets back up with pavement at Terryall Rd.
We headed south towards Lake George, and once we turned on to Hwy-24 we spotted the perfect lunch-stop!
A Food-Truck selling Prime-Rib Sandwiches!
At almost the same instant, we both said to each other over the intercom "Lets Do It!"
It was worth the stop, and did not disappoint.

IMG_7568.JPG

IMG_7569.JPG
 

SkunkWorks

Well-Known Member
Joined
Sep 13, 2018
Messages
1,771
Location
Colorado
One of the things that I enjoy while moto-touring like this, is that wherever you stop people always want to know where you are headed, or where you just came from.
They seemingly always are drawn to the bikes, and can't help but strike up a conversation wanting to know about your trip.
I enjoy meeting people that way, and try to be as engaged as possible if they show an interest.....

After our Sandwiches and a Coke, we continued south to Cripple Creek, and made our way around to one of my favorite dirt-roads.
We headed south on Phantom Canyon road towards Canon-City.
I didn't really get any pictures here. I was enjoying myself too much.
Just this shot by one of the old tunnels you ride through along the way.

IMG_7571.JPG

We topped up with Fuel in town, and then headed west towards Salida along the Arkansas River.
This road is a series of fast flowing sweepers through the canyon.
There is usually a lot of traffic through here, especially on the weekends, but this day it was pretty light so we had fun with it.

From Salida we headed north for a short ways to meet up with Hwy-285.
We turned at Johnson Village and rode a short way up the canyon to a campsite that we were hoping to get.
It is underneath this giant Tree, next to a babbling-Brook.
I'm not even sure what kind of tree this is? Maybe some sort of Willow-Tree? Cottonwood?

We arrived to find it empty.......................SCORE!
We set up our tents, made our dinner, had some beverages, and spent the rest of the evening relaxing to the sound of the water flowing next to us.

IMG_7573.JPG

IMG_7575.JPG

IMG_7576.JPG

IMG_7578.JPG

IMG_7580.JPG

Here's a basic map of our route for the first day.


IMG_7618.PNG

Here's a 3D Video of our Route.


SkunkWorks

Well-Known Member
Joined
Sep 13, 2018
Messages
1,771
Location
Colorado
Correction on the very first Post.
It was supposed to read September 26th thru October 4th....................................Not August 4th!
 

SkunkWorks

Well-Known Member
Joined
Sep 13, 2018
Messages
1,771
Location
Colorado
Day-2

322 Miles.

Originally our plan for the second day was going to be:
Ride Marshall Pass Rd, then make our way over to Lake City to Cimarron, then take Owl Creek Pass to Ridgway and find somewhere to Camp along there or near Ouray.
Looking at the weather forecast, it was supposed to be below freezing for that area over the next couple nights.
We made the decision to just push on into Utah a day early and take advantage of the warmer temps.

After Morning Coffee and breakfast, we packed up Camp and headed back down the Canyon towards Buena Vista.
There is a Picnic/Day-use area just a couple miles down the road with clean Vault-toilets, so we stopped in for potty-break.
Can't help but enjoy the views from the ridge.


Mt. Antero, 14,275-ft
IMG_7583.JPG

Mt. Princeton, 14,204-ft
IMG_7582.JPG

IMG_7585.JPG

We continued south to Poncha Springs, and took US Hwy-50 west over Monarch Pass.
After making a quick stop for fuel in Gunnison, we continued west alongside Blue Mesa Reservoir.
We stopped at the Dam for a couple of quick pictures.


You used to be able to walk out to the Intake Tower, and look down the Spillway Tunnel, but they have it all fenced-off now.
IMG_7587.JPG

IMG_7588.JPG

We continued west to Montrose, and stayed on Hwy-50 as we made our way through Delta and north-west towards Grand Junction.
The turnoff for Hwy-141 is just south of there.

This road follows a twisting Canyon all the way into Gateway.
Along the way we stopped at a Picnic area and took a break under the shade of some large trees.

IMG_7589.JPG

IMG_7591.JPG

IMG_7590.JPG

From there it was just a short ride into Gateway, where we got fuel at the only station in town.

IMG_7594.JPG
 

SkunkWorks

Well-Known Member
Joined
Sep 13, 2018
Messages
1,771
Location
Colorado
After getting Fuel in Gateway, we turned west into John Brown Canyon.
From here it is dirt all the way into Utah.
The road winds its way up the Canyon until you emerge above it.

IMG_7595.JPG

IMG_7597.JPG

IMG_7596.JPG

From there we continued west towards Moab area.
The main route (Gateway Road) is easy to follow, and leads you over the high plateau to the "Bull Canyon Overlook"
We stopped here for a break, and to take some more pictures. Ron put his Drone up and got some video from the air. (I don't have any of his footage except for one picture)

IMG_7602.JPG

IMG_7608.JPG

IMG_7609.JPG


Shot of Me, taken from Ron's Drone.
IMG_7980.JPG

There is a short hiking trail along the Ridge, where one of the highlights is a set of Dinosaur Tracks from an ancient "Velociraptor-like" Creature that once roamed these areas.

IMG_7605.JPG

IMG_7606.JPG
 

SkunkWorks

Well-Known Member
Joined
Sep 13, 2018
Messages
1,771
Location
Colorado
From this point, you meet back up with Pavement.
There are a few ways you can take to get down into Moab from here.
We chose to head down through Castle Valley and meet up with Hwy-128, in hopes that we could find a Campsite along the Colorado River.

IMG_7610.JPG

We rode past all the Campgrounds, and even doubled-back to cruise through a few of them....................They were all full!

We continued down the River Canyon and turned north on Hwy-191.
There are a couple BLM camping areas just north of Moab, so we were hopeful on finding a place to throw up our tents there.

We found a great spot in the Willow Springs Camping area.
It was guarded by a nice Tree and a Wall of Rock.
We set up our Tents and enjoyed some dinner and relaxing with some adult-beverages, and a decent showing of Stars and Planets.
IMG_7614.JPG

IMG_7616.JPG

IMG_7615.JPG

Here's the 3D version of our Route for Day-2.


And here's the basic Map of our Route.

IMG_7619.PNG

Thanks for taking a look......................
Stay Tuned!
 
Top