Spark plug replacement, what a PITA

semmyroundel

Active Member
Joined
Mar 12, 2021
Messages
217
Location
London UK
I've followed all the great advice given here, thanks guys.

I even got some genuine NGK Iridium via japansparkplugs, rather circuitously going to France first (as they refused to ship direct to UK) and am very happy with them (I noticed quicker engine start and smoother take up on acceleration) I only use T mode as I'm not a speed merchant, but it certainly felt like it was in R mode.

I replaced the coils with RMStator units, but the existing ones had absolutely NO signs of corrosion, and the standard plugs that came out seemed to be the right colour and gap.

Why did I do this with the bike after only 7000 miles from new? Well, the other day, in fact a day after riding in the rain, the bike cut out twice, dead.
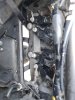
I suspected water ingress, but apart from the evidence that water clearly had got onto the cylinder head (water and debris marks kicked up from front wheel), when I pulled out the coils, they were spotless inside the plug wells, and looked very much like the new coils I'd bought.

So what was a PITA? Yes, the tube underneath the air box was a pain to get off, and a much bigger pain to get back on, and someone here recommended a set of Amtech very long pliers (absolutely useless, as the ends were too narrow to press the pipe clamp together). In the end I took the clamp off and put a jubilee clip on instead.

But the FAR bigger pita was the left the side panel, the bolts that are supplied are a little short to engage in the captive threads on the clips on the inside around the fan area (the other side of the bike was fine).
As you push with the allen key, the inner fixings move back making it very difficult to engage the thread.
I must've had that panel off three times trying to look at the fixings, this panel alone cost me two hours of swearing. I have the Givi crash bars and they don't permit the sliding upwards of that left panel to inspect the internal captive nut, without loosening them, which I didn't want to do.

Of course, one of the captive nuts dropped out, so now I've got more work to do!

So: Does anyone know of a supply in uk of these bolts but longer?
What and how do I measure resistances on the coils to check if they are ok?

And lastly, as I write this, I've just realised that I didn't do up the two air box clamps to the "carbs" or injector ports, whatever they're called, cue loads more swearing...
 

StefanOnHisS10

Converting fuel into heat, noise and a bit motion
Staff member
Global Moderator
Joined
Apr 8, 2020
Messages
2,168
Location
The Netherlands, Friesland.
Yes it is not extremely simple but maybe step back an hour, smoke a cigarette/drink a beer/make your wife happy/snif a line/whatever… It ain’t that difficult. I’m a mechanic for the biggest part of my life now and when things don’t work with you, just walk away (curse if you will) and try again later. Always works for me.
 

semmyroundel

Active Member
Joined
Mar 12, 2021
Messages
217
Location
London UK
Yes it is not extremely simple but maybe step back an hour, smoke a cigarette/drink a beer/make your wife happy/snif a line/whatever… It ain’t that difficult. I’m a mechanic for the biggest part of my life now and when things don’t work with you, just walk away (curse if you will) and try again later. Always works for me.
Good advice, perhaps you'd now be so good as to answer my questions? At least the one about checking resistances?
 

Jlq1969

Well-Known Member
Joined
May 5, 2018
Messages
1,800
Location
Argentina
So what was a PITA? Yes, the tube underneath the air box was a pain to get off, and a much bigger pain to get back on, and someone here recommended a set of Amtech very long pliers (absolutely useless, as the ends were too narrow to press the pipe clamp together). Ñ
I don't know which procedure you followed to disconnect / connect that tube, but it has some flexibility ... so it is much easier if you first disconnect the filter box from the throttle bodies and then disconnect the hose ... and when you put it in, first connect the hose and then you plug the filter box into TB. doing so, you have enough space to put your hand in with a normal tweezers
 

Tenman

Well-Known Member
Joined
Dec 7, 2013
Messages
2,109
Location
Natchez Ms USA
I had the same PITA getting 2 screws in the upper radiator side panel. Took a couple of cussing breaks. I finally stuck a screwdriver behind the back of the plastic it screws into and gave it a little push outward. Using my cheap electric screwdriver. It went right in.
 

semmyroundel

Active Member
Joined
Mar 12, 2021
Messages
217
Location
London UK
Thanks Stefan, I'll check that out for sure, but I'm doubting that I'll find any problem with any of the coils at all, which makes the cutting out all the more puzzling.
I do wonder if water managed to compromise the cable plugs that go onto the coils..
Tenman, I did try that but I hadn't taken the crash bars off so there was virtually no movement for me to get my hand behind, or indeed a screwdriver. However, I did line up the thread with a screwdriver from the front, but as soon as I pushed the bolt in, without a method to hold the captive nut in place, it just pushed back.
I did manage to pack the "o ring" area with dielectric grease though, so happy about that.
 

Attachments

semmyroundel

Active Member
Joined
Mar 12, 2021
Messages
217
Location
London UK
I don't know which procedure you followed to disconnect / connect that tube, but it has some flexibility ... so it is much easier if you first disconnect the filter box from the throttle bodies and then disconnect the hose ... and when you put it in, first connect the hose and then you plug the filter box into TB. doing so, you have enough space to put your hand in with a normal tweezers
I could get both hands in the method you suggested of pulling the pipe up a bit, that wasn't the problem, it was that the two halves of the clip are so far apart that a long (thin nosed pliers) kept jumping off the tabs.
Someone else mentioned long nosed pliers with a 90 degree end on them, that would've worked a treat. In fact I might reinstate the Yamaha clip on the next service once I get some of those pliers.
 

Boris

Well-Known Member
Joined
Dec 21, 2013
Messages
2,078
Location
midlands. UK
I took the hose clamp off and left it off, about 30k miles ago. The hose is short enough, stiff enough and routed in such a way that it can’t and won’t drop off. I use the long nose pliers to slip the hose on and then forget it until the next plug change. It’s always stayed put!
 
Last edited:

Boris

Well-Known Member
Joined
Dec 21, 2013
Messages
2,078
Location
midlands. UK
Is yours a Gen2 bike? Mines a Gen1 and I’m pretty certain that mine doesn’t have those connections on the two outside coil fixing bolts?

see post 7 above.
 

Jlq1969

Well-Known Member
Joined
May 5, 2018
Messages
1,800
Location
Argentina
They are only grounding cables (-), the difference with gen1, can be due to the accessories (ES, hand warmer, etc). The coils do not need (-)… they have only two cables, one is negative… the other the signal
 

SparrowHawkxx

Active Member
Joined
Dec 9, 2012
Messages
203
Location
Oklahoma
I could get both hands in the method you suggested of pulling the pipe up a bit, that wasn't the problem, it was that the two halves of the clip are so far apart that a long (thin nosed pliers) kept jumping off the tabs.
Someone else mentioned long nosed pliers with a 90 degree end on them, that would've worked a treat. In fact I might reinstate the Yamaha clip on the next service once I get some of those pliers.
I've always used Lineman's pliers, the tip of the pliers is wide enough to grab all 3 tabs on the clamp.
Also do what Jlq1969 suggested:
first disconnect the filter box from the throttle bodies and then disconnect the hose ... and when you put it in, first connect the hose and then you plug the filter box into TB.​
This has always worked for me.

There are a lot of threads on here about this issue and many have suggested the long nosed pliers with a 90 degree end, I've also seen a 45 degree end suggested, so I thought I would give that a try. I got a cheap pair of the 11" pliers with a 90 degree end to see if it was any better.
They did not work for me. I think the problem was the angle was not really 90 degrees it was a bit short of 90 and I couldn't get it squarely on the clamp.

Try a google search, its a better search than what you can do on the forum.
Try something like this: site:yamahasupertenere.com vent hose clamp air box
 

semmyroundel

Active Member
Joined
Mar 12, 2021
Messages
217
Location
London UK
I had seen that thanks. But that guy didn't realise that the sky was reflecting on his DMM screen!?
Anyway, being an electrician, I can check with my Fluke DMM which IS accurate.
Watch this space, but I'll bet that all four coils are fine when I check them.
It was a little fortuitous that I forgot to do up the airbox clamps because it gave me the opportunity to revisit the side panel fixings. This time, they went in without too much problem.

I did find out why one of the bolts gave me so much trouble:
It was the middle one at the front of the left hand panel (over the fan). It should not have been undone as it only holds the two parts of the panel together, and doesn't hold the panel to the bike.
What had happened was the captive nut clip had moved and eventually dropped down inside the panel, which I eventually found once I removed the panel, and no need to remove the crash bars!
I must've been having a senior moment/day yesterday.

As someone said, once done, next time it's one hour/ two tops.
 

Jlq1969

Well-Known Member
Joined
May 5, 2018
Messages
1,800
Location
Argentina
well ... now that it seems that you have everything in its place, a question: ... did you read at some point, a post in which it was mentioned the placement of a "second" o-ring in the coils to prevent the entry of water?….
the feeling, if you hadn't read the post… .it's more or less like forgetting condoms… .just that night:):)


semmyroundel

Active Member
Joined
Mar 12, 2021
Messages
217
Location
London UK
well ... now that it seems that you have everything in its place, a question: ... did you read at some point, a post in which it was mentioned the placement of a "second" o-ring in the coils to prevent the entry of water?….
the feeling, if you hadn't read the post… .it's more or less like forgetting condoms… .just that night:):)

Only wore one once, and that was over thirty five years ago, so I can't remember that feeling.
I remember reading that months ago, but when I started the work the other day I couldn't find that one, there are so many posts on the subject...
However, I packed the top part of the coils in grease, you can see in my photo it oozing out, am fitting a mudguard extender AND a plate in front of that area, so I'm happy I've got it covered.
But thanks.
 

holligl

Find the road less traveled...
Joined
Nov 13, 2015
Messages
2,242
Location
IL/AZ
But the FAR bigger pita was the left the side panel, the bolts that are supplied are a little short to engage in the captive threads on the clips on the inside around the fan area (the other side of the bike was fine).
As you push with the allen key, the inner fixings move back making it very difficult to engage the thread.
I must've had that panel off three times trying to look at the fixings, this panel alone cost me two hours of swearing. I have the Givi crash bars and they don't permit the sliding upwards of that left panel to inspect the internal captive nut, without loosening them, which I didn't want to do.

Of course, one of the captive nuts dropped out, so now I've got more work to do!

So: Does anyone know of a supply in uk of these bolts but longer?
I have been there done that. It is not a length issue at all, if the panel is lined up properly. I have since learned that the more you fight these panel screws the more they will resist starting. Like the CCT reset, it requires more technique and absolutely no brute force. I now start them only with fingers, no impact drivers or even screw drivers until the threads are started. If one screw doesn't start immediately, visually check the alignment and/or try a different screw. Again, more brute force will not work and make things worse.

Sent from my SM-N950U using Tapatalk
 
Top