Big thanks to
@BlueDog69 for tips - did not want to fwark this up!
Well my Tank repair I though was above and beyond my capabilities. Turns out if you take your time and dont rush each step it can come out smelling like a new tank!.
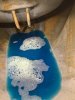
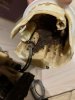
Made a gasket from thin neoprene rubber sheets @Bunnings, and a window from 3mm perspex i had lying around - I needed to buy some Longer screws to button it down with the pump frame holder.
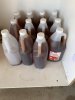
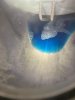
Leave the Filler Cap in place. I used 2lt White vinegar and some clean aquarium gravel initially to attack and knock off the rust and crude. 2 days rotating and shaking the tank every few hours and a nice dark 'ale' was produced!
Rinsed the tank out with tap water, dried it with hot air gun and then filled it to the brim with white vinegar. Left it brewing for 4 days like this rotating and shaking the tank every 6 hours or so.
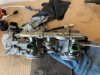
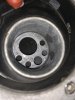
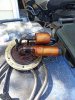
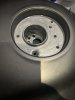
I had to buy a new pump as the old pump metal casing was complete rusted up and I was not putting that back into the tank. Old Filter was rock hard with rust. But the inlet and outlet of the pump was crystal clean which was a sign nothing was injested up into the pump or to the fuel injectors (fuel lines were aslo clear and not discoloured). Went with All Ballz brand pump and it fit well. All you need to reuse is the pump outlet rubber cap and this slides over the pump outlet and seals the outlet when you insert pump into the frame.
I also had to buy a new fuel regulator as this also has surface rust all over it and inside where the spring is... Search for 23280-22010 mine also suited a Toyota was cheap.
I bought the KSB Large MotorCycle Tank kit but did not want to use it's special solutions in a cruddy tank and wanted to give it the best chance for working on cleaner surfaces. Rinsed Tank again and then did 2 days with a 50/50 mix of engine degreaser.
Now this is where you should set aside a full day and take your time as you are now going to use the KSB Kit.
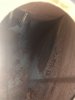
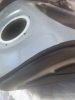
Empty the degreaser, rinse and dry and check the inside of tank for left over varnish deposits, use a green scotchbrite pad to remove any left over varnish and give the internal surface a light rub over. My filler neck was also rusted so I made sure I cleaned it well as I will be painting this with the Epoxy Kit. My tank was looking like new and fresh inside!
Take the KSB kit and follow the directions... yes you... follow the directions... yes again follow the directions!!!!!
Use the Cleaner solution and let it do its thing. Because the tank was pretty clean inside it would not have had to work that hard, so I re-bottled the solution after use.
Use the Rust Converter solution, I also rebottled this.
Take the Filler Cap of the Tank now - and clean this up later.
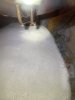
You are still Following the KSB kit directions... Leave the tank open - no caps etc... Having a head mounted light will be good here... Pour the Epoxy in - it is thick like honey.
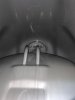
Now the fun part... 30-45 min of arm pump and back strain as you will be holding the tank up over your head and rotating it, watching from the pump opening what the epoxy is doing.
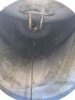
Slowly rotate the tank so the epoxy puddle runs over all the surfaces. Now how to cover the return lines and the internal hump - turn tank upside down and let the epoxy pool near the filler end of the tank and then quickly flip the tank over right side up so the expoxy drips down onto the return lines and hump. Keep watching inside and what is happening and tilt the tank so the drips mover over other parts inside. You will have to do this many times till you are satisfied that all the parts are covered. I had to do this like 8-10 times. FYI, not a single drop of epoxy came out of the tank while I was doing this.
When you are satisfied that you have covered the tank internals, rested the tank upside down and let the epoxy pool, then used a chinese soup spoon taped to a stick to collect the residual epoxy and put it back into the tin. BTW - from the Large Kit 500ml tin you will recover about 400ml - Yes this makes sure you have adequate drip and run coverage - when you start you think you don't have enough inside!
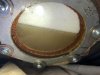
I also quickly painted the edges of the pump housing opening and outer mounting surface with epoxy before resting the tank in its upright position just like it would be on the bike - any extra epoxy will pool into the lower seams of the tank.
While it was still wet i also painted with epoxy the inside of the fuel filler and the outside cap mating surface where all the bolt holes are and drain tubes. Dont put any epoxy into the holes!!!!
Now lightly over the filler opening so dust etc does not fall onto the wet epoxy or into the tank - Leave it set for 5 days!
While tank is setting up - clean you filler cap. I disassembled the cap and also painted epoxy around the metal cap parts as they also were rusting.
Cleaned up the pump housing and assembled.
After 5 days, put the tank together (I reused the old pump gasket) put some fuel into the tank - check for leaks, turned the key, pump pressurised the rail and I pressed the big red button...
5 secs of ka-he...ka-he...ka-he...ka-he and she spluttered back to life. 30 seconds later she was purring nicely at idle.
Took her for a quick 5 minute ride... hehe... big smiles all is good!
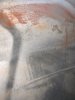
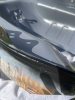
( I also repainted the underside of the tank and seam edges with Kill-Rust matt Enamel paint as these surfaces are also prone to rust. The Tank seams have rubber edging and this traps moisture and the seams rust - so I had to also tend to these issues. I recovered the edges with some 7mmx10mm edge protection leaving a join at the lowest part of the tank seam so water can drip out)

 103.6 KB Views: 124
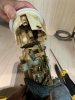 128.8 KB Views: 124
 144.9 KB Views: 123
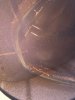 169.3 KB Views: 120