RRR Adjustable Handlebar Risers for the Super Tenere - Ready

spinalator

Member
Joined
Apr 13, 2016
Messages
234
Location
Saskatchewan, Canada
Hi Gorden, the package arrived up here in Canuckastan today, thanks for the quick shipping. They look awesome, I will try to put them on this week and report back.
 

Ilbikes

Member
Joined
Sep 28, 2015
Messages
118
Location
South Alabama
Thanks Ryan, Terry. I'm looking forward to some ride reports and photos. Your inputs and feedback will determine if we make any more of these and what changes should be included.

I appreciate you guys taking the leap to try something new and very different from the normal stuff commercially available that I didn't feel worked...........

YOU GUYS ROCK!

Gordon/RTS
 

Ilbikes

Member
Joined
Sep 28, 2015
Messages
118
Location
South Alabama
Now Brent, did the wife keep the secret about the Hi-Vis tool roll kit all the way to the end? When I called back the 2nd time, I told her that I was going to surprise you with the Yellow.....

Happy Birthday....!!!

Gordon
 

spinalator

Member
Joined
Apr 13, 2016
Messages
234
Location
Saskatchewan, Canada
I did a test run install last night, and found one of the 4 bolts holding the OEM bars on was loose. I need to get cable extensions, as things are pulled very tight. Nice looking risers.
 

Gigitt

Active Member
Joined
May 15, 2015
Messages
427
Location
Sydney Australia
Hi Gordon

My heavy parcel arrived... Thank You


Can you please explain to me the accessory plate mounting top caps...
why is there an inner set of smaller threaded holes?
these smaller diameter threaded holes get covered by the plate when mounting and are not used - well maybe not?
The supplied plate mounting bolts dont fit the holes.

Also If I want to mount a RAM ball bolt should I only use the plate mounting bolt?

Cheers
 

Ilbikes

Member
Joined
Sep 28, 2015
Messages
118
Location
South Alabama
Hi Marko,

The small, inner 6mm holes are there to mount items onto when you're not using the dash and when using my Wedge/Incline system - these are not used in your application. These are programmed into the machining process. I designed some wedge blocks that would go there to incline the dash plate on some of the vintage bikes and cafe bikes where the customer might want an inclined dash.

I pre-fit and tested every set of these sets - including the dashes. Be sure that you don't have the handlebar caps tightened - if you're using the dash, then install the 2 small bolts loosely, then the large joint bolts - tighten the handlebar caps last.

Here is my suggested use of RAM balls - and a few photos of the Wedge -these do not come with my Tenere systems.

Keep me posted - Thanks Gordon


Ilbikes

Member
Joined
Sep 28, 2015
Messages
118
Location
South Alabama
I have them in stock, but they aren't cheap.....There is a lot of machining in those little wedges. If you're serious about wanting the incline, I'll dig them up.

Best Regards, Gordon
 

TheHelios

Taco Enthusiast
Joined
Dec 1, 2014
Messages
556
Location
Dallas, TX
While I try to figure out my short cable situation, i utilized the plate from the kit which I was most excited about.


Ilbikes

Member
Joined
Sep 28, 2015
Messages
118
Location
South Alabama
Guys,

All of the Gen 1 and Gen 2 Riser Systems are gone. Folks snapped up the remaining 3 pretty quick once posted. I've been preparing and now attending a Gold Wing event so time on the computer is limited.

I'm ready to see photos and get some operational feedback - ride, handling, and comfort.

Best Regards, Gordon/RTS
 

Chuck B

New Member
Joined
Apr 2, 2014
Messages
301
Location
Flagstaff AZ
I have a Gen1 riser that I've decided not to install. Going a different route. If anyone is interested send me a msg.
 

Gonzodog

Family, friends, bikes and skiing
2013 Site Supporter
Joined
Sep 10, 2013
Messages
27
Location
NWPA
Ilbikes said:
Guys,

All of the Gen 1 and Gen 2 Riser Systems are gone. Folks snapped up the remaining 3 pretty quick once posted. I've been preparing and now attending a Gold Wing event so time on the computer is limited.

I'm ready to see photos and get some operational feedback - ride, handling, and comfort.

Best Regards, Gordon/RTS
Have had Gen 1 on my '13 for a few weeks now and I am very pleased with the result. Had to install longer brake/clutch hoses (PITA$$) and rearrange the throttle cable guide. Once that was done, the risers were easy to adjust. I have not moved hem from the first position I came up with. Not sure I need to fiddle with this set up much more.

Now riding is much more comfortable as I sit further back on the seat now and my arms aren't stretched out as far, and standing I am much more upright.

RECCOMEND if you want robust. easy to install risers. Just bear in mind the need to get longer hoses if you want to use the full range.
 

Ilbikes

Member
Joined
Sep 28, 2015
Messages
118
Location
South Alabama
Hi Guys, I needed to post up some additional information on the Gen2 Riser install. I've now had 2 installers point out the lack of details in the instructions. This is to help those of you still haven't made the install -

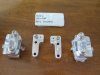
The part both beta testers got stumped on was the stock base angles. Yes, You will have to loosen the OEM Post - there is no key or splined teeth, those simply "pinch" together with the 10mm nuts (14mm head size). The new RRR bases have to be parallel - else they would not articulate backwards and forwards. Please see attached image - This is the underside of the triple clamp showing the simple 14mm nuts holding the OEM post - you simply loosen them, rotate, install, and tighten those.

Here are the detailed and stepped notes Harry sent me after his successful and complete installation - Best Regards, Gordon/RTS

1. Starting with longer clutch and brake lines already installed (And Handlebars installed)

2. Loosed both of the lower 14 mm nuts about 1 turn (Break loose with small wrench … ~ 23 fl lbs torque to break loose)

3. Loosen / remove both top handlebar clams with a 6 mm hex shaft driver (Break loose … ~ 20 ft lbs)

4. Raise handlebars and use hook (Bungie Cord Works Well) to provide space to install new risers

5. Place and attach both left and right risers .. Torque lower riser front 6 mm hex / allen bolt first then rear bolt (all to 20 ft lbs)

6. Hand / Loosely tighten the 17 mm bolt / nut to keep the riser from dropping during step 7

7. Place handlebars into upper riser slots and… Torque upper front 6 mm hex / allen bolt first then rear bolt (all to 20 ft lbs)

8. Torque both the lower 14 mm nuts … to 23 ft lbs …

9. Loosen the upper riser clamp 6 mm hex / allen bolts and rotate the handlebars to the position you want (Torque when done)

10. Loosen the 17 mm bolts and move the riser back and forth / up and down to the position you want and then Torque to 60 lbs/feet and tighten the Gold lock nuts.


Kabish

Member
Joined
May 9, 2016
Messages
193
Location
San Diego
Do you have plans on making more of these down the road?

I know i need risers, well at least I'm pretty sure I do, and these sound like they are better than Rox Risers.
 

Ilbikes

Member
Joined
Sep 28, 2015
Messages
118
Location
South Alabama
Hi Kabish, I hope so. The answer will be based on the feedback and enthusiasm from the Beta testing I did on these.

I need to make sure I can sell them and that depends on having a customer base that wants/needs them.

I will post here when that conclusion is made. I have to do at least 10 at the time for set-up efficiency.

Thanks for your interest! Best Regards, Gordon

http://www.rrrtoolsolutions.com/index.php
 
Top