yz454
Member
Come on guys it,s not that complicated for all these pages . Just tap it or a self tapping over size plug which is easy .
Just a POI: The single oversize stands a good chance of splitting the aluminum casting that holds the threads.yz454 said:Come on guys it,s not that complicated for all these pages . Just tap it or a self tapping over size plug which is easy .
 Seen it, had to fix it, not fun. (customer vehicle)
Thanks for the tips! any thoughts whether I should lean the bike on its side for drilling and threading or working on it while on the center stand will do it ?EricV said:It's a good kit. Clean the aluminum area of new threads very well with a solvent or alcohol and let dry before you install the insert and use some permanent loctite for the insert to aluminum threads. I have seen Timeserts come out in spark plug and oil drain plug applications after a while. It rarely causes damage, but is something of a pain to deal with every time you unscrew it after that. It's hard to get it to stay after the Timesert comes loose.
Note that it is possible to strip the threads again, but that you won't strip the steel Timesert threads, but instead the aluminum threads the Timesert is threaded into.
That is correct. The S10 uses a copper washer instead of the hollow, one time use crush washers that you are familiar with. Nothing wrong with your technique. I have a '12 and my drain plugs are not allen, but the same technique works with a combo wrench, (open end one side, box the other).racer said:Ericv, do I understand correctly that the S10 DO NOT use crush washers on the drain plugs? I just changed my oil and looked at the washers and they appeared copper in color and did not resemble the crush washers I had on hand from past bikes. BTW, I just snug up the drain plugs then go a little more with the allen wrench, no ratchet involved. Racer
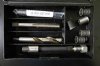
There ya go. That's the right tool for the job IMO.DarkKnight said:Got the M12 x 1.5 Time-Sert kit yesterday. This is dummy proof set for first time rethreading and includes a steel inserts for an M12 bolt, so no more stripping *ever* again on this thread....

I always coat the tap in grease, this will catch most of the shavings. Then I use a small round brush to clean the hole. Put the brush in the hole and pull it down the sides to brush any debris out. Any 1/2 x 20 drain plug will work. Just use a crush washer and don't over tighten it again. I've fixed a small boat load of Honda four wheelers this way. Works great.AndrewA said:Ugh.... Joined the club yesterday evening & stripped the front drain plug threads. After reading all this, I think I'm going to go the 1/2-20 tap route, and have some questions on that:
[list type=decimal]
[*] Should I really drop the pan to re-tap the plug hole?
[*] Are there any 1/2-20 oil plugs that are better or worse than others?
[*] If I drop the pan, do I have to separate the "Oil Element Cover" (part 24 in the attached pic) from the "Strainer Cover" (pan base), or can I do it leaving them attached/connected?
[*] If I drop the pan, do I have to replace all the gaskets and O-rings?
[/list]
Here's the parts image:
I'd obviously prefer to not have to drop the whole pan, but I don't want to risk aluminum shavings in the crankcase. I don't have a lift, so I'd just be working with the bike on the center stand. It's always a risk-reward balancing act, I guess, isn't it?
Thanks!
Andrew
Right. On Honda four wheelers the drain bolt screws directly into the crankcase, no pan.AndrewA said:Cool. Thanks! So, I assume your advice about the grease and the brush mean you generally do this without pulling the pan off the bike?