Lower or adjustable rider foot pegs for my '17 Super Tenere?

Shuter

Active Member
Joined
Sep 12, 2018
Messages
104
Location
Western Oregon, USA
Hi all, I find that (with bad knees), the ST riding position is a bit cramped. I've installed a Sargent seat in the "high" position already. Wondering if there are any who have experience with lower rider foot peg options that may help alleviate this? Thanks!
 

Shuter

Active Member
Joined
Sep 12, 2018
Messages
104
Location
Western Oregon, USA
Tricky, the footpegs scrape easy in cornering as they are OEM.
Lowering them will only increase the scraping and cornering more difficult…
Thanks for your reply. I can see how that would be the case. I generally don't go hard enough to scrape anything however, so less so in my case:). For others who may be looking, I just found and ordered this product from Knight Design. They are 1.25" lower than OEM and they claim they use the feelers at the bottom of OEM peg for their gauge to be sure they're not too low. We'll see. I'll install and report back. Good to have an option at least.


DamonS

Active Member
Joined
Apr 27, 2021
Messages
89
Location
Ontario, Canada
have you tried putting on a set of handlebar adjusters that allow the bars to sit closer to you? this may uncramp your riding position in ways even peg changes cannot.
I have ROX risers on my snowmobile for just this reason. the stock sitting position gives me cramps in my hips, so pulling the bars back allows me to errr. unfold a bit on the seat keeping the cramps from forming
 

Sierra1

Well-Known Member
Joined
Nov 7, 2016
Messages
14,974
Location
Joshua TX
Tricky, the footpegs scrape easy in cornering as they are OEM. . . .
Maybe increase your preload? Even at my weight, and riding style, I've never touched down, and had no chicken strips. I was using two helmets for preload (88%). I'm now using one helmet, and luggage (55%), but have increased the rebound/dampening, due to road conditions.
 

Don in Lodi

Well-Known Member
Founding Member
2012 Site Supporter
2013 Site Supporter
2014 Site Supporter
Joined
Feb 1, 2011
Messages
5,780
Location
Lodi Kalifornia
Adjusting the foot levers 1.25 lower may be problematic. The shifter might make it, the brake lever won't.
 

DamonS

Active Member
Joined
Apr 27, 2021
Messages
89
Location
Ontario, Canada
Thanks...yes I installed Heli Bar risers, which I like a lot. This issue is specific to the sharp bend of the knees.
HMM. these problems are right in my wheelhouse hah. like i need any more projects to put onto my plate.

I'd have to do some measurements, but I could see a floorboard system similar to aftermarket items for cruisers, that tuck feet just under the crash pad, with a relief to put your feet down during a stop.
moving the shift pivot would be completely a non-issue. the floor pad would only have minimal give though, so you don't trap your feet in a neat little metal box during a crash, but you'd still have plenty of corner clearance.

I imagine the mounts and brackets would be easy to machine, again i'd have to look at my bike and do measurements, but might be able to napkin draw up something you can take to a machine shop
 

Shuter

Active Member
Joined
Sep 12, 2018
Messages
104
Location
Western Oregon, USA
Adjusting the foot levers 1.25 lower may be problematic. The shifter might make it, the brake lever won't.
At this point I'll have to see how close I can get. In adjusting the rear brake pedal, please see photo...do I need to remove cotter pin and transverse pin at bottom of "stirrup", then turn stirrup clockwise further up the threaded bolt until it can't go any further? Or can it be adjusted without disassembling it somehow? Can't find anything about this in my manual or even the shop manual!
IMG_5099.jpeg
 

Sierra1

Well-Known Member
Joined
Nov 7, 2016
Messages
14,974
Location
Joshua TX
Looking at the picture, I would think that the pin is to prevent the bolt from coming completely out of the stirrup. Does the nut, partially inside the rubber boot, not do the adjusting? 'Cuz, if the stirrup was how it is adjusted, there wouldn't be a need for the jam nut.
 

Shuter

Active Member
Joined
Sep 12, 2018
Messages
104
Location
Western Oregon, USA
Looking at the picture, I would think that the pin is to prevent the bolt from coming completely out of the stirrup. Does the nut, partially inside the rubber boot, not do the adjusting? 'Cuz, if the stirrup was how it is adjusted, there wouldn't be a need for the jam nut.
I was thinking it was the upper nut, partially covered by the rubber boot, that did the adjusting but didn't want to torque on anything without checking with others who have experience with it. If so, does that upper nut loosen so the rod can turn, or is it connected to the rod, and therefore is what actually does the adjusting? Sorry for the word salad!
 

Shuter

Active Member
Joined
Sep 12, 2018
Messages
104
Location
Western Oregon, USA
Also, what is the purpose of the flats cut into the bottom of the adjusting bolt and the cotter pin that runs through it at the very bottom if you can cut the entire section with the flats off in order to lower the pedal further without creating an issue?
 

Sierra1

Well-Known Member
Joined
Nov 7, 2016
Messages
14,974
Location
Joshua TX
That, I don't know. You should probably touch base with TABASCO. I'm sure he would know for sure.
 

Don in Lodi

Well-Known Member
Founding Member
2012 Site Supporter
2013 Site Supporter
2014 Site Supporter
Joined
Feb 1, 2011
Messages
5,780
Location
Lodi Kalifornia
I think the cotter pin was just over engineering, to prevent the whole thing from randomly coming undone. Cutting the end of the bolt off is what I did. It got me a half inch or so lower. For me, I couldn't get my ankle to flex high enough to get my toes on the lever. Don't forget to adjust the electrical after you're done.
 

Shuter

Active Member
Joined
Sep 12, 2018
Messages
104
Location
Western Oregon, USA
I think the cotter pin was just over engineering, to prevent the whole thing from randomly coming undone. Cutting the end of the bolt off is what I did. It got me a half inch or so lower. For me, I couldn't get my ankle to flex high enough to get my toes on the lever. Don't forget to adjust the electrical after you're done.
Thanks Don. So is the upper nut partially under the rubber boot above the jam nut the one to turn for adjustment?
 

Shuter

Active Member
Joined
Sep 12, 2018
Messages
104
Location
Western Oregon, USA
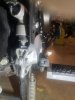
Well, I got the shift lever and brake lever adjusted to my satisfaction. Didn't end up cutting the brake lever adjusting rod; just adjusted down about as far as it'll go when left intact. The lever could be a bit lower, but after a short test ride I think I can easily get used to it. My brake was constant on at first, but the plastic brake switch nut was easily adjusted to eliminate that issue. Cruise also worked perfectly after adjustment.

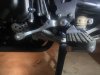
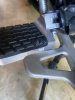
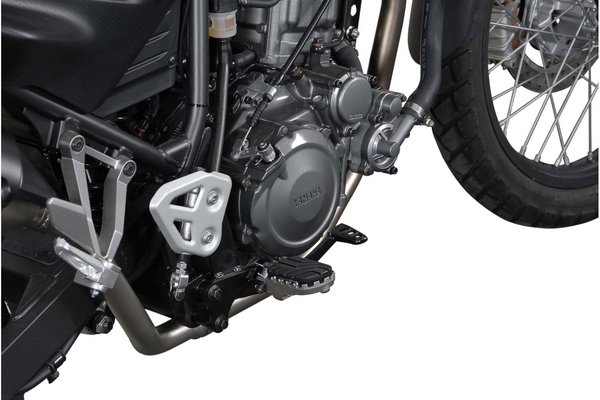
As far as the Knight Design pegs themselves go, they're beautifullly-machined and more comfortable for me based on the short test ride. Only issue was that I had to grind the left side peg significantly in order for it to clear the sidestand brace/foot shelf (or whatever it's called)...maybe I should have ground on that instead of the peg? Oh well, you'd have to be looking for it to see it. I've made the nice folks at Knight Design aware of this and they said they'll re-engineer them.

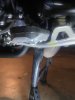
The last 3 pics show the left side peg...the first of them before grinding on the lower rear edge, and the last 2 after. Not as pretty but much more effective:).

Anyway, all's well that ends well. I may end up cutting the brake lever adjusting rod...time will tell. Thanks for all the help guys!

RobIMG_5122.jpegIMG_5115.jpegIMG_5118.jpeg
IMG_5079.jpeg
IMG_5120.jpegIMG_5117.jpeg
 
Last edited:

TnTiretracks

New Member
Joined
Feb 8, 2018
Messages
8
Location
Near Tennessee
I am probably crazy, but don't you have the new foot pegs mounted on the wrong side of the bike.
Also looks like you left a carter pin out on the third pic up.
 
Top