Cycledude
Well-Known Member
I removed the Yamaha crash bars from my 2013 Tenere last fall when I traded for a new 2018.
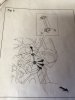
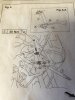
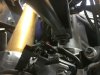
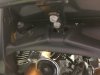
Well today I’m installing the crash bars, everything is going fine except for the single bolt for the brace at the very top, I don’t have any instructions and I’m wondering exactly how I’m supposed to go about attaching the single bolt to the brace ? Are you supposed to just bend that nut locking piece of metal so it’s out of the way and switch to a self locking nut ?
Well today I’m installing the crash bars, everything is going fine except for the single bolt for the brace at the very top, I don’t have any instructions and I’m wondering exactly how I’m supposed to go about attaching the single bolt to the brace ? Are you supposed to just bend that nut locking piece of metal so it’s out of the way and switch to a self locking nut ?