How much of a pita is the install on the OEM crash bars?

Wrathchild

Member
Joined
Sep 30, 2018
Messages
84
Location
Austin Texas
Right off let me say that I am not looking for "you should do X brand instead" so please don't, I know there are more protective chocies, but these are what I have. I already have these, I have no other funds to do different ones and am not going to for a while so I am not interested. I am doing these and adding those ones that go up top that I have to order from Spain and that's what I am going to have for a few years anyway. Please don't take that as me being a dickhead, just saying that other options aren't an option right now :)


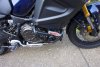
But what I am looking for is, are there any tricks to the install on these? It looks semi involved but straight forward. Maybe 2 hours worth of work?
 

Nikolajsen

"Keep it simple"
Joined
Jul 1, 2017
Messages
2,046
Location
Denmark
No, I don'tthonk you can make it 2 hours.
The buttom is pretty much straight forward, but the part that goes up under the headlight, is a bit time consuming:).
You have to make some change to the M8 bolt that holds a part of the dashboard, I don't remember how i was ment to be done, but I did it in another way, and I think it was a costum made lenght to the M8..
And you have to drill a hole in the plastic cover under the headlight.
 
B

ballisticexchris

Guest
2 hours sounds about right. I actually thought about getting the OEM ones but chose the ALTRider instead. FWIW my buddy has the OEM optional crash bars on his 2013 ST since almost new and it's taken quite a few dirt naps with no damage other than breaking off the foot pegs and bending foot peg pins.
 

EricV

Riding, farkling, riding...
2011 Site Supporter
2012 Site Supporter
2013 Site Supporter
2014 Site Supporter
Joined
May 22, 2011
Messages
8,289
Location
Tupelo, MS
I haven't installed them, just removed them. But I have installed other systems that use engine and upper bars and it's not that difficult. A couple of hours is about average, depending on your comfort level and tools available to you. The upper hoop uses the main bolt thru the front subframe that all the front stuff, (gauges, headlights, windscreen, etc), is bolted to, if I recall correctly. The easy way is to loosen it with a long extension and socket/ratchet. The nut at the bottom is captured, so won't fall out. Be very careful if you remove it completely from the nut, that you get it threaded into the nut strait when re-installing it. It can be easy to cross thread, especially if you tweaked the metal that captures the nut to slide a flat bar in.

Keep in mind that the OEM plastic drop guards may need to stay in place. The left, (clutch side), one incorperates a lower radiator mount that you need. If the OEM bars don't have that mount, you'll need to keep the plastic part and sandwich them at those bolt holes. That is where 90% of lower engine guards mount, the factory drop guard's two bolts on each side, or at least one of them.

If you don't have instructions, you should be able to download them from Yamaha or get a copy from the dealer.
 
Top