Head light adjustment.

2daMax

Active Member
Joined
Jun 3, 2015
Messages
676
Location
Penang, Malaysia
Tools and adjustment bolts aside, I had trouble getting it right on the illumination part. I saw the adjustments require the bike to be 25' away from a wall, and with a 2" drop in height relative to the bike's lamp's height.

This was my mistake:

1. Measurements of lamp distance to the ground were made with the double stand.

The result is I could not see the road very well, and high beam gets me to see the monkeys at the tree tops....just saying.

What I think is the correct procedure is:

1. Place bike on side stand and use a spacer to get the bike to be as upright as possible. Measure the middle of the lamp (of the projector lens) to the ground. Then sit on the bike with upright and estimate a slight drop in that distance. The right measurement is with the rider on the bike.

2. Mark the wall with this estimated drop height. My house has a short frontage, so I have to work with 12.5' of distance to the wall instead of 25', so that gives me 1"
drop.

3. Since I made a boo boo earlier, the initial light level were like 6" higher than the reference height, and I had to adjust 7" down to get it right.

Now it illuminates the road well but I still need to make it shoot a little further up.

Now I can't remember which side adjusts downwards or upwards when using the Philips Screw driver,...I think CW on the screw driver means upwards.
 

Mkr64

Member
Joined
Apr 24, 2018
Messages
70
Location
Jacksonville, Fl
Great thread and I adjusted my lights last night. Once I had the muscle memory to find the nut I was easily adjusting the vertical position. Still can't seem to see any difference in the horizontal adjustments though...
 
B

ballisticexchris

Guest
I just adjusted mine about 3/4 of a turn and will see how it does on my next ride. Funny thing I noticed was the high beam is not a separate bulb than the low beam. Both sides come on at once.

Other thing worth noting is the suspension sag setting makes very little difference, if at all, in how high the light points. Only thing that made it go up slightly higher was rider weight.
 

Sierra1

Well-Known Member
Joined
Nov 7, 2016
Messages
14,974
Location
Joshua TX
....Funny thing I noticed was the high beam is not a separate bulb than the low beam. Both sides come on at once....

Yup, the "high" beam is actually just the whole beam. "Low" beam is the top half of the beam covered by a....what I refer to as a "flapper". You can hear it moving as you switch from high to low. My wife's car has a "flapper" that is stuck/failed up, stuck on "high". I really miss a good quality, "old fashioned" reflector style head light. Projection headlights are too finicky.
 
Last edited:
B

ballisticexchris

Guest
Projection headlights are too finicky.
Boy you got that right!! What a damn nightmare. OEM adjustment from factory points at the sky. When you adjust low beams down to proper hight then the high beams still seem to point too high. Good news is other drivers don't flash me. So for now I'm going to leave them at 3/4 of a turn. I figure after I install the LED lamps to just ride it as is for a few rides and see how I like it.
 

Sierra1

Well-Known Member
Joined
Nov 7, 2016
Messages
14,974
Location
Joshua TX
….When you adjust low beams down to proper hight then the high beams still seem to point too high. Good news is other drivers don't flash me....

The beam, apparently, is broad. But, unless the bulb/beam is pointed directly into oncoming traffic's eyes, it doesn't blind. I've been noticing that vehicle angle, car or bike, has a huge influence on projector bulb/beams; and the road angle influences the vehicle angle. I've been blinded by vehicles, thinking that their "highs" were on. Only to realize that the vehicle went over a rise in the road.
 

U.P.rider

I M A UPR
Joined
Jul 26, 2011
Messages
208
Location
Eastern Upper Peninsula of Michigan
TIA for the printable instructions, I will found a good building to check/ set my light on and hope to get it done tomorrow night. I finished up my Rigid driving lights install today and man are they BRIGHT!
 

Niterunnr

Active Member
Joined
Jul 2, 2019
Messages
104
Location
Irvine, CA
This is by far the worst designed headlight adjustment setup I have encountered. Did Yamaha not imagine a situation where adjusting the headlight aim would be beneficial? You feel with your finger only to find the socket can’t fit alongside. Extremely frustrating
No tools should be required for this simple adjustment.
Serious fail!
 
Last edited:

StephanSF

Member
Joined
Mar 10, 2020
Messages
98
Location
Las Vegas, NV
So I know this is an old thread, but I ran into an unexpected issue today adjusting my beams. Every thing I have read about adjusting the headlight aim indicates that there are two sets of screws, one raises the beam up or down, the other shifts it left and right.

According to the service manual the black phillips/8mm bolts at the top of the assembly are to raise the beam up and down, while the 8mm (no phillips) greyish bolts near the inside bottom of the headlight assembly adjust the beams left and right.

However, this seems to be exactly backward. I adjusted the upper black/8mm bolts till I was blue in the face and the beam did not shift up or down at all. After adjusting it as far as it would go I went for aride and it seemed like it had shifted the beam horizontally, not vertically.

I happen to have a headlight assembly off the bike on my workbench from when I had an encounter with an immovable object that smashed up my headlight so I started playing with those adjustments, and it is plain as day that the upper two black screws do NOT raise or lower the beam, (they shift them right/left) and it is the lower, hard to get to, greyish 8mm bolts that change it up and down.

But I swear that I read it the other way around in the manual I found online.

Am I missing something, am I senile ?
 

minnjohn

New Member
Joined
Feb 5, 2021
Messages
1
Location
Minneapolis
So I know this is an old thread, but I ran into an unexpected issue today adjusting my beams. Every thing I have read about adjusting the headlight aim indicates that there are two sets of screws, one raises the beam up or down, the other shifts it left and right.

According to the service manual the black phillips/8mm bolts at the top of the assembly are to raise the beam up and down, while the 8mm (no phillips) greyish bolts near the inside bottom of the headlight assembly adjust the beams left and right.

However, this seems to be exactly backward. I adjusted the upper black/8mm bolts till I was blue in the face and the beam did not shift up or down at all. After adjusting it as far as it would go I went for aride and it seemed like it had shifted the beam horizontally, not vertically.

I happen to have a headlight assembly off the bike on my workbench from when I had an encounter with an immovable object that smashed up my headlight so I started playing with those adjustments, and it is plain as day that the upper two black screws do NOT raise or lower the beam, (they shift them right/left) and it is the lower, hard to get to, greyish 8mm bolts that change it up and down.

But I swear that I read it the other way around in the manual I found online.

Am I missing something, am I senile ?
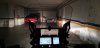
I have a 2012 Tenere and finally removed the headlight nacelle to study the method of aiming the lights. I have a number of friends with the same bike, most of whom tried unsuccessfully to adjust the aim of their lights. First, despite what I note below, moving the headlight beams actually requires adjusting two separate adjusters, one of which is the phillips screw on the top, of each light above the bulb cover, and the other, an 8 mm hex nut, below each cover. Both are difficult to reach.

The problem is that each headlight lens is mounted on three points within the headlight nacelle. One of the legs is essentially a ball and socket that pivots in any direction. The other two legs are adjusted by the two bolts mentioned above. To properly aim the lights, you actually need to move the two adjusters together. I discovered this by removing the entire assembly, placing the nacelle on my work bench, and shining a bright light through the bulb opening behind each lens. Very small adjustments can be made by using the phillips bolt on the top of the assembly, or by using the 8 mm bolts below, but larger adjustments require the coordinated adjustment of both legs, and this is very difficult to do because of the space constraints. The reason for this is that moving the adjusters not only moves the position of the projector lens side to side or up and down, but also tends to move the lens in and out.

Some will complain that this is contrary to the factory service manual, which at Chapter 3, page 30 (page 606, if you have a pdf version), describes the lower 8 mm bolts as responsible for raising and lowering the beam in each light, and the phillips bolts for moving each beam left or right. While I have found that this is true for small adjustments, it is not uncommon for the adjusters to be so wildly out of synch, because of aggressive attempts at adjustment, that simply fiddling with these adjusters individually will bring the projectors far out of position, and make adjustment based on the up/down - left/right assumption very difficult. You may also note that, following overly aggressive adjustments, the projector lenses appear to have receded into the socket. At this point, I find it easier to remove the assembly, set up the nacelle on a bench, and move the adjusters together until the lens is properly centered in each socket. Then, by removing the bulb and shining a light through the back of each light, so you can see a projection of the beam on a distant wall, move the adjusters together to bring each lens into approximate adjustment, and thereafter make final adjustments when the unit is returned to the bike.

I thought I was going too far with this until I visited my local dealer and talked with one of the mechanics who described having to go through a similar process where customers had badly misaligned the lenses.
 

sandro1973

Active Member
Joined
Jan 26, 2018
Messages
121
Location
Portugal
Another ST needing some headlight adjustment :confused:
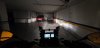
.....i have the tools and know where the vertical and horizontal adjustments are made....but....apart from seeing today what some of you meant as "cross eyed headlights", after covering each of them individually, what bugs me is that you need to have the engine running to get the lights turned on....and then if you don't keep it running, you'll drain the battery quickly...but then it'll eventually heat up....and you have to turn it off..... :rolleyes:

So....what's you best / preferred way to do this without killing the battery ? Keep it on a battery charger while doing it ?

Update : trying to keep the lights on with the aid of a battery charger doesn't work, since the voltage will stay at 12,1V....while with the engine running it'll keep at 14,3 on idle....
 
Last edited:

WJBertrand

Ventura Highway
Joined
Jun 20, 2015
Messages
4,528
Location
Ventura, CA
I just clicked the starter switch long enough to cause the headlights to come on without starting the engine. Completed the adjustment, then put the bike back on the tender until the tender indicated fully charged. I did a few dry runs so as to be able to do the adjustment as quickly as possible.
 

sandro1973

Active Member
Joined
Jan 26, 2018
Messages
121
Location
Portugal
I just clicked the starter switch long enough to cause the headlights to come on without starting the engine. Completed the adjustment, then put the bike back on the tender until the tender indicated fully charged. I did a few dry runs so as to be able to do the adjustment as quickly as possible.
Each headlight seems to have a different "function", the left one ( from a seated position ) seems to have the stronger forward beam and the right one seems to shed more light in front of the bike....at least, it's what it looks like to me...specially when covering each one individually with a piece or cardboard ( my 1st approach to adjust each one individually )

Anyway, from a garage "adjust and test" it seems to be much better and i also adjusted the PIAA Led lights, which were off too....only on real outing at night i'll really now if i did it properly or not.
 

sandro1973

Active Member
Joined
Jan 26, 2018
Messages
121
Location
Portugal
Here's a few photos taken tonight after my 1st atempt at adjusting things.......on the first photo you can clearly see the longer beam, coming from the left side, like i mentioned....looks weird, maybe the right one is pointing too much to the right instead of forward. Looks like there is a "spot" missing light to the right.

Before this i had more light pointing to the sides then forward....and even the PIAA were poiting too low. Just need to have a couple of runs and night, see how it feels and have second go if necessary...


Low-Beam after adjustment ( wide-angle for perspective )

20211004_212937.jpg


Low-beam and PIAA Led

20211004_213012.jpg


Low-Beam after adjustment ( riders point-of-view )

20211004_212954.jpg
 

WJBertrand

Ventura Highway
Joined
Jun 20, 2015
Messages
4,528
Location
Ventura, CA
Each headlight seems to have a different "function", the left one ( from a seated position ) seems to have the stronger forward beam and the right one seems to shed more light in front of the bike....at least, it's what it looks like to me...specially when covering each one individually with a piece or cardboard
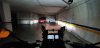
I don't think that's the intent. Both bulbs are the same and the aiming instructions in the manual don't specify any differences. If they look uneven it's probably because their adjustment is out of sync or one of the bulbs is different or not seated in the assembly correctly.
 
Top