Random_Rockfish
Member
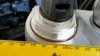
So 24mm is the size of the cap nut?
If so, I'm going to just buy a plastic one and see how it goes.
If so, I'm going to just buy a plastic one and see how it goes.
Thanks!RCinNC said:Yes, it's 24mm.
")
I treated my BMW GS like it was made of glass.Next said:You can also take a paper towel, and place it on the cap, as a barrier. I scratched one for cap a bit with just a single layer of paper towel, but then doubled up the paper towel on the second one and had no issues. I think I've just had dual sport bikes for too long and don't care too much about a smudge or two in some aluminum that few other will ever see. That said, I treated my Triumph Speed Triple and Moto Guzzi like they were made of glass
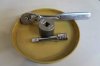
Thanks for actually posting the link ! Ordered one a few minutes ago, shipping is almost 2 times what the wrench cost. I sure don’t understand why Yamaha made those nuts of such soft aluminum, they should have used steel.BWC said:http://www.partsnmore.com/parts/?filters[category]=tools&q=Fork+cap+wrench+tool
Found it here awhile back while rounding up parts for my 81 Honda 900-F.
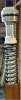
Most 6 point sockets will work but if you look at the inside edge of them they are usually rounded and if that surface was ground or turned flat it sit would down better on the the rather shallow alluminum fork cap nut.
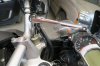

Hi mate, I measured my ES last night and the cap measures just shy of 44mm across the flats with a vernier caliper. Can you confirm 46mm or can someone else measure. I almost bought a 46mm wrench before I checked it.TomZ said:In changing the fork oil on my 2015 ST with electronic suspension, I didn't take long to realize that the tools required were different from the ones that work on non-ES, gen. 1 bikes. The top nut, for example, requires a 46-mm wrench. Harbor Freight had just the right tool, an 18" crescent wrench. (I would attach a photo, but ya know -a crescent wrench is pretty common). I padded the jaws with adhesive-backed Velcro loop tape and easily loosened the top cap without damaging the aluminum nut. The fork compression tool is different too because the plastic spacer in the fork is different. Someone in Denmark sells an appropriate compression tool like the one shown in the service manual, but price and delivery were a consideration, so a friend and I built one with an appropriate-sized steel washer welded to scrap metal. It's too ugly to show a picture, but it worked, cost next to nothing and I did not have to wait for shipping. Later I made a better one similar to the one in the service manual from 1/4" aluminum sheet using another friend's end mill. Nothing fancy.
Anyway, anyone contemplating rebuilding the forks or changing the fork oil on an ES bike should know that the job requires different tools than the older non-ES bikes. And you don't need a special plastic wrench from Japan.
By the way, the service manual says to remove the handlebar, but that was not necessary with bar risers.