DDM HID H7 Install

LowAndSilent

New Member
2013 Site Supporter
Joined
Apr 5, 2013
Messages
23
Location
Seattle, WA
I had HID lights on my FJR, which was a necessity for running around in dear infested areas after nightfall. Once I moved to the Tenere I noticed it had pretty decent lights to begin with, but they could be better, which led me to this project. I do have to say...the HID installation on the Tenere is a lot easier than on the FJR, which has limited space in the nose and a lot of bodywork and hardware to remove.

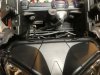
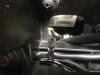
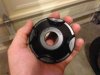
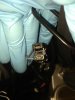
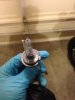
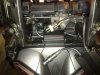
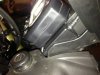
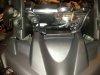
Here are some of my photos from the install, showing ballast and igniter placement.
 

Attachments

~TABASCO~

RIDE ON ADV is what I do !
Founding Member
2011 Site Supporter
2012 Site Supporter
2013 Site Supporter
2014 Site Supporter
Vendor
Joined
Apr 4, 2011
Messages
7,352
Location
TEXAS
Those do work well, I did the same... Great light for the price ! ::008::
 

LowAndSilent

New Member
2013 Site Supporter
Joined
Apr 5, 2013
Messages
23
Location
Seattle, WA
~TABASCO~ said:
Those do work well, I did the same... Great light for the price ! ::008::
Excellent light for the price. Cheaper than the Bi-Xenon kit on the FJR, since it had to have a shutter servo to go to highbeam. Less wiring as well.

avc8130 said:
Nice spot to tuck the ignitors!

ac
Thanks! I mainly did this to give everyone some more ideas for placement of the HID hardware. I had a hard time figuring out placement since I haven't seen to many writeups on these type of installations. To tuck those igniters away all I had to do was remove the three screws holding the display. That allowed me to lift it up and slide them into place. Gave more than enough distance for wiring as well, and left more room behind the bezel behind the windscreen.
 

BaldKnob

Well-Known Member
Joined
Aug 11, 2012
Messages
776
Location
SENC
Very clever, LowandSilent (Submarine much?). I may have to copy your install prior to the Baja Squadron or PIAA LP530 driving lights due to the low cost and simplicity. Quick question about durability... do you know what the estimated life on these bulbs are and can I revert back to an H7 in an emergency? Thx in advance.
 

avc8130

Active Member
Joined
Jan 29, 2012
Messages
3,269
Location
North NJ
Are these the 35 or 55w HIDs?

I did a 35W install with Swampy and we got all 4 boxes under the front cover. I did a 55W install on my own bike and wound up with 1 ignitor and both ballasts under the front cover and the 2nd ignitor on the top of the headlight assembly visible under the dash.

There are pics somewhere if you search.

No clue about life expectancy, but you can always swap a standard halogen in if one fails on the road somewhere.

ac
 

LowAndSilent

New Member
2013 Site Supporter
Joined
Apr 5, 2013
Messages
23
Location
Seattle, WA
I've seen life expectancy put around 2500 hours. Who knows. If one does fail it's as easy as disconnecting the three cables that have disconnects, opening the dust cover, and unplugging the power and ground leads that go into the headlight socket. Remove the HID bulb and replace with a standard halogen (I'm keeping my old bulbs with me on the bike) and plug back in the headlight socket to the halogen bulb. Probably a good idea to buy some backup dust covers, since the HID installation requires a 1 inch hole be drilled in them.

AC, I have the 35w. I did fit the hardware in like you mentioned, but I didn't like the stress it placed on the wiring (at least with how I had routed it). Once I saw the gaps to the left and right of the instrument cluster, I decided that'd be a nice place to put them where the wiring would have the least amount of kinks in it. I may use the space for other items later.

I still need to install my LED driving/aux lights and Skene IQ-170A. Once my PC8 shows up ill be wiring that and my GPS in.
 

greg the pole

There are no stupid questions, only stupid people
Joined
Apr 18, 2012
Messages
3,343
Location
Calgary AB
well that looks tasty.
I recently installed a H4 dual HI/LOW Beam on my vfr (5000K) and I'm happy with the quality of kit, and the actual light output.
Ordered a set for my tenere.

should go well with my Denali D2's
 

Topgear

New Member
Joined
Aug 22, 2012
Messages
119
Location
Minooka, IL
Thanks for the pics and post on this. Just did my DDM Tuning HID install and used the same locations next to the gauge cluster. Got the 194 LEDs for the auxiliary lights as well. I plugged in both LEDs and turned on the key. Nothing. I pulled one LED and flipped it. Light! I guess I lost that 50/50 chance twice! :D Anyway, LEDs work, HIDs work, love the new combination!
 

avc8130

Active Member
Joined
Jan 29, 2012
Messages
3,269
Location
North NJ
Topgear said:
Thanks for the pics and post on this. Just did my DDM Tuning HID install and used the same locations next to the gauge cluster. Got the 194 LEDs for the auxiliary lights as well. I plugged in both LEDs and turned on the key. Nothing. I pulled one LED and flipped it. Light! I guess I lost that 50/50 chance twice! :D Anyway, LEDs work, HIDs work, love the new combination!
Any magical method to get to the parking light 194s without disassembling the whole bike?

One of my LED 194s has been off for probably 10k miles just over shear laziness.

ac
 

~TABASCO~

RIDE ON ADV is what I do !
Founding Member
2011 Site Supporter
2012 Site Supporter
2013 Site Supporter
2014 Site Supporter
Vendor
Joined
Apr 4, 2011
Messages
7,352
Location
TEXAS
avc8130 said:
Any magical method to get to the parking light 194s without disassembling the whole bike?

One of my LED 194s has been off for probably 10k miles just over shear laziness.

ac
There are four bolts holding it in.. take them out, slide the housing forward and then you can get to the twist dial to take them out... easy....
 

avc8130

Active Member
Joined
Jan 29, 2012
Messages
3,269
Location
North NJ
~TABASCO~ said:
There are four bolts holding it in.. take them out, slide the housing forward and then you can get to the twist dial to take them out... easy....
Yeah, that's what I thought.

That used to be easy...until I piled all of this HID gear in some magical perfect order on top of the head light housing. I'm scared it won't ever go back. LOL

ac
 

LowAndSilent

New Member
2013 Site Supporter
Joined
Apr 5, 2013
Messages
23
Location
Seattle, WA
Topgear said:
Thanks for the pics and post on this. Just did my DDM Tuning HID install and used the same locations next to the gauge cluster. Got the 194 LEDs for the auxiliary lights as well. I plugged in both LEDs and turned on the key. Nothing. I pulled one LED and flipped it. Light! I guess I lost that 50/50 chance twice! :D Anyway, LEDs work, HIDs work, love the new combination!
Glad it could help! I should have gotten the LED's when I ordered, but I didn't. I guess I'll need to get some and swap them out.

I finally had the chance to ride after dark with the HID's installed (lots of riding during day-light since the instal). Geez those suckers are nice! I almost want to say they're better than the ones on the FJR. I'm also thinking my lights may be aimed a little too high for low cars. I didn't get flashed, but about 7-9 cars got out of my way quickly when I approached from the rear.

Now I just need to get my LED aux lights wired up, once I find a suitable SPDT 3-position, waterproof toggle...which is proving really, really difficult to find. Then I'll really be able to throw from light down range.
 

Topgear

New Member
Joined
Aug 22, 2012
Messages
119
Location
Minooka, IL
twinrider said:
Which kit did you order from DDM?
http://www.ddmtuning.com/Products/DDM-HID-Kit-Slim-Ballast-35W-or-55W

I bought the 35W kit in 4500K. I found the easiest was to install the bulbs into the housing first, then route the wiring from the bulbs back to the ballast. There is a protective cover that screws together to protect the bulb. I was a little confused by what to do with the inner ring first, but then I just gave it a good squeeze until it shattered so I could remove it. If you have the kit in your hand, that will make more sense. I actually used a 1" wood spade bit to drill the holes in the dust covers. One little pass with a round file to clean up the hole and it worked perfectly. I think I have a couple of these grommets around yet from Eastern Beaver. Might be the perfect thing to carry two of these in the tool kit in case I have to swap back to standard bulbs for some reason. Probably the 26mm grommet.

http://www.easternbeaver.com/Main/Elec__Products/Grommets/grommets.html
 

scott123007

Well-Known Member
Joined
Jul 27, 2012
Messages
1,483
Location
Jupiter, Florida

twinrider

Well-Known Member
Joined
Sep 28, 2011
Messages
1,882
Location
Yokohama
Topgear said:
http://www.ddmtuning.com/Products/DDM-HID-Kit-Slim-Ballast-35W-or-55W

I bought the 35W kit in 4500K. I found the easiest was to install the bulbs into the housing first, then route the wiring from the bulbs back to the ballast. There is a protective cover that screws together to protect the bulb. I was a little confused by what to do with the inner ring first, but then I just gave it a good squeeze until it shattered so I could remove it. If you have the kit in your hand, that will make more sense. I actually used a 1" wood spade bit to drill the holes in the dust covers. One little pass with a round file to clean up the hole and it worked perfectly. I think I have a couple of these grommets around yet from Eastern Beaver. Might be the perfect thing to carry two of these in the tool kit in case I have to swap back to standard bulbs for some reason. Probably the 26mm grommet.

http://www.easternbeaver.com/Main/Elec__Products/Grommets/grommets.html

Thanks for the info. ::008::
 

greg the pole

There are no stupid questions, only stupid people
Joined
Apr 18, 2012
Messages
3,343
Location
Calgary AB
good price for the kits, but oh my... the shipping time.

7-10 working days delivery...my ass.
::009::
must not like Canadians.
 

avc8130

Active Member
Joined
Jan 29, 2012
Messages
3,269
Location
North NJ
I gave in and replaced my out marker lights with some standard 194 bulbs since I was sick of messing around with the Chinese LEDs.

I also took the opportunity to setup my HID kit the same way as the OP this time.

ac
 
Top