Changing the Thermostat

MidlifeMotor

Member
Joined
Mar 31, 2012
Messages
383
Location
Mesa, AZ
After lots of scrounging, was able to find and All Balls thermostat on line. Menu said it fit Yamaha 2017 Super Tenere. I verified on partzilla that the 2012 that I have has the same part number for the thermostat as the 2017 Super Tenere. The web site did not have an option for 2012.

Any opinions are welcome, but I think this will work. I know comparing pics isn't much help but the pic posted by Mr. BR above (very helpful) looks like the part listed that I ordered.
 

MidlifeMotor

Member
Joined
Mar 31, 2012
Messages
383
Location
Mesa, AZ
Thanks Thughes317 but partzilla says "ships 2-3 days". When I called to see what that meant they told me they had none and had to order from Yamaha and it was not available until May 6th. Boats.net told me the same thing on the phone. 5 Yamaha parts connections all said May 6th availability. I long for the old days when the local Yamaha place would tell you what dealer nationwide had one in stock and would give you the phone number to call them.
 

MidlifeMotor

Member
Joined
Mar 31, 2012
Messages
383
Location
Mesa, AZ
Good news: I got to the thermostat cover relatively easy. As OP stated I did not have to take off throttle body, just lifted it up to clear some space and cover came off easily to pull out old thermostat.
Good news: I tested the old OEM thermostat and it failed, so this is likely the only problem.
Bad News: The after market replacement from AllBalls Racing is not a match despite what they say. It's too small.
Bad News: I am back to the starting line finding an OEM thermostat and everyone is telling me they are out and May 6th is date Yamaha is giving for new ones to ship from Japan.
Good News: One of the part store sources was able to use the parts network and found a single OEM thermostat in the USA at a dealer in Connecticut. He gave me the phone number for the dealer.
Good News: I called Dansbury Power Sports in Connecticut and Brandon in parts found one in stock. I paid him over the phone and he is mailing it to me. Yay!

I will post update after I drop it in. This has also given me some good ideas for when I tackle the next valve clearance job in 2k miles. I did the first one with a lot of help of a friend who has since died. I think I can do it solo. We will see.
 

dadio

New Member
Joined
Apr 7, 2020
Messages
16
Location
Virginia
Thanks guys.

Having a hard time finding anyone with one in stock i.e. local dealers, partzilla, babbits etc. Looks like there's a back order from Yamaha. ETA mid-May! Yikes, gotta get scrounging to find one.
Partzilla. $50 delivered. Mine arrived 14Apr.
 

MidlifeMotor

Member
Joined
Mar 31, 2012
Messages
383
Location
Mesa, AZ
New OEM Thermostat came in today via UPS courtesy of Danbury Motorsports in Connecticut. If any of you live in the area of Danbury MS, they really took care of me.

Before dropping the new thermostat in I thought I'd test it for giggles. I put it next to the old thermostat in a pan of water and heated the water. The new thermostat opened as expected and the old one barely opened at all, confirming my suspicions in the side by side test.

Reassembly went as expected. Before attempting to hook up the crank case vent hose to the bottom of the air box, I went ahead and closed the door from my garage to my house so my wife wouldn't have to hear me swearing. When I've done this air box procedure twice before, I let the F bombs fly as I really struggle with this. Sure enough, it didn't disappoint but I got it back together with only one donation to the swear jar.

When I pushed the starter button the engine turned over but wouldn't start. After a few failed attempts I suspected it was fuel related and sure enough I did not push the fuel hose end in far enough to the bottom of the gas tank. Once resolved I figured it would start right up. Nope.

It was acting like the "Hard Start" issue so I tried what has worked for me before to no avail. I found the Hard Start thread and applied the following technique as documented in post 642 in the Hard Start thread.

1. Turn ignition off
2. Press both blacks buttons in the cockpit, turn the ignition on and keep pressing both buttons for 8 seconds (the display will switch to diag mode). Now you can release the buttons.
3. Push booth buttons again for 3 seconds. The display will switch again.
4. Now give full throttle and let the starter turn for 4-5 seconds.
5. Release the throttle and turn the ignition off.
6. Turn the ignition on (display should be in normal mode) and the XT should start without any problems.

After several rounds of this I was able to get her running again. I let the bike idle up to 221 and the fan kicked right on. Temp did not go over 221 as it had been doing the past few weeks. After less than a minute with the fan on the temp was back to 210 and the fan shut off. I am calling this fixed.

I'm not sure what value I added to this thread other than confirming what the OP documented. This is a great site and I was able to get valuable info on the repair.

Sean
 

dadio

New Member
Joined
Apr 7, 2020
Messages
16
Location
Virginia
Now to change the tstat on 2013 yst. I don't have a manual, but thread indicates it's not much help anyway. If anyone can post a screenshot of any truly helpful info I would appreciate. Great Day!
 

MidlifeMotor

Member
Joined
Mar 31, 2012
Messages
383
Location
Mesa, AZ
I didn't have time to type a response to you yesterday. Not sure what your experience level is with regards to taking the S10 apart. This job wasn't that tough if you've got decent mechanical skills. The most difficult part for me was getting some of the electrical connections apart and of course the air box crank case vent. As you can see from the photo, all that needs to be done with the throttle body assembly is to loosen the clamps that secure it to the intake tubes. All connections to the throttle body were left in place. The electrical connection in the right of the photo is from the air box.

If you run into issues you can text me or we can talk on phone. I'm no expert but might have the nudge you need if you get stumped.

Sean 480 797-7716
 

Kruzzin5

Well-Known Member
Joined
Oct 14, 2019
Messages
416
Location
Newmarket, Ontario
Notes on changing the thermostat:
Parts ordered: new thermostat, coolant temperature sensor and washer, and coolant drain bolt washer.
You will also need 1.83 L (1.93 US qt) of coolant to fill the radiator and 0.26 L (0.27 US qt) to fill the coolant reservoir.

The FSM procedure for Removing the Thermostat is on page 6-4.
To drain the coolant it refers you to Changing the Coolant – FSM page 3-28​
To remove the throttle bodies it refers you to Removing the throttle bodies – FSM page 7-5​

The FSM says to remove the coolant reservoir to drain it. I did not remove it. I sucked the coolant out using a cooking baster and put a piece of vinyl tubing on the tip so it would reach the bottom of the reservoir. This worked OK but was a bit messy, the coolant dribbled out of the baster.
A large syringe would work better. A 300 ml syringe would hold all the coolant, 0.26 L (260 ml), but I think I will order a 150 ml syringe to use next time. A smaller one takes up less space for storage and using it 2 times would get all the coolant out.

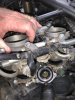
The FSM says to remove the throttle bodies. I did not completely remove it. I removed all the electrical connectors and loosened the clamp screws. I did not remove the 2 throttle cables or the throttle body joints. I lifted it off and used some heavy cord to hang it off to the side from the fill neck on the radiator.

The FSM says to remove the coolant temperature sensor. I see no need to remove it unless you are replacing it or testing it. I was replacing it and it came out easy with a 19 mm deep socket.

The FSM says to remove the radiator inlet hose that is attached to the thermostat cover. I did not remove the hose, just removed the cover from the engine and pulled out the old thermostat.


Installing the Thermostat – FSM page 6-5
The FSM just says “Install: Thermostat” and gives a TIP to install the thermostat with the breather hole facing forward.
There is also a bolt hole for the cover at his position, so the breather hole would line up right behind that bolt hole.

Or worded more like Don described it in his reply above, the hole should be oriented so that it is in the highest position, which makes more since, it is a breather hole. Either way, both descriptions would be correct.
The thermostat breather hole is easy to see, it’s a 3 mm (about 1/8”) diameter hole.

The spring end of the thermostat goes in to the engine side as Don mentioned above and as shown in the diagram in the FSM. The cover is such a tight fit that I don't think you could install it backwards anyway.
Your instructions were very helpful...thank you! I just changed my thermostat out as it was very lazy. With temperatures at 9゚C, my thermostat was reading 85 to 89゚C. The new thermostat is reading mid 70's Celsius with ambient temperatures of 12゚C. Huge improvement! I sourced the only thermostat available in Canada out of a Winnipeg power sports dealer. I cannot believe how difficult these are to find with Yamaha Canada having no availability date.
 

MidlifeMotor

Member
Joined
Mar 31, 2012
Messages
383
Location
Mesa, AZ
Great job getting it done. I found the only one in the US two weeks ago in Connecticut. The only other one in North America was the one you found in Winnipeg.
 
Top