staq50
Member
Well. finally got over the god dam clutch rattle and banging around in my 2012. I originally took the clutch out 1 year ago before my 10 day tour fully loaded 2 up, thinking that maybe the clutch wouldn't handle the pace...It did, with no issues, but noticed then the tell tale marks of wear and sag on 3 of the springs...a year later bit the bullet and have had enough, options were, buy a new basket at $750.00 NZ, or, me being me, consider a rebuild....., because any metal on metal bashing in any motor is not satifactory and just downright wrong ...so after late nights in bed thinking of options and mental rebuilds, as one does lol, so the clutch is now out, and here we are...
So we all know by now that these clutches are rattly noisy, but, why?
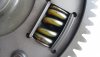
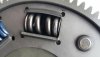
first pics show the wear marks on the springs, or as I would say 'impact' marks....I should say now that this bike does have 74.000 k's...pretty reasonable for this bike
also the 'yellow' springs have sagged by 1.5 mm making them rattle, the blue springs are still tight. so this is where the noise comes from......the 'yellow' springs.....now to work at the repair.
also before we carry on I see that the 'yellow' springs have one less wind, and also made of a little thicker wire....so there are two different springs with different tensions.....'yellow having more tension than the blues. from the looks of this system it actually seems that the 'yellow' springs are designed to be loose? where the clutch takes up on drive on the blue then progress to the yellow heavier springs....you really cannot have them all tight and have a progressive spring rate..so if this is so and the 'yellow' are loose from factory....bad idea..right..asking for a noisey system right off...no wonder they changed in 2014....
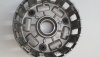
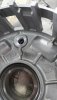
so instead of posting heaps of pics of the process I'll walk you Quicly through what I did........Firstly, was to drill out the three rivets that hold this all together....simple, as they are only mild not hardened so drill straight out....pull everything out, spring plate, gear and spacers, there is a clip on youtube of a R1 rebuild and pretty much the same system parts, I wanted to keep options open if I wanted to change a mod, so didn't want to re rivet back together so I did this....as the rivet through holes were 9mm, and I wanted a sytem to hold but dissasemble again, I opted for 3/8 UNF HT countersunk cap screws and nuts....... 3/8 is close to 9mm so only just reemed out rivet holes and spacers....easy again. so, I can now 'bolt this back together. .now your thinking WTF....bolt together...not for purists...lol. right...yea me to..will it work? lol. visions of clutch explodes and total mess....so what I did now for the spring fix was, and seems pretty simple is to make new springs to replace the sagged 'yellows' so that's what I did, down to my spring man ..I actually decided to make the springs the same wire thickness and wind as the blue springs...making all springs the same throughout, like any other clutch........as my spring man didn't have a tension tool strong enough to gauge the yellows tensions under a certain load.....that's one reason why I opted for that....
next is to bolt this whole thing up and give it a go...... before I bolted together, and was useing countersunk cap screws I did countersink the heads into the basket as per pic..... reason is here you cannot go too high in the screw head because it will connect with the centre hub..so keep low as pos. so with everything bolted back together now was the time to reduce the nut size and radius the corners to make sure this side does not come into contact with anything in the case.....sorted, assembled with locktight and puched the nuts for extra precaution.....see pic with new springs installed, still having visions of clutch explosions..lol...but looking good...
next episode will be install and run to see if the new springs and there spring rates work............
So we all know by now that these clutches are rattly noisy, but, why?
first pics show the wear marks on the springs, or as I would say 'impact' marks....I should say now that this bike does have 74.000 k's...pretty reasonable for this bike
also the 'yellow' springs have sagged by 1.5 mm making them rattle, the blue springs are still tight. so this is where the noise comes from......the 'yellow' springs.....now to work at the repair.
also before we carry on I see that the 'yellow' springs have one less wind, and also made of a little thicker wire....so there are two different springs with different tensions.....'yellow having more tension than the blues. from the looks of this system it actually seems that the 'yellow' springs are designed to be loose? where the clutch takes up on drive on the blue then progress to the yellow heavier springs....you really cannot have them all tight and have a progressive spring rate..so if this is so and the 'yellow' are loose from factory....bad idea..right..asking for a noisey system right off...no wonder they changed in 2014....
so instead of posting heaps of pics of the process I'll walk you Quicly through what I did........Firstly, was to drill out the three rivets that hold this all together....simple, as they are only mild not hardened so drill straight out....pull everything out, spring plate, gear and spacers, there is a clip on youtube of a R1 rebuild and pretty much the same system parts, I wanted to keep options open if I wanted to change a mod, so didn't want to re rivet back together so I did this....as the rivet through holes were 9mm, and I wanted a sytem to hold but dissasemble again, I opted for 3/8 UNF HT countersunk cap screws and nuts....... 3/8 is close to 9mm so only just reemed out rivet holes and spacers....easy again. so, I can now 'bolt this back together. .now your thinking WTF....bolt together...not for purists...lol. right...yea me to..will it work? lol. visions of clutch explodes and total mess....so what I did now for the spring fix was, and seems pretty simple is to make new springs to replace the sagged 'yellows' so that's what I did, down to my spring man ..I actually decided to make the springs the same wire thickness and wind as the blue springs...making all springs the same throughout, like any other clutch........as my spring man didn't have a tension tool strong enough to gauge the yellows tensions under a certain load.....that's one reason why I opted for that....
next is to bolt this whole thing up and give it a go...... before I bolted together, and was useing countersunk cap screws I did countersink the heads into the basket as per pic..... reason is here you cannot go too high in the screw head because it will connect with the centre hub..so keep low as pos. so with everything bolted back together now was the time to reduce the nut size and radius the corners to make sure this side does not come into contact with anything in the case.....sorted, assembled with locktight and puched the nuts for extra precaution.....see pic with new springs installed, still having visions of clutch explosions..lol...but looking good...
next episode will be install and run to see if the new springs and there spring rates work............
Attachments
-
 124.9 KB Views: 90
 -
 94.2 KB Views: 91
 -
 138.6 KB Views: 91
 -
 72.5 KB Views: 92
 -
 115.2 KB Views: 88
Last edited:

