Pro Taper Evo ADV High Bar Install (with original question)

SkunkWorks

Well-Known Member
Joined
Sep 13, 2018
Messages
1,771
Location
Colorado
For those that switched to this Handlebar:
Does everything fit in the Control area if I keep all the factory stuff, including factory Hand-guards?
Or should I be looking at a set of BarkBusters?
Tapping the ends for the OEM Bar-Ends is not an issue (I already have the correct size Tap.

If the BarkBusters are required, do they work with the OEM Bar-Ends?
 

Jeff Milleman

Active Member
Joined
Nov 21, 2015
Messages
326
Location
Ft Lauderdale ,Florida/ N Georgia
I put those Protaper bars on and love, m .Everything fits fine but I did put extended hoses on and I did put the little hole in so the controls wouldn't slip ,some people grind it off . Ive read on here where you may re run the hoses and it works but I being a Virago and Auto tech like some breathing room.....
 

SkunkWorks

Well-Known Member
Joined
Sep 13, 2018
Messages
1,771
Location
Colorado
Thank you!
I'm planning on drilling the little holes for the switchgear, and I also like a little wiggle-room with the hoses so I'm looking at extending them or getting custom hoses made.
 

steve68steve

Active Member
Joined
Oct 23, 2014
Messages
441
Location
Seacoast, NH
I have those bars and everything fits.... barely. You'll need every last little bit, including the bar end weights.

I also have the extended lines. I'm not sure the bars would work without them.
 

sdbcable

New Member
Joined
Jul 27, 2018
Messages
7
Location
Michigan
I installed the Pro Taper EVO high bars and extended lines last night on my 2013. These bars fixed my neck and back issues and fit me perfect (6.5"). The black is much better looking than the stock silver.

The install:
I tried the bars without the extended lines moving the stock ones around and bended the guides and they were still way too tight. I installed the Jaxon lines. Jaxon (aka. ~TABASCO~) got them to me in a couple of days. I still have some work to clean up the routing and secure the hard line junctions. - All good.

I filed off the position buttons on the controls, tightened them up and they don't move. I wanted the freedom to change the angles.
On my 2013 the right control electrical supply wires were tight at lock, the routing was incorrect. Even after I corrected the routing, I felt they were still too tight. I moved the control inboard ~15mm from the throttle to correct, I still can comfortably reach the kill switch with my thumb. Happy I removed the button and didn't drill. Dry fit everything and test if you're going to drill. As Steve said, "I needed every last bit, including the bar end weights." - All good.

Since I had the bars apart, I decided to add Oxford heated grips. Nice add and clean install, very happy. Michigan spring huh, snowed yesterday. - All good.

Notes for 2013 owners - I did have issues with my handguards, weights, and Kakao cruise control. They were secured at bar end with M8 bolts so threading the end of the new bar was not an option unlesss I wanted to buy all new. I ended up buying Tusk D-Flex Bar-End Clamp Handlebar Inserts and uxcell M8x150mm Thread 304 Stainless Steel Hex Socket Head Cap Screw Bolt DIN912 to make it all work. A shorter M8 (<150mm) would have worked, I was getting impatient trying to find long enough bolts to fit and went overboard. In the end (ptp) everything is secure - All good.

Brake reservoir question??? - On a stock 2013 with everything in proper position, is the brake reservoir perfectly horizontal / level? Mine is not and can't remeber if it was on the stock bars.
 

Gigitt

Active Member
Joined
May 15, 2015
Messages
427
Location
Sydney Australia
Brake reservoir question??? - On a stock 2013 with everything in proper position, is the brake reservoir perfectly horizontal / level? Mine is not and can't remeber if it was on the stock bars.
I have my clutch and brake levers pointing lower than horizontal for when I stand up my wrists are not in awkward angles when squeesing.
This means the reservoirs are not horizontal/level ... been fine for 2 years.
 

SkunkWorks

Well-Known Member
Joined
Sep 13, 2018
Messages
1,771
Location
Colorado
Well,
It arrived yesterday!
Now I can get to work figuring out what else I need................

IMG_4074.JPG
 

steve68steve

Active Member
Joined
Oct 23, 2014
Messages
441
Location
Seacoast, NH
You're going to need an M16 x 1.5 tap if you want to use the stock bar-end weights. No drilling required - you can just turn the tap right into the open ends of the bar with a wrench or socket. IIRC correctly, I lubed with WD40. It's pretty soft/ easy cutting, and the tap is beefy enough that breaking it isn't likely. I got mine from Fastenal.

As others have confirmed, I think you should plan on getting the longer brake and clutch lines from Jaxon (Tabasco on here). I did.
 

SkunkWorks

Well-Known Member
Joined
Sep 13, 2018
Messages
1,771
Location
Colorado
Got the Box Open.
IMG_4078.JPG

I already had the correct size Tap!
IMG_4080.JPG

I double-checked that it was the correct size, just to be sure......................(measure twice)
IMG_4081.JPG

I clamped the bar in a Vice and lubed the Tap with some 3-in-1 oil.
It cut fairly easily.
IMG_4082.JPG

Got both sides done...........Sprayed some cleaner down the Tube, both ways to get the chips out, then blew it out with compressed-air.
IMG_4085.JPG

This is as far as I got today................Have a Date with my Wife to get ready for.........We're going to "Art-Brew" Downtown.
 

SkunkWorks

Well-Known Member
Joined
Sep 13, 2018
Messages
1,771
Location
Colorado
Took the Brake and Clutch hoses off the bike.
I took them over to "Hose Works" here in Denver (It's inside Whisler Bearing on the north side of I-70) this morning.
The guy (Rick) made them for me while I waited. Took a little less than an hour, and he was very particular about the details. He did a really nice job with them.
I had them made 3-inches longer than stock.
They use DOT approved SS-braided line and fittings, and he pressure-tests them to 3000psi when finished.

I thought about just ordering the lines from Jaxon, but I wanted to do away with the two junctions in the middle of the Clutch line.
I had them make a one-piece line for the entire length.
Plus he had a fitting with a Tab on it for the Brake hose, so I can just bolt it back to the frame.

Both lines, with Tax and (6) new copper-washers came to just under $120.

T25.jpg
 

SkunkWorks

Well-Known Member
Joined
Sep 13, 2018
Messages
1,771
Location
Colorado
Process of removing the OEM Bar was fairly easy.
To get the left Heated-Grip off, I ran the bike with the grips on "High" for about 10 minutes. It twisted off without a terrible amount of effort.

T26.jpg

T28.jpg

T27.jpg
 

sdbcable

New Member
Joined
Jul 27, 2018
Messages
7
Location
Michigan
Awesome. Try and take some picks of lines where junction would have / used to be. I may want to find someone local to me for a custom job.
 

SkunkWorks

Well-Known Member
Joined
Sep 13, 2018
Messages
1,771
Location
Colorado
Awesome. Try and take some picks of lines where junction would have / used to be. I may want to find someone local to me for a custom job.
Do you want better pics of the old lines? Where the junctions are?
You can remove just the upper hoses from both the clutch and the brake. The junctions to remove them are on either side of the frame right at the steering-neck.

I removed the whole clutch line (all three sections together) because I wanted to get rid of the middle "Steel" section, and the two associated junctions.

I will probably be re-assembling it tomorrow.
Let me know what exactly you need pictures of, and I'll try to help you out.
 

SkunkWorks

Well-Known Member
Joined
Sep 13, 2018
Messages
1,771
Location
Colorado
Installed the new Hoses.
Due to the fact that Rick at "Hose Works" took absolute care to clock the new fittings in exactly the same position as the old ones, they were a breeze to install!

Here is the original upper "Junction" for the Clutch Hose. It uses a metal "P" Clip to bolt it to the frame at the steering-neck.
There is also a wire-harness clip that you have to separate to remove it from the electrical harness.
IMG_4117.JPG

This is where it bolts to the frame.
IMG_4115.JPG

Here is the upper "Junction" for the Brake Hose that runs down from the Master-Cylinder.
It bolts to a metal clip, which bolts to the frame on the opposite side of the steering-neck from the clutch hose.
IMG_4133.JPG

Here is where it bolts to the clip on the frame.
(I put a red vinyl cap over the steel brake line after I disconnected it)
IMG_4116.JPG

Here's a better picture from underneath.
IMG_4125.JPG

Someone else's notes (that I searched for on this Forum, but can't find now)) were invaluable in helping to get the old brake-hose off.

There is plenty of space on the brake side to get wrenches in there from both the top and the bottom.
First un-bolt the brake hose from the clip, and move it away from the frame to give you a little more room to work with it.
Put a 17mm wrench on the hose-block to hold it while you undo the steel line from it.
You will definitely need a 10mm flare-nut wrench to undo the steel line. DO NOT try with just a 10mm open-end wrench. You will just round it off. (I had to go buy a set of metric flare-nut wrenches, as I only had some SAE ones in my tool-box)
IMG_4108.JPG

After test-fitting the new Clutch-Hose, and marking where to position the "P"-Clip, I removed it from the original Clutch-Hose.
I used a piece of split fuel-hose to take up the space, and a couple of zip-ties to hold the rubber-spacer in position.
Installed the "P"-Clip on to the new hose.
IMG_4118.JPG

IMG_4119.JPG

I then bolted it to the Frame in the original position.
IMG_4120.JPG
 

SkunkWorks

Well-Known Member
Joined
Sep 13, 2018
Messages
1,771
Location
Colorado
Connected the lower end of the Hose to the Clutch Slave-Cylinder first, using new copper-washers.

IMG_4121.JPG

The Stainless-Steel Braided Hose even clipped into the OEM frame-clip in the same location as the middle steel section of the OEM line did, where it runs up the frame next to the Engine.
IMG_4122.JPG

Then bolted the upper end to the Clutch Master-cylinder using new copper-washers.
IMG_4123.JPG

When Rick made the new Brake Hose, he looked for an exact match for the OEM Hose-Block (with the hole in it for the bolt), but this part was discontinued and he no-longer had any.
He did have one with a Tab on it. There is plenty of room at the frame-clip, so I had him make it with that end.

It fit perfectly! Here it is bolted back in the original position.
IMG_4126.JPG

IMG_4132.JPG

Lastly I bolted the upper end of the new hose to the Brake Master-cylinder using new copper-washers.
IMG_4131.JPG

The new Hoses fit perfectly......................The extra 3-inches longer is more than enough.

Now to flush/bleed with fresh fluid!
 

SkunkWorks

Well-Known Member
Joined
Sep 13, 2018
Messages
1,771
Location
Colorado
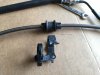
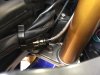
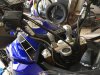
Started with the Clutch side.
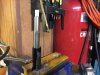
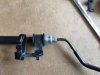
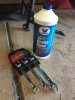
Hooked up my Mity-Vac to vacuum-bleed the system.

IMG_4134.JPG

I could not draw any fluid down from the Master-cylinder.
Tried different combinations of squeeze-the-lever and Release-the-lever....................still no fluid would leave the reservoir.
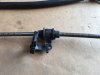
I then hooked up my vacuum-pump to generate a steady vacuum, while I tried more combinations of squeeze/release............Still nothing!
The next thing I tried worked!
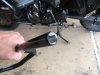
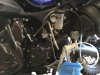
I removed the clutch-lever from the master-cylinder. This allowed the plunger to release further from inside the bore.
I cycled the plunger into the bore with my thumb a couple times, and as soon as I did that the fluid in the reservoir started to disappear down the line.
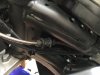
I quickly topped it up with fresh fluid and continued to add as the vacuum-pump continued to draw it out the bleeder-screw at the slave.

Once it was flowing clear fluid at the bottom I stopped the vacuum process, reinstalled the clutch-lever, and bled it manually a few times using the pump-and-hold then crack the bleeder method.

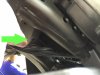
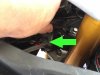
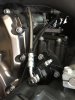
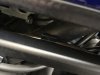
I moved on to the Brake side.
I hooked up my vacuum-pump straight away, and just fed fresh fluid through the system, starting with the right front caliper, then the left, and then the rear caliper.
IMG_4135.JPG

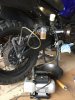
After I got clear fluid out of everywhere, I went to the normal pump-bleed method for all three calipers.

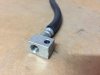
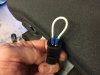
Next I made my jumper-wire for the ABS test-connector "Blue" and "Black" wires, and ran through that procedure 4 or 5 times.
IMG_4138.JPG
IMG_4139.JPG

I'm letting it sit overnight, then I'm going to bleed again tomorrow, followed by another ABS-cycle and then a final bleed.


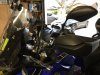
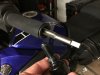
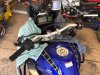
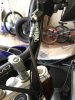
I'm happy with the height of the Bars now.
It seems a more natural reach to the controls, and when I stand-up on the bike I don't have to bend forward to reach them!
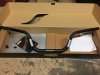
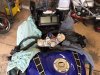
Everything (Just barely) fits onto the control-area of these Bars.
I ended up drilling holes to lock-in the switchgear like they were from the factory.
Now I can't wait to ride!
IMG_4136.JPG

IMG_4137.JPG
 

SkunkWorks

Well-Known Member
Joined
Sep 13, 2018
Messages
1,771
Location
Colorado
Took a 90-mile test ride today.

The Bars definitely feel more natural to ride with (I'm tall. 6'2")
I would say the Clutch and Brake fluid was overdue for a flush/bleed!

The clutch lever feels about the same to me, but the shifting seems quite a bit smoother. Both up and down shifts.
The front brake lever feels a lot firmer than it did before, with nowhere near the lever travel to engage the brakes as it had before.
The rear brake lever feels about the same to me. Rear brake works good. It will lock up the rear wheel on dirt if I push it far enough.

Very satisfied with the High-Bar addition, and also with the longer hoses and fresh fluid.
 
Top