What the inside of a bad ABS unit looks like

MikeinNZ

Active Member
Joined
Sep 27, 2018
Messages
122
Location
NZ
Hi all.

Well I finally plucked up enough courage to tackle the ABS unit.
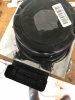
I ground back the peens that hold the motor on and removed it.
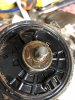
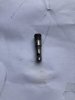
The motor has an eccentric shaft that makes a needle roller bearing actuate on two pistons. Obviously front and rear side of the ABS unit.
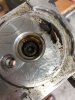
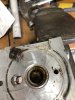
The bad news is the cavity was so full of dirt,oil and water that it has caused corrosion on the outer surface of the roller bearing and the exposed surface of the pistons.
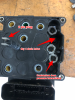
I can see a hydraulic type seal in the block that can only be accessed by removing the pumps from the aluminium block which are swaged in.
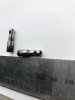
The inner (not damaged) part of the pistons measure 5.53mm, the damaged ends measure as low as 5.44mm
The hard chrome has been worn away by the gritty paste in the cavity and I am sure this is where the pump blocks are introducing air into the independent systems. The rear seems to be most affected as the when using unified braking the front system has pressure on the pump and the ECU is asking for rear pressure from the rear side pump. The first part of supplying pressure is to suck in oil and with a worn piston and possibly damaged seals it sucks in air.
I am considering getting the pistons ground back, re hard chromed and reground to the original dimensions. I’ll have to hope for the best with the seals as these are made from unobtainium and inaccessible.
Hopefully I can source a new roller bearing although that looks special also.
I can’t emphasise enough how important it is to keep the plastic “bucket” the unit sits in clear of water and grit. Drill the drain holes bigger and avoid deep water crossings at all costs would be my suggestion.
The old Super Ten has an Achilles heel and it is the housing!
I will update this with how the repair goes.... At $2500 NZD I think it’s worth a shot.
93B4A335-821A-4598-8446-A592363D1DAD.jpeg474F4C8E-27A8-4132-B5A1-3E0FE195F588.jpeg0493106A-1ED8-42B7-9C16-D76D9D4A2908.jpeg3CBB6453-4474-4D17-89B2-489E68B4FC82.jpeg
 
Last edited:

MikeinNZ

Active Member
Joined
Sep 27, 2018
Messages
122
Location
NZ
A donor bike could provide the part at a substantial savings. Then your problem will be plug and play. :)
No donors available here unfortunately and depending on how the bike was treated could be just as bad.
 

BWC

Active Member
2011 Site Supporter
2012 Site Supporter
2013 Site Supporter
2014 Site Supporter
Joined
Jul 31, 2011
Messages
490
Location
Canada
Your certainly headed into new territory on this one.
Just to clarify, does the drive side of the pump motor shaft and bearing run in its own oil supply or in the brake fluid? Im wondering whether cycling the pump on a regular basis is of any help in keeping all the internal parts from potential corrosion starting. And any sign of where or how the water and dirt gets in? It looks like it has a pretty effective seal between the motor and pump body.
Good pics. and info, thanks for posting them up.
 

MikeinNZ

Active Member
Joined
Sep 27, 2018
Messages
122
Location
NZ
Your certainly headed into new territory on this one.
Just to clarify, does the drive side of the pump motor shaft and bearing run in its own oil supply or in the brake fluid? Im wondering whether cycling the pump on a regular basis is of any help in keeping all the internal parts from potential corrosion starting. And any sign of where or how the water and dirt gets in? It looks like it has a pretty effective seal between the motor and pump body.
Good pics. and info, thanks for posting them up.
The bad news is the bearing doesn’t have an oil supply to the outer race (the bit that operates the pistons). The inner part of bearing is a needle bearing that is packed with grease and has a lip seal.
The piston and motor cavity is vented via drillings to the ECU (plastic) side of the unit and shouldn’t have any fluid in there. Mine did as the piston seals were leaking. The plastic ECU side has 4 little square drains facing down. I guess when the “bucket” fills up with dust dirt and worse water it backs up and somehow finds its way to the pump cavity.
I don’t know how my bike was treated but it can’t be good if dirt got all the way in there!
The only way to clean out the “bucket” properly is to remove the ABS unit. Either that or a vacuum with a smaller hose that can get down the sides.
I can get the unit out in about 15 mins but I’ve done it twice now....here’s how if anyone’s interested.

Suck out the oil from both systems ( otherwise you’ll wind up with a “bucket” full of oil and dirt.
Remove tank mount, seat latch/cable/key barrel and plastic cover as one unit. You will need a T27 tip with a hole in the middle for the key barrel.
Remove the 4 rigid brake lines and blank the ports with foam ear plugs x8
Remove the 4 housing frame mount bolts
Lever up the front of the ABS tray and wedge a screwdriver handle between the lower frame and the tray so you can access the 2 lower and 1lh side Allen head screws
The big ECU plug will be full of grit so won’t work as advertised. The manual isn’t very clear but you have to deform the plug just below the lever to release the catch. I started with a little bit of movement on the lever and just kept working it up and down until all the dirt and grit fell out.
lift it out.

I have drilled the drain holes out to 3/8” and fitted clear tubes so I can hopefully keep the dust out and see if they get blocked.
I would vacuum the 4 little drains in the ECU one at a time and make sure they are not blocked.

I think operating the ABS at least every 6 months would be a good practice.
I will continue to try my best to not use unified braking as this cycles the pump every time.
From what I have seen the unit is built well enough to last years using it for just ABS but not well enough for UBS 20 times a day but that’s just my opinion.
 
Last edited:

Don in Lodi

Well-Known Member
Founding Member
2012 Site Supporter
2013 Site Supporter
2014 Site Supporter
Joined
Feb 1, 2011
Messages
5,780
Location
Lodi Kalifornia
Damn, thats some nasty corrosion on those pistons. What do the bores look like?
 

MikeinNZ

Active Member
Joined
Sep 27, 2018
Messages
122
Location
NZ
Damn, thats some nasty corrosion on those pistons. What do the bores look like?
I could only see in the bores with a dentists mirror.
They seem to have a nylon liner with an integrated type seal that looked ok. I gave them a good clean with IPA and cotton buds.
The small end of the pistons push on a small cup that has a ball bearing type check valve. I’m guessing the porting holes in the piston draw fluid in and when the ports close it pushes it through the center port to supply pressure.
The piston is only 5.6mm diameter so I could completely wrong... the internals are well over my head.
 

MikeinNZ

Active Member
Joined
Sep 27, 2018
Messages
122
Location
NZ
So after phoning and emailing pictures all over New Zealand to see if anyone could repair or make new pistons I got impatient and made my own.
It was mainly to test the seals as if they were damaged it was a pointless exercise paying to have pistons made.
I started with a couple of 5.6mm drill shanks which are 0.02mm smaller than the original un-damaged part.
I used a battery drill as a lathe and an angle grinder with a fine disc to make the step. It sounds real dodgy but check out the finished product on the left, original on the right. I have never tried to drill holes in a HSS drill before but it was easier than I expected.
75C297E0-395E-4102-9971-3DA3DFF9F25C.jpeg
I hardened and tempered them and put the unit back together. Re-peened the motor back on to the block.
Those who have read my other post on “losing rear brake after a good bleed”
will know the system held pressure but wouldn’t hold a vacuum.
I blanked both systems and tested them to 20inHg which it held for a good half hour.
At this stage I was feeling slightly confident.
I filled bled cycled and bled x10 and can happily say everything seems ok. No leaks as yet but I haven’t ridden it yet. Raining cats and dogs here and now I’m at work.
Fingers crossed for a better day tomorrow and some testing .....
 
Last edited:

BWC

Active Member
2011 Site Supporter
2012 Site Supporter
2013 Site Supporter
2014 Site Supporter
Joined
Jul 31, 2011
Messages
490
Location
Canada
It looks like it should have one of those data plates on it that says “ do not disassemble, no user serviceable parts inside”
Good on you for seeing what can be done and hoping for a positive outcome on the test ride.
 

MikeinNZ

Active Member
Joined
Sep 27, 2018
Messages
122
Location
NZ
Great post. Thank you.

Question: How do you put it back together if the Peens were grounded off?
As it’s only a temporary motor install I re-peened where the old peens were. The machined block takes the torque load, the peens just hold the motor on. It’s not a very good photo but you can just see the peens.

If I can get new pistons made or the old ones repaired I will probably drill and tap the raised blocks and make up spacers to hold it with small screws. I will ultra-sound the blocks to see if there are any drilling’s that run shallow enough to be a problem.
3D458FCA-FF33-4F4D-8284-14015898C90D.jpeg
 

MikeinNZ

Active Member
Joined
Sep 27, 2018
Messages
122
Location
NZ
Well I test rode it today... and got mushy brakes :(
The ABS worked perfectly and UBS worked well for a while so a bit disappointing.
It could have been trapped air in the unit so I’ll give it one more try tomorrow.

Out of 5 electroplaters throughout NZ only one has replied saying he can’t promise anything but wants me to courier them for so he can have a closer look.
 
Top